
The safest install is the one you plan before you loosen the first bolt
- Turn off power at the breaker and confirm the circuit is dead before touching any wiring.
- Match the disposal to your sink mount, cabinet clearance, and power setup before you buy it.
- Most straightforward DIY installs finish in under 2 hours, but only if the plumbing lines up.
- Keep a bucket, plumber’s putty, wire nuts, a screwdriver set, and a support block within reach.
- Test every joint with about 1 inch of water in the sink before you call the job done.
What to check before you buy the unit
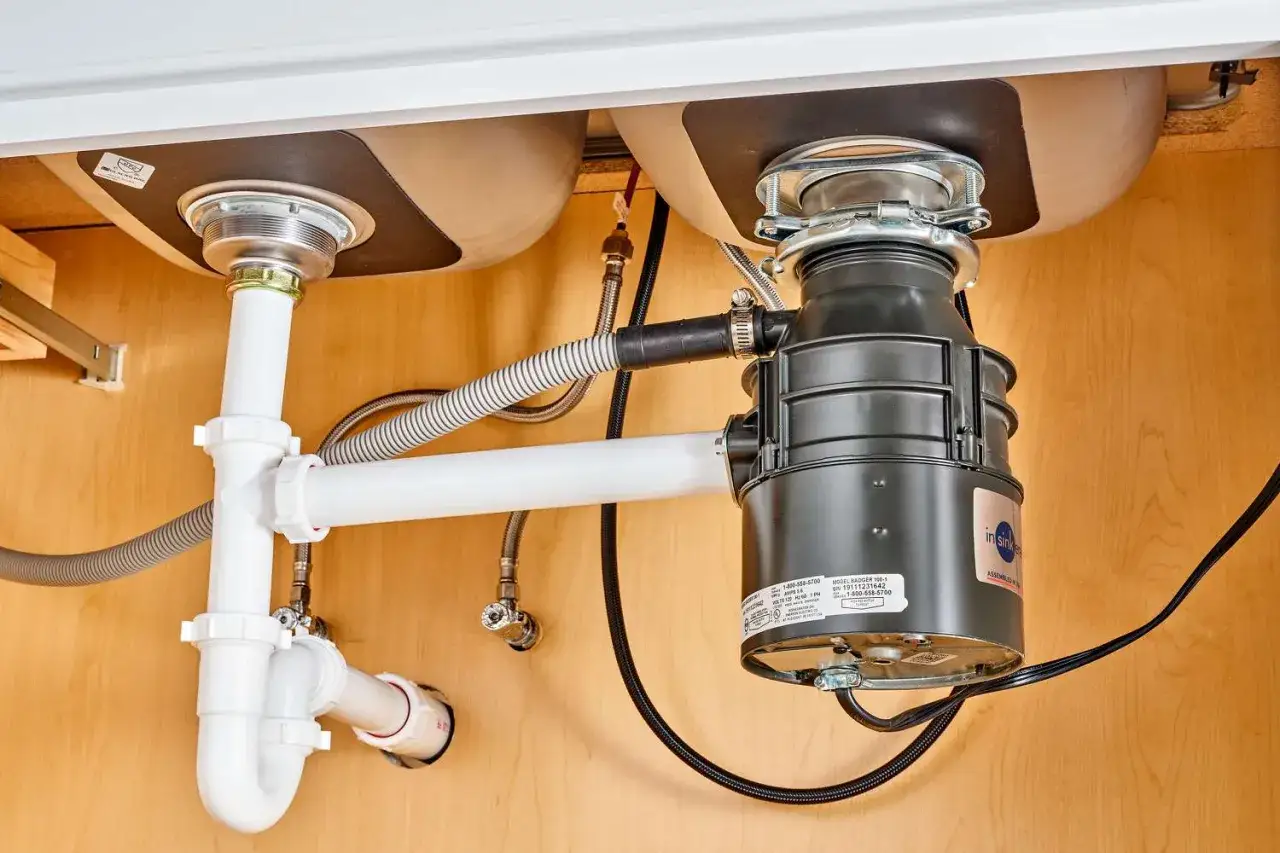
Before I touch a wrench, I make sure the new disposer actually fits the sink and the household it’s going into. Home Depot’s current installation guide notes that common residential units usually fall in the 1/3 to 1/2 HP range, while heavier use can justify 3/4 HP to 1 1/4 HP. That matters because horsepower affects size, noise, and how easily the unit clears food scraps without bogging down.| Check | Why it matters | What I look for |
|---|---|---|
| Mounting style | The disposer has to match the sink flange and hanger system. | Use the same style if you are replacing a unit, or buy the right adapter if the mount changed. |
| Power setup | Some units are corded, others are hardwired. | Confirm whether you have a nearby outlet or a proper junction box under the sink. |
| Cabinet space | Larger motors can hit the cabinet floor or crowd the trap. | Measure height, depth, and clearance before you buy. |
| Household use | Light cooking and heavy cooking call for different capacities. | I lean toward more power for larger families or frequent meal prep. |
| Septic or local code | Some systems and municipalities restrict disposals or require extra plumbing details. | Check septic compatibility and local rules before installation. |
| Dishwasher connection | If the dishwasher drains through the disposer, the setup needs the right inlet and, in some areas, an air gap. | Confirm whether the new model has the dishwasher inlet and whether your code requires an air gap. |
If I’m choosing between feed styles, I usually think in terms of habit. Continuous-feed models are simpler for most families because they run while the switch is on, while batch-feed units add a little extra control because the stopper has to be in place before they start. Neither is automatically better; the right pick depends on how cautious you want the kitchen to feel and how much you value convenience.
Gather the tools and shut the project down safely
Most of the frustration in this job comes from starting with the wrong setup. I want the cabinet empty, the floor protected, and the power shut off at the breaker before anything comes apart. Do not rely on the wall switch alone. A disposal is one of those appliances that feels harmless until your hand is near the wiring or the trap is full of water.
- Screwdriver set
- Adjustable pliers
- Wire nuts
- Plumber’s putty
- Bucket or dish pan
- Flashlight or headlamp
- Hacksaw or tubing cutter if the discharge pipe needs trimming
- Sturdy block, box, or disposal installation tool to hold the unit while you work
I also keep a towel under the trap and a second one nearby. Even when the water is shut off, there is usually some water left in the line, and a clean cabinet is much easier to work in than a wet one. If the disposal is hardwired and you are not comfortable identifying the conductors, I would stop there and bring in an electrician or plumber rather than guess.
Remove the old disposal and clean the drain opening
If this is a replacement, the removal step is where patience matters. I start by putting a bucket under the drain trap, then I disconnect the trap and, if present, the dishwasher drain line. After that, I support the disposal from below before releasing it from the mounting ring, because these units are awkward and heavier than they look.- Switch off the breaker and verify the unit is dead.
- Disconnect the trap and place a bucket under the pipes.
- Detach the dishwasher hose if the old unit is tied into one.
- Remove the electrical cover plate and disconnect the wiring.
- Release the disposer from the mounting ring and lower it carefully.
- Remove the sink flange and old plumber’s putty from the drain opening.
If the flange is stuck, a quarter-turn from below with adjustable pliers usually breaks it free. That detail matters because people often pry too hard from above and chip the sink edge. Once the opening is bare, I clean off every trace of old putty and check the rim for corrosion or cracks. If the sink opening is damaged, the new seal will not hold for long.
Mount the flange and hang the disposal
This is the part where the job starts to feel real. According to InSinkErator’s installation guide, the basic sequence is simple: mount the disposal to the sink, complete the electrical connection, finish the plumbing, and then test for leaks. The exact hardware can vary by brand, but the logic stays the same.
- Roll plumber’s putty into a rope about 3/8 inch thick and press it under the sink flange.
- Drop the flange into the sink drain from above and press it down evenly.
- From below, install the backup ring, gasket, and mounting ring in the order your manual shows.
- Tighten the mounting screws a little at a time, alternating sides so the seal pulls down evenly.
- Lift the disposal into position and align the outlet with the drain pipe.
- Lock the lower ring or latch mechanism until the unit is fully supported by the mount.
I like to keep the disposer propped up while I work because that last connection is easier when the unit is not hanging from one hand and fighting the weight of the motor. If your model uses a lift-and-latch style, follow that sequence instead of forcing a standard mount pattern. The principle is the same: the seal has to be even, and the unit has to sit squarely.
Wire the unit and handle the dishwasher line correctly
The electrical part is where I slow down, because rushing here creates the worst kind of problem: a unit that looks finished but is not actually safe. Some disposals come with a cord, others need a hardwired connection or an adapter. I read the manual first, then I open the electrical cover only after I know exactly what the model expects.
- Confirm the breaker is off before touching any conductors.
- If the unit uses a cord, connect it exactly as the manufacturer shows.
- For most simple wiring setups, white goes to white, black goes to black, and green goes to ground.
- If the disposer will accept dishwasher drainage, remove the knockout plug from the inlet before attaching the hose.
- If your local code requires an air gap, install it before finalizing the dishwasher connection.
The knockout plug is a small piece inside the dishwasher inlet that blocks water from entering the disposer until you punch it out. Leaving it in place is a classic beginner mistake, and it turns into a useless dishwasher hose with nowhere to drain. I also keep in mind that some communities do not allow disposals in every situation, or they require an air gap when the dishwasher ties into the unit. Home Depot’s installation guide calls that out for a reason: code compliance is not the place to improvise.
Finish the plumbing and test for leaks
Once the unit is wired and mounted, I finish the drain line. That usually means trimming the discharge tube to length, attaching it to the disposer outlet, and reconnecting the P-trap so the pipe runs without strain. Not every unit sits at the same height, which is why one model may need a shorter tube than the last one did.
- Trim the discharge tube only if the fit requires it.
- Reconnect the P-trap and tighten the slip nuts snugly, not brutally.
- Fill the sink with about 1 inch of water.
- Check the flange, the trap, and the disposer outlet for drips.
- Run the disposer with cold water flowing and watch every joint.
- Retighten the fittings if a connection weeps.
If I see a leak at the flange, I usually suspect the putty seal or uneven screw tension. If the leak is lower, it is more often a slip-nut connection or a tube that is cut too long and pulling sideways on the trap. I prefer to catch that now, while the cabinet is open, instead of discovering swollen particleboard a week later.
When I would DIY it and when I would call a plumber
There is a point where the job stops being a straightforward weekend project and starts becoming a cluster of small decisions: new wiring, a different mount, a tight cabinet, a dishwasher tie-in, or old plumbing that is already corroded. That is usually when I tell people to step back and choose the path that costs less overall, not just the path that looks cheaper at the store.
| Situation | My take | Why |
|---|---|---|
| Simple replacement, same mount, nearby outlet | Good DIY candidate | The plumbing and wiring are already mapped out. |
| New wiring or a missing junction box | Call a pro | Electrical work under a sink is not worth guessing through. |
| Corroded flange, cracked trap, or stripped fittings | Call a pro | Damaged parts can turn a small job into a leak chase. |
| Septic concerns or local code questions | Call a pro | Those issues are easier to get right before installation than after. |
| No helper and a heavy unit | Maybe call a pro | Holding the disposal in place while fastening it is harder than it looks. |
The small details that keep the install from turning into a callback
The part most people underestimate is not the lifting or the wiring. It is the small finishing habits that make the new disposer feel solid after the cabinet door closes. I run cold water while the unit is working, keep grease out of the drain, and avoid stuffing fibrous scraps or large hard items into the chamber. The goal is not to treat the disposer like a trash can; it is to give it food waste it can actually handle.
- Run cold water while grinding and for a few seconds after you switch it off.
- Use the unit regularly so it does not sit wet and neglected.
- Avoid grease, bones, fibrous peels, and oversized scraps.
- If you notice odor, vibration, or a new hum, check the mount and the underside for a slow leak first.
That last point is the one I care about most. A disposer that smells bad or sounds rough is often telling you something simple and fixable, like a loose mount, a partly blocked drain, or a tiny leak that needs attention now instead of later. If you install it carefully, test it properly, and keep an eye on the first few days of use, the unit should feel boring in the best possible way.