Key things to know before you start
- Most leaks come from the cartridge, O-rings, washer, or diverter, not from the trim plate.
- Temperature shocks usually point to a pressure-balancing or thermostatic problem.
- A basic cartridge repair often takes about 30 to 60 minutes if the part is not seized.
- In the U.S., a cartridge replacement often runs about $100 to $350 with labor, while a full valve job is usually higher.
- Exact part matching matters; cartridges are not interchangeable across brands.
- If you see corrosion, wall damage, or a fused cartridge, a plumber is usually the smarter move.
Start by matching the symptom to the likely fault
I always start with the symptom, because the symptom usually tells you where the failure lives. A drip after shutoff is rarely the same problem as a temperature surge or a stiff handle, and treating them the same wastes time and money. The table below is the fastest way to narrow it down before you pull any parts.
| What you notice | Most likely cause | First thing to check | Typical fix |
|---|---|---|---|
| Water drips from the showerhead after the handle is off | Worn cartridge seals, O-rings, or washer | Identify the valve brand and cartridge type | Replace the cartridge or rebuild the internal seals |
| Handle feels stiff, gritty, or hard to turn | Mineral buildup or damaged internal seals | Inspect the stem and cartridge for scale | Clean, lubricate, or replace the cartridge |
| Water suddenly turns hot or cold | Pressure-balancing or thermostatic failure | See whether the problem happens only in the shower | Replace the balancing cartridge or related parts |
| Water flow is weak only at the shower | Clogged cartridge or blocked showerhead | Check the showerhead first, then the valve | Clean or replace the cartridge |
| Tub diverter will not send water to the showerhead | Worn diverter seal or diverter cartridge | Test whether the tub spout or diverter handle is failing | Replace the diverter parts |
If the problem points to temperature swings or a handle that binds, the next step is identifying the valve type. That matters more than most homeowners expect, because the wrong part number turns a simple repair into a return trip.
What usually fails inside the faucet
Inside the wall, the repair is usually about one of four things: a cartridge, a compression stem, a diverter, or a pressure-balancing assembly. In most modern U.S. showers, the cartridge is the most common failure point, especially when the faucet drips after shutoff or the handle starts feeling rough. Older two-handle and three-handle setups often use washers and seats instead, which means the repair logic is different even if the symptom looks similar.
| Valve type | Where you usually see it | What typically fails | Best repair approach |
|---|---|---|---|
| Cartridge valve | Many single-handle and newer two-handle showers | O-rings, seals, mineral buildup | Clean, lubricate, or replace the cartridge |
| Compression valve | Older two-handle or three-handle showers | Rubber washer, valve seat, stem packing | Replace worn washers and seats, or rebuild the stem |
| Diverter valve | Tub-and-shower combinations | Diverter seal or internal wear | Replace the diverter parts or cartridge |
| Pressure-balancing valve | Most modern anti-scald systems | Balancing piston or diaphragm | Replace the balancing cartridge or assembly |
| Thermostatic valve | Higher-end showers and multi-head systems | Temperature-control element, cartridge wear | Replace the exact matching cartridge or trim-specific part |
One detail that saves a lot of frustration: I never assume a new cartridge from a different brand will fit, even if it looks close. The body, stem length, orientation, and seals can differ enough to cause a leak or a jam. Once you know the part type, the repair becomes much more manageable.
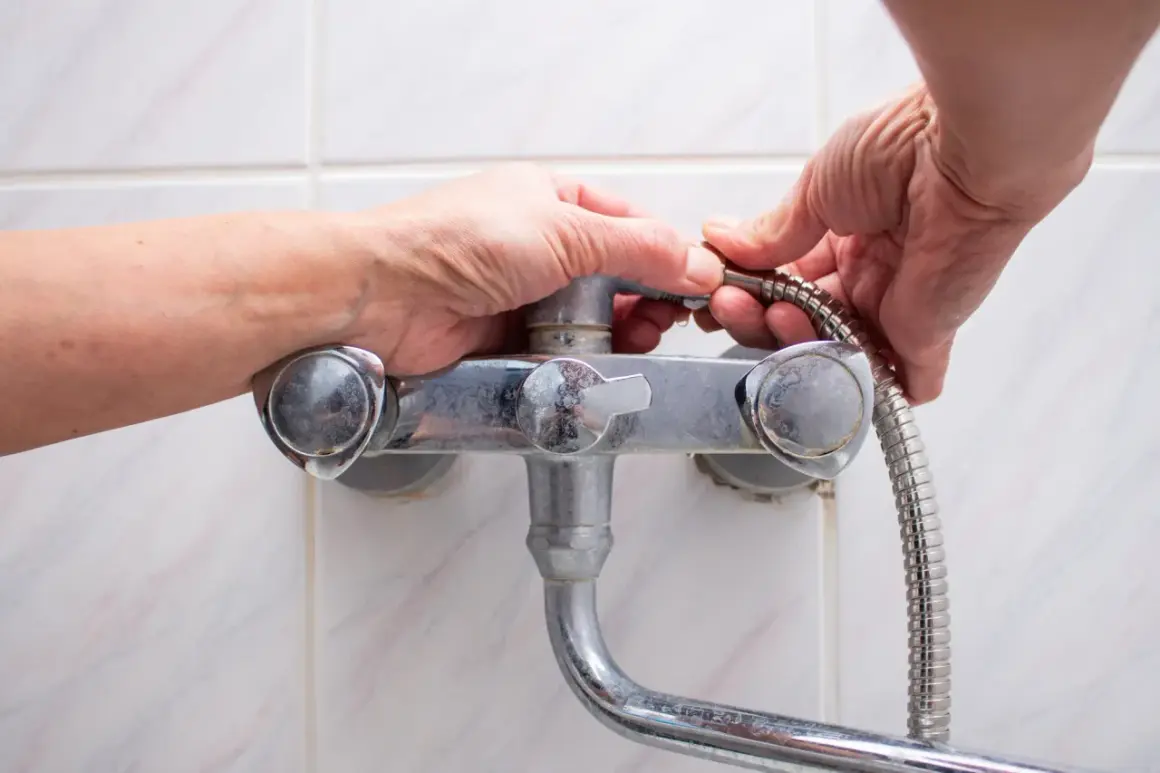
The safest DIY repair path step by step
If the valve body is sound and the right part is still available, this is usually a straightforward home repair. I like to work slowly here, because the mistake that ruins a simple job is forcing a part that should have been identified first. A good cartridge swap is not glamorous, but it is often the cleanest fix.
- Shut off the water to the shower, or turn off the main supply if there is no local stop valve.
- Open the shower and a nearby faucet to relieve pressure and drain the line.
- Remove the handle and trim plate, then take a photo of the valve before pulling anything out.
- Identify the brand and cartridge number if it is stamped on the part, the valve body, or the instructions.
- Pull the retaining clip or bonnet nut with needle-nose pliers or the correct wrench.
- Remove the cartridge straight out; if it sticks, use a cartridge puller instead of prying hard on the stem.
- Inspect the valve body for scoring, corrosion, or broken plastic pieces.
- Lubricate new O-rings lightly with plumber’s grease and install the replacement in the correct hot/cold orientation.
- Reassemble and test slowly, then check for drips, proper shutoff, and stable temperature.
When the cartridge comes out cleanly, the job often lands in the 30- to 60-minute range. If the part is seized, corroded, or buried behind tile with no access panel, the repair time goes up fast, and that is usually the moment to reassess the approach. The next question is whether cleaning is enough or whether replacement is the real answer.
When cleaning is enough and when replacement is smarter
Not every shower problem needs a new valve. If the issue started after plumbing work in the house, or the handle feels rough because of sediment, a deep clean and a little plumber’s grease can sometimes restore normal operation. But once seals flatten, plastic cracks, or the valve body is scarred, cleaning becomes a temporary fix at best.
| Option | Best for | Pros | Limits | Typical U.S. cost |
|---|---|---|---|---|
| Clean and re-grease | Light stiffness, debris, minor buildup | Fast and cheap | Will not fix a failing seal or a dripping shutoff | $0 to $20 in supplies |
| Replace the cartridge | Drips, temperature drift, stiff movement | Most common durable fix | Part must match exactly | About $100 to $350 installed, depending on labor and part |
| Replace the whole valve | Corrosion, cracked body, repeated failures, obsolete parts | Resets the system | Often requires wall access and patching | About $225 to $575 for the valve assembly, often more with wall repair |
Temperature swings and pressure problems need a different diagnosis
When the shower suddenly goes from comfortable to scalding or ice-cold, I stop thinking like a drip repair and start thinking like a safety repair. Modern pressure-balancing valves are built to keep the temperature steady when another fixture in the house changes the water pressure, and a failed balancing part can let the mix drift badly. That is the kind of problem that deserves attention quickly, not a shrug and a longer test shower.
- Hot water appears when cold should be flowing often points to a failed pressure-balancer diaphragm or a cross-connection inside the valve.
- The shower is weak but only at one fixture usually suggests a clogged cartridge, debris in the shower head, or a valve-specific restriction.
- Every fixture in the home has low pressure usually means the issue is upstream, such as a partially closed shutoff, sediment, or a supply problem.
- The temperature changes when a toilet flushes usually means the anti-scald function is not doing its job the way it should.
- The handle is noisy or thumps on startup can point to internal pressure-balancing wear or debris inside the valve.
If the shower is the only fixture acting up, the valve is still the prime suspect. If the problem follows the whole house, the shower repair may be the wrong battle entirely, and the next section is where I would decide whether to stop DIY.
When I would stop DIY and call a plumber
I am comfortable with a lot of shower repairs, but I do not force a job once it starts involving damaged walls, corroded parts, or unknown plumbing behind the trim. At that point, the risk is no longer just a leaking faucet; it is a leak inside the wall, a broken valve body, or a repair that turns into a larger restoration project. A plumber is usually the better call when the repair starts to outgrow the fixture itself.
- The cartridge is frozen in place and a puller still will not move it.
- The valve body is heavily corroded, cracked, or covered in mineral buildup.
- You need to open tile or drywall to reach the plumbing.
- The home has an older three-handle system or soldered copper connections.
- The shower still leaks after the correct cartridge has been installed.
- There is visible water damage, mold, or soft wall material around the shower.
- The temperature swings are severe enough to raise scalding concerns.
That judgment also has a cost angle. Once you add tool purchases, wall patching, and the possibility of buying the wrong part twice, the savings shrink quickly. If the repair is moving from a simple valve swap into wall work, I would rather pay for the right fix than spend a weekend making the job larger. The best next step is usually to keep the repair smaller the next time around.
Keep the next repair smaller than this one
The most useful habit I have picked up with shower repairs is documenting everything before I reassemble the trim. A quick photo of the cartridge orientation, the brand stamp, and the part number can turn a future repair into a simple parts run instead of another troubleshooting session. It also helps if you ever need to match the valve years later, which is a lot harder than it should be once the trim is back on the wall.
- Save the old cartridge box or write the model number inside a cabinet.
- Take one photo of the valve before removal and one after the new part goes in.
- Use plumber’s grease sparingly on O-rings instead of forcing dry seals into place.
- Test the handle every few months so scale does not seize the cartridge again.
- In a hard-water home, plan on earlier replacement rather than waiting for a total failure.
If you follow that approach, the repair is usually straightforward: identify the symptom, match the part, replace the worn internal piece, and stop before the wall opens up. That is the practical answer to shower faucet repair in most U.S. homes, and it is the difference between a manageable Saturday job and a bathroom project you did not mean to start.