
A damp base, a rocking bowl, or a bathroom that suddenly smells wrong usually points to more than a cosmetic issue. This guide to toilet wax ring replacement walks through how I diagnose the leak, what parts actually matter, and the sequence I use to reset a toilet without creating a second problem.
The goal is simple: stop water and sewer gas at the flange, protect the subfloor, and avoid the mistakes that turn a cheap repair into a floor repair. I’ll also cover when a standard wax ring is enough, when an extra-thick seal makes sense, and when I would call a plumber instead of forcing the job.
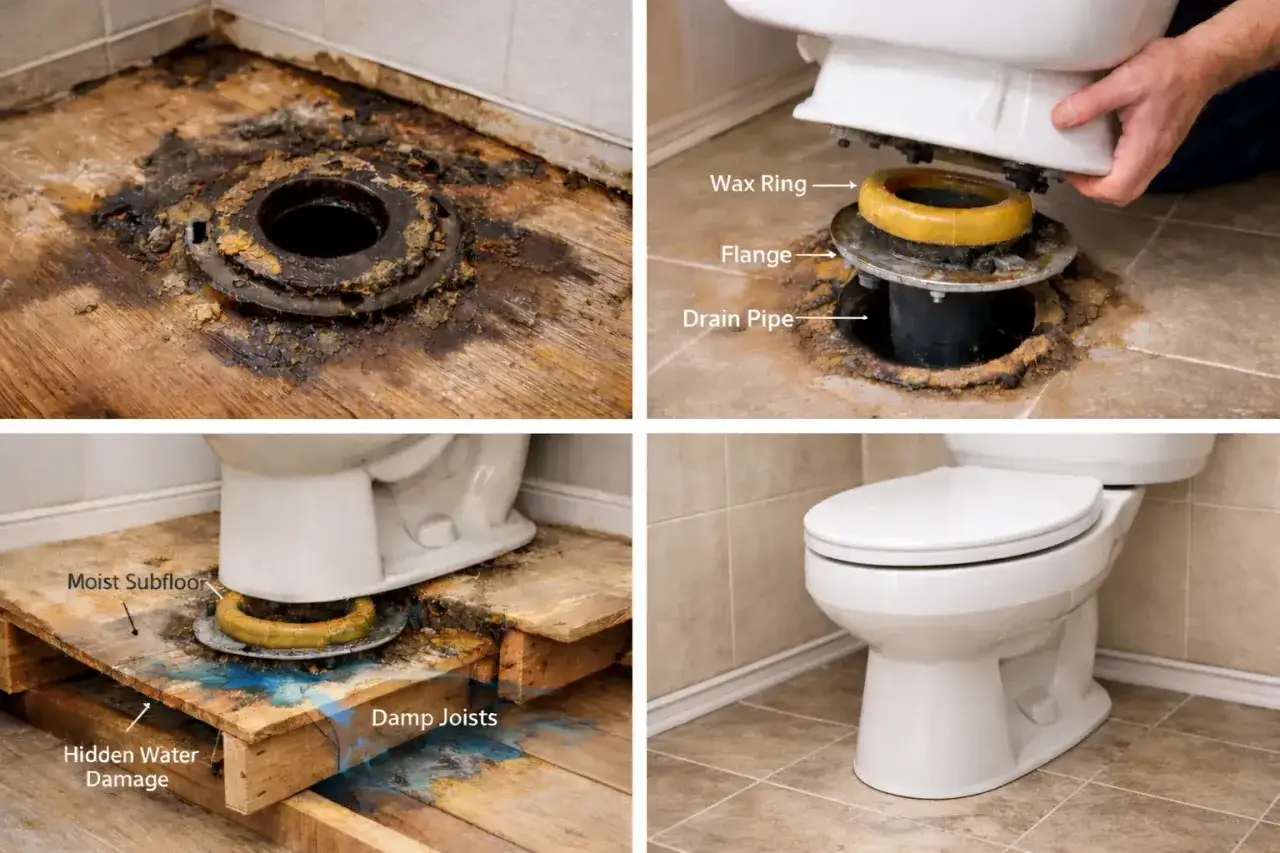
What you need to know before you lift the toilet
- A new seal is used whenever the toilet comes off the flange; I do not reuse the old wax ring.
- Water at the base, sewer odor, and a rocking bowl are the clearest signs the seal has failed.
- If the flange is cracked, loose, or below the finished floor, the repair is bigger than a simple ring swap.
- Most DIY jobs need only basic hand tools, but new closet bolts and shims often save time later.
- The toilet must go back down straight and level; sliding it around after contact is how many leaks start.
How I tell the seal has failed
I start by separating a true base leak from condensation, a supply-line drip, or water that runs down from the tank. A wax seal problem usually shows up after flushing, not while the tank is simply refilling.
| What I notice | What it usually means | What I check next |
|---|---|---|
| Water around the base after a flush | The seal is no longer holding pressure | Dry the floor and watch several flushes |
| Rocking or side-to-side movement | The bowl is no longer stable on the floor | Check the flange, bolts, and shims before the wax fails again |
| Persistent sewer smell | Air is escaping where the seal should block it | Inspect the seal, but also consider a vent issue if no water is present |
| Soft floor or staining near the base | Water has been getting under the toilet for a while | Stop and inspect the subfloor before resetting the bowl |
| Wetness only on the tank or supply line | The leak is probably not the wax seal | Check the fill valve, supply line, and tank bolts first |
If the odor is there but the floor stays dry, I do a little more detective work before pulling the toilet. That small pause can keep you from replacing a seal when the real problem is somewhere else, and that leads naturally to the parts and measurements that matter.
What I check before buying parts
Before I buy a new seal, I look at the flange, the floor, and the toilet outlet size. That small check saves me from installing the wrong ring twice.
- Flange height matters. I want the flange on or just above the finished floor, not buried low under the tile.
- Flange condition matters even more. Cracks, looseness, or rusted bolt slots mean the seal may not be the only repair.
- Outlet size should match the bowl. Most toilets use a 3-inch or 4-inch opening, and many rings are sold in those sizes.
- Bolt condition matters because corroded closet bolts make it hard to reset the bowl evenly.
- Floor level matters because a rocking toilet destroys a good seal over time.
- Supply line length matters because an old, stiff line is cheap to replace while the toilet is already off.
If the flange sits low, I do not try to solve that with hope. I use the right ring, an extender, or a different seal type instead of forcing a standard wax ring to do a job it was never meant to do. Once those checks pass, the actual reset is straightforward if I keep the toilet controlled from the first lift to the last flush.
How I replace the seal without creating a new leak
-
Shut off the water and empty the toilet.
Close the stop valve, flush the tank, and sponge out the remaining water from the bowl and tank. I also disconnect the supply line so the toilet is fully free before I move it.
-
Remove the bowl carefully.
Pop the bolt caps, loosen the nuts, and cut through old caulk if the base was sealed. Then rock the toilet only enough to break the seal and lift it straight up. I keep the bowl as level as possible so I do not smear the wax and lose my alignment.
-
Clean and inspect the flange.
Scrape off the old wax and wipe the flange clean. I plug the drain opening with a rag so nothing drops in, then I inspect the flange, the floor around it, and the closet bolts for damage.
-
Set the new bolts and seal.
If the old bolts are corroded, I replace them now. Then I center the new ring exactly where the package directs and make sure the toilet will lower onto it without sliding. The wax ring is the seal, not the caulk around the base.
-
Lower the toilet straight down.
This is the part that matters most. I line up the bowl over the bolts, lower it in one controlled motion, and avoid any side-to-side movement after the ring touches. A small twist can be enough to smear the wax unevenly.
-
Shim, tighten, and stop when it is snug.
If the floor is not perfectly flat, I slide plastic shims under the bowl before tightening. Then I tighten the nuts alternately, a little at a time, until the bowl is stable. I never crank down hard enough to flex the porcelain.
-
Reconnect and test.
After the supply line is back on, I turn the water on, let the tank fill, and flush several times. Then I dry the base and check again with tissue or paper towels around the perimeter. If I see any moisture, I stop and reset the toilet rather than pretending it will improve on its own.
If the toilet still rocks after the bolts are snug, I stop and fix the support problem instead of tightening harder. That lead-in matters, because the choice of seal is only half the story when the flange height or floor condition is not ideal.
Wax, extra-thick, or wax-free
I usually think in terms of fit, not fashion. The best seal is the one that matches the flange height, the bowl outlet, and the amount of movement the floor allows.
| Option | Best use | Why I choose it | Tradeoff |
|---|---|---|---|
| Standard wax ring | Normal installations with a sound flange at the right height | Cheap, simple, and still the default choice for most toilets | Less forgiving if the flange is low or the bowl is hard to center |
| Extra-thick wax ring | Low flange, minor floor mismatch, or a bowl that needs more compression | Gives me more material to work with when the flange is not ideal | Still depends on a stable toilet and proper alignment |
| Wax-free seal | Jobs where repositioning helps or the installer wants a cleaner reset | Often easier to handle and less messy during installation | Costs more and still does not fix a bad flange or rotten floor |
My rule is simple: if the flange is merely a little low, I reach for an extra-thick seal or an extender. I do not stack two wax rings as a routine shortcut, because that usually creates more risk than it solves. The wrong seal is one of the easiest ways to end up repeating the job, which is why the next section matters so much.
Why the same leak comes back
- Reusing the old ring. Wax deforms permanently. Once it has been compressed, it is not a fresh seal anymore.
- Letting the bowl slide after contact. The seal must compress evenly. Once the toilet shifts, the wax can shear.
- Ignoring a wobbly toilet. If the bowl moves, the seal moves with it. I fix the support, not just the leak.
- Overtightening the nuts. A cracked porcelain base is a much worse repair than a failed seal.
- Missing flange damage. Loose or cracked flanges do not hold the bowl securely, even with a new ring.
- Using caulk as camouflage. Caulk is not a repair for a leaking seal. It only hides the base visually.
- Skipping the leak test. A dry floor after one flush does not prove much. I test several times and check again later.
When I see one of these mistakes, I assume the toilet needs to come back off and be reset correctly. That is usually cheaper than leaving a hidden leak in place, especially once the conversation turns from parts to repair cost.
What the job usually costs in the US and when to call a plumber
In 2026, the parts are still inexpensive, which is why this repair looks simple on paper. The cost jumps when the flange is damaged, the floor is soft, or the toilet has been leaking long enough to affect the room below.
| Scenario | Typical US cost | What pushes it higher |
|---|---|---|
| DIY with standard parts | $5 to $20 | New bolts, shims, supply line, or sealant |
| DIY with wax-free seal | $10 to $20 | Extra fittings or flange-height correction |
| Professional seal replacement | $50 to $200 | Minimum service charge, time, and cleanup |
| Flange replacement | About $145 to $165, sometimes more | Corrosion, broken hardware, or hard-to-access drains |
| Subfloor or finish-floor repair | Variable, often hundreds or more | Rot, mold, ceiling staining, or structural damage |
I call a plumber when the flange is broken, the floor feels soft, the toilet sits on a bad slope, or I find evidence of long-term leakage below the bathroom. At that point, the seal is only one piece of the repair. The last thing I want is to spend less on the ring and more on the damage it leaves behind.
The small details that keep the seal dry
After the toilet is back in place, I treat the first day as the real test. A repair is only finished when the bowl stays stable, the base stays dry, and the room does not pick up a sewer smell after a few flushes.
- Set shims before fully tightening the bowl, then trim them flush once the toilet is stable.
- Tighten the nuts evenly and stop as soon as the bowl is secure.
- Check again after several flushes and one more time later that day.
- Replace the supply line if it is old or stiff, because that is cheap insurance while the toilet is already out.
- If you caulk the base, leave enough access to spot future moisture instead of sealing every edge shut.
When the floor stays dry, the bowl no longer rocks, and the odor is gone, the repair is finished. If any of those signs come back, I reopen the job immediately, because a seal that is almost right is the one that does the most damage later.