The version of this job that lasts is the one you dry-fit, seal correctly, and test twice
- Match the sink style to the cabinet and countertop first. Drop-in sinks are easiest; undermount and farmhouse styles demand more support and prep.
- Replace brittle parts while the sink is out. Supply lines, washers, and old trap pieces are cheap compared with a leak under the cabinet.
- Dry-fit the drain before using glue or sealant. Most kitchen setups use 1 1/2-inch under-sink parts, but verify the exact size of your fixture.
- Use the sealant the manufacturer specifies. Putty and silicone are not interchangeable in every situation, especially with stone and plastic surfaces.
- Test every joint with water and a dry paper towel. A slow drip is easier to fix before the cabinet floor swells.
Choose the sink style that fits the cabinet, countertop, and drain
I start by deciding whether the sink itself makes sense in the space. A basic replacement is usually easiest when the new sink matches the old cutout and the drain stays where it is. Once the project turns into a different sink style, the plumbing is only part of the work.
| Sink type | Best for | Installation difficulty | What usually makes it harder | Typical installed price range |
|---|---|---|---|---|
| Drop-in / self-rimming | Fast retrofits and laminate counters | Easy | Sealing the rim evenly | $260 to $1,250 |
| Undermount | Stone, quartz, and a cleaner look | Intermediate | Support brackets and silicone curing | $350 to $1,500 |
| Farmhouse / apron | Remodels and deep basins | Advanced | Cabinet and front cutout changes | $500 to $5,000 |
| Workstation | Prep-heavy kitchens | Intermediate to advanced | Accessory fit-up and extra weight | $400 to $1,400 |
A drop-in sink is the forgiving choice because the flange sits on the counter and the rim hides minor imperfections. An undermount looks cleaner and makes wiping crumbs straight into the bowl easier, but the countertop has to support it properly. Farmhouse sinks are the least forgiving because the cabinet opening and front apron often need to be modified. Once you know which style belongs in the opening, the next step is buying the right parts for the plumbing under it.
Gather the right parts and tools before you shut off the water
I like to have everything on the floor before I disconnect anything. That keeps the project moving and prevents the common mistake of opening the drain, finding a missing washer, and then running to the store with a cabinet full of water and tools.
Tools I keep within reach:
- Adjustable wrench and channel-lock pliers
- Basin wrench for faucet nuts in tight spaces
- Tape measure, marker, and utility knife
- Bucket, sponge, rags, and a flashlight
- Caulk gun and putty knife
Parts I check before installation:
- Sink, faucet, and any soap dispenser or side sprayer
- Basket strainer or sink drain assembly
- Supply lines for hot and cold water
- P-trap, trap arm, tailpiece, washers, and slip nuts
- Plumber’s putty or silicone, depending on the fixture instructions and sink material
- Optional disposal flange, dishwasher branch fittings, or an air admittance valve where local code allows it
In many U.S. kitchens, the under-sink drain assembly is built around 1 1/2-inch parts, but I never assume that without checking the sink outlet and the existing trap assembly. A matched set is better than a pile of random fittings, especially when the cabinet space is tight. With the parts laid out, the actual install becomes much cleaner.
Set the sink and faucet before you reconnect the plumbing
The cleanest installs start on a workbench or a pair of sawhorses, not under the cabinet. I attach as much as possible to the sink before it goes into the opening because it is easier to tighten and inspect parts when I can actually see them.
- Shut off the hot and cold stop valves under the sink and open the faucet to release pressure.
- Disconnect the supply lines and drain parts, then lift the old sink out. If the seal is stuck, cut the caulk or putty fully before forcing anything.
- Clean the countertop edge and cabinet top so the new seal sits on a dry, clean surface.
- Install the faucet, drain basket, and disposal flange on the sink before it is set in place. I prefer to replace old supply lines at the same time unless they are clearly in excellent shape.
- Set a drop-in sink with the correct sealant under the rim, then tighten the mounting clips evenly. Do not crank one side down hard while the other side is still loose.
- For an undermount sink, use the supplied clips or brackets and follow the manufacturer’s cure time. Silicone needs time to bond; rushing this step is how a sink starts moving later.
- Reconnect the faucet supplies and turn the water back on slowly to check the shutoff valves, not just the sink itself.
One detail I never skip: I check the sink material before choosing a sealant. Plumber’s putty is common for some metal drain baskets, but some plastics and stone surfaces need silicone instead. The manufacturer instructions win here, not habit. Once the bowl is seated and the faucet is secure, the drain is the part that decides whether the job stays dry.
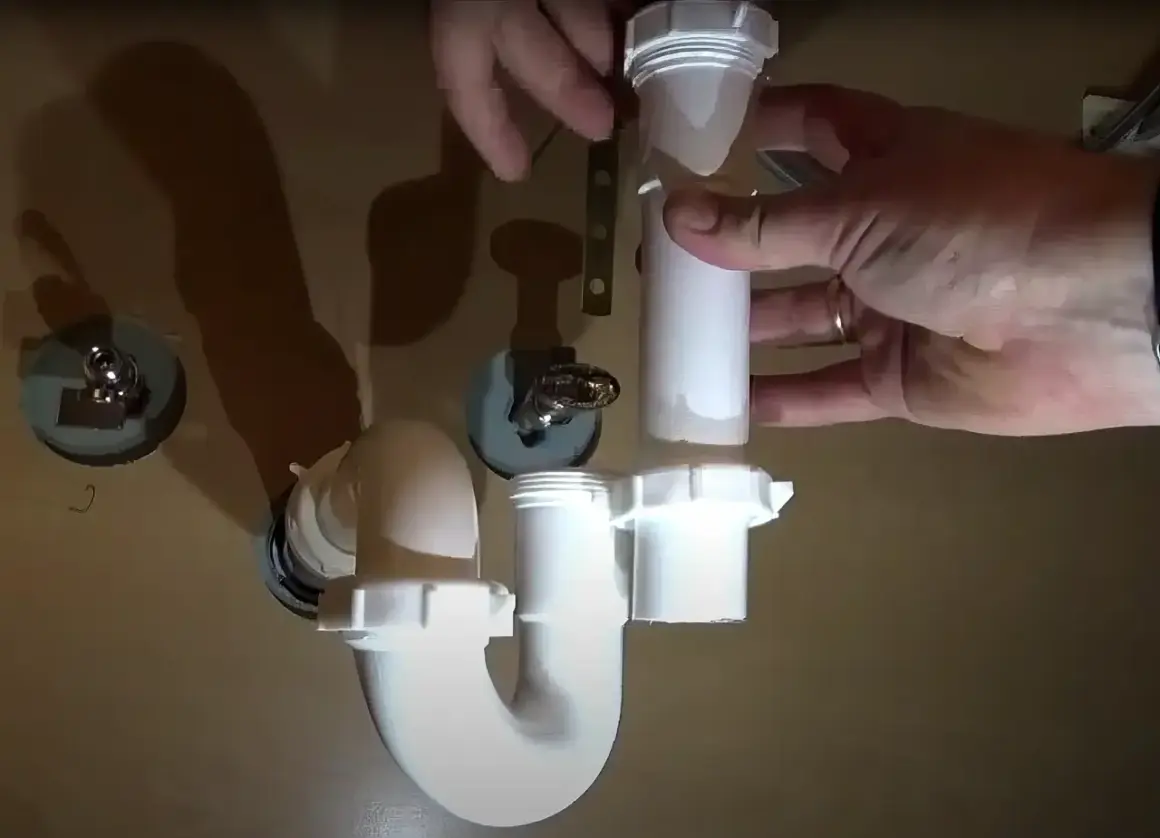
Build the drain correctly the first time
The drain assembly looks simple until a small alignment mistake creates a leak, a gurgle, or a trap that does not hold water correctly. The parts matter: the tailpiece is the vertical pipe from the sink drain, the P-trap is the curved section that holds water to block sewer gas, and the trap arm runs from the trap to the wall connection.
| Problem | What it usually means | What I do |
|---|---|---|
| Water drips from a slip joint | Washer is crooked, missing, or overtightened | Disassemble it, seat the washer properly, and tighten only until snug |
| Sink drains slowly and gurgles | Bad slope or a venting issue | Check the trap arm slope and look for an allowed vent solution |
| Smell comes back from the drain | Trap is not holding water or is installed incorrectly | Reset the trap so it holds a proper water seal |
| Parts do not line up | Wrong fittings or bad measurements | Dry-fit first and swap to the correct adapters before gluing anything |
My rule is simple: dry-fit everything before I commit to glue, tape, or a final tightening. That matters even more if the sink has a disposal, because the added weight and extra outlet increase the number of places a mistake can show up. Where local code allows it, an air admittance valve can help on an island sink or in a cabinet where a proper vent is hard to run; the valve has to sit high enough above the trap and remain accessible for service. If the drain layout keeps fighting you, the issue may not be the sink at all but the venting behind the wall.
Know when to stay DIY and when to bring in a plumber
In 2026, a straightforward U.S. kitchen sink replacement usually lands in the low hundreds for a simple swap, while a more involved job can climb quickly. For an installed kitchen sink, broad current ranges look like this: $380 to $1,400 for a sink replacement, $600 to $2,000 when the faucet is included, and $800 to $3,400 when a garbage disposal enters the picture. If new under-sink plumbing is needed, the total can move into the $450 to $1,800 range or higher.
- DIY makes sense when the new sink matches the old cutout, the valves shut off cleanly, and the drain stays in the same place.
- Hire a plumber when the cabinet has water damage, the drain has to move, or the countertop needs cutting.
- Be cautious with heavy sinks like cast iron, fireclay, or large farmhouse models because support becomes part of the plumbing job.
- Do not guess on venting if the sink gurgles, backs up, or sits on an island with a complicated drain path.
- Replace corroded parts instead of reusing them if the trap, valves, or supply lines are old enough to look tired in your hand.
I usually tell people the real savings come from a like-for-like swap. Once the scope changes, the labor and the risk both rise. A cabinet full of dry parts is the goal; a cabinet full of improvised fittings is how a small project turns into a second visit. If you still want to finish it yourself, the last step is not cosmetic, it is a test.
The checks I would not skip before closing the cabinet
Before I put anything back under the sink, I run a test that is more demanding than a quick glance. The install is not finished until it stays dry under real water load.
- Run cold water, then hot water, for several minutes and watch every joint.
- Fill the bowl and let it drain fast so the trap sees a real surge, not just a trickle.
- Wipe each slip joint, seal, and valve with a dry paper towel to catch slow seepage.
- Turn on the disposal, if there is one, and check the flange, splash guard, and drain connection again.
- Let sealant cure for the full time on the label before you load the cabinet or use harsh cleaning sprays.
- Check the cabinet again the next day, because some leaks show up only after the first thermal change or vibration cycle.
A sink looks finished long before it is actually proven. The installs that hold up are the ones where the fit is right, the sealant matches the material, and the drain stays dry after a real test. If those three things are right, the sink becomes a working part of the kitchen instead of a slow leak waiting for attention.