A shower that swings from hot to cold, drips after it is shut off, or feels rough at the handle usually points to a control issue behind the wall, not a bad showerhead. In this guide, I break down when I would replace shower valve hardware and when a cartridge is enough, what the job typically costs in the U.S., and how to handle the work without creating a hidden leak. The goal is to make the fix once, test it properly, and close the wall with confidence.
The right fix depends on whether the cartridge or the valve body has failed
- A cartridge swap is cheaper and cleaner when the valve body is still sound.
- A full valve replacement makes more sense if the body is corroded, cracked, or the ports are damaged.
- In the U.S., a full installed replacement usually lands around $225 to $575, with access and wall repair pushing the price higher.
- Temperature swings when another fixture runs often point to a worn pressure-balancing mechanism.
- The real challenge is usually access, not the wrench work.
- I always test the valve with the wall open before I patch anything.
The valve body and the cartridge do different jobs
The valve body is the part buried in the wall that receives hot and cold supply water. The cartridge or internal control unit is the moving part that blends that water and responds to the handle. The trim, handle, and escutcheon are only the visible parts, so they can look fine even when the actual control mechanism is worn out.
That distinction matters because not every shower problem calls for a full replacement. If the body is intact and the issue is limited to a leaking or sticky insert, a cartridge swap is the smarter repair. If the casting is corroded, the ports are damaged, or the shower is being upgraded to a different style of control, I treat it as a full valve job. That difference is what keeps a small repair from turning into a second opening of the wall later.
Most modern U.S. showers also rely on pressure-balancing or thermostatic control. A pressure-balancing valve helps reduce hot-and-cold swings when pressure changes elsewhere in the house, while a thermostatic valve is designed to hold a set temperature more precisely. Once you understand which one you have, the rest of the diagnosis becomes much easier. Next, I look for the symptoms that tell me the body itself is the real problem.
Signs the valve body is the real problem
There are a few clues I trust more than the handle itself. One bad symptom does not prove the body has failed, but a cluster of them usually does.
| Symptom | What it often means | What I do next |
|---|---|---|
| Water gets suddenly hot or cold when a toilet flushes | Pressure imbalance or a worn balancing mechanism | Check the valve before blaming the water heater |
| The shower drips long after shutoff | Worn cartridge, seals, or a body that no longer seats correctly | Inspect the trim, then pull the cartridge if the body looks sound |
| The handle binds, wobbles, or feels gritty | Internal wear or mineral buildup | Compare the condition of the cartridge to the valve body |
| Moisture or corrosion appears around the escutcheon | Possible hidden leak at the valve or supply connection | Open the wall enough to inspect the piping and body |
| Hot and cold are reversed | Wrong piping orientation or valve installed incorrectly | Verify the rough-in before replacing trim |
If the problem is only in one shower, I suspect the valve before I suspect the water heater. If the whole house is affected, I widen the search to the supply side, pressure regulator, or heater. That simple split saves time and keeps me from replacing the wrong part.
Choosing the right replacement and what it costs
Cost depends on the valve type, the brand, how much wall access you have, and whether the trim is being updated at the same time. In many U.S. homes, I would budget for the following ranges.
| Option | Best for | Typical U.S. cost | Main tradeoff |
|---|---|---|---|
| Cartridge only | A body that is still in good shape | $20 to $85 for parts, often under $200 installed | Cheapest, but only works if the housing is healthy |
| Full valve body replacement | Corrosion, cracking, age, or a style change | About $225 to $575 installed in many markets | More labor and usually wall access |
| Valve plus trim upgrade | When the finish or handle style is being modernized | Usually higher than a straight replacement | Better result, but more parts have to match |
I also pay attention to compatibility. Many brands use proprietary cartridges, valve bodies, and trim kits, so a part that looks close enough may still be wrong. If the shower has copper, PEX, or CPVC supply lines, the connection method changes too, and that can affect both labor and the tools I need. Once I know the part family and connection style, the actual swap is straightforward.
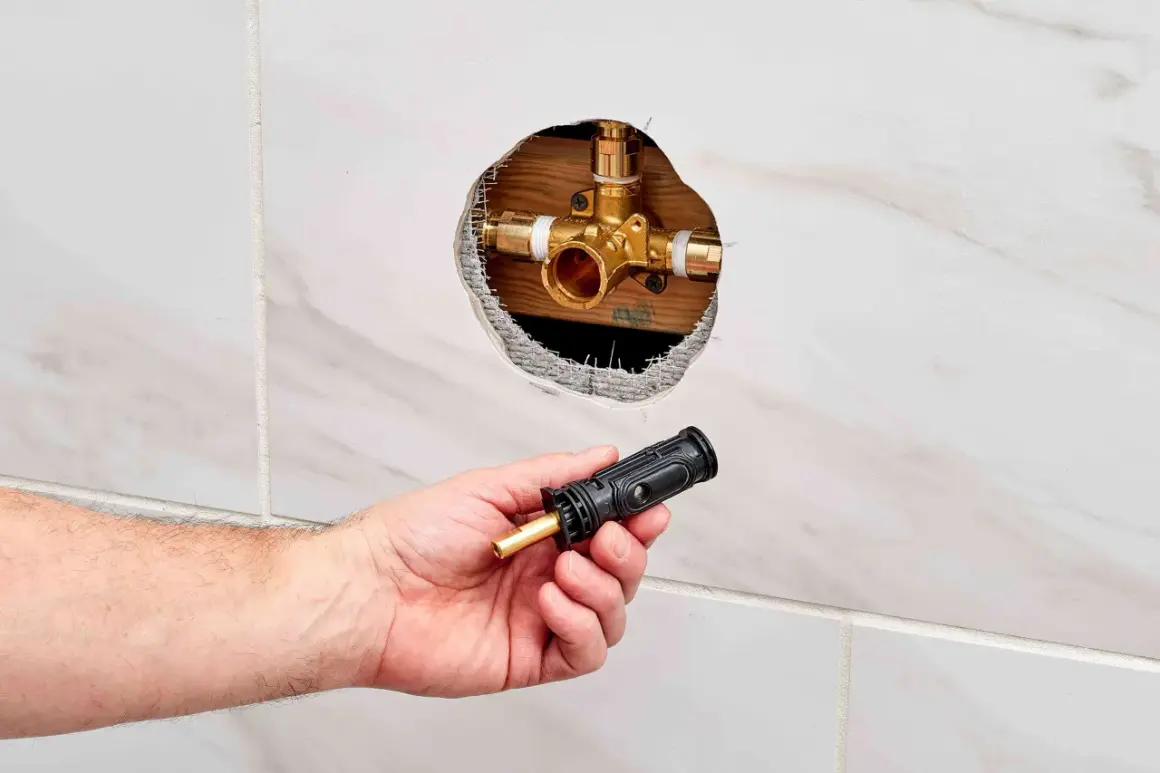
How the swap actually happens behind the wall
This is the part most homeowners picture as a single plumbing task, but in reality it is a sequence of small checks. I treat it as four controlled stages: shut down the water, expose the valve, move the piping, and test before closing the wall. That order matters because once the wall is patched, small mistakes become much more expensive.
1. Shut off the water and make the area safe
I start at the main shutoff or the closest branch shutoff that fully isolates the shower. Then I open the shower and nearby fixtures to relieve pressure and make sure the lines are actually dead. Towels, a drop cloth, and a bucket save time here because the first few minutes usually involve residual water and debris.2. Remove the trim and open enough wall to work
The handle, escutcheon, and any decorative sleeve come off first. After that, I open the wall from the back side if there is an access panel, or from the shower side if there is no usable rear access. I want enough room to see the valve body, support the pipes, and make clean connections without forcing anything.
3. Swap the valve body and set the depth correctly
The old valve comes out with whatever connection method the plumbing uses: soldered copper, crimped PEX, solvent-weld CPVC, or threaded adapters. I keep the new valve aligned to the manufacturer’s marking for depth so the finished trim does not sit too deep or stick out awkwardly. If the valve includes a plaster guard, I use it as a reference for finished-wall depth, because that small detail affects how well the trim seals later.
Read Also: Loose Flush Lever? Fix Your Toilet Handle Fast!
4. Pressure-test before the wall closes
Before I patch anything, I turn the water back on and inspect every joint under real pressure. I check hot and cold orientation, run the shower through its full range, and look for slow seepage around the body, the supply lines, and the tub spout or shower arm. If anything looks questionable, I fix it while the wall is open. That is the cheapest time to catch a leak.
When the valve passes the test, I close the wall, reinstall the trim, and finish with the cosmetic work. If the shower surrounds tile, I plan that patching step in advance because tile repair can easily become the most visible part of the job. From there, the next concern is avoiding the mistakes that create a second round of damage.
Common mistakes that lead to leaks or bad temperature control
I see the same handful of problems over and over, and most of them are preventable.
- Picking the wrong part family - A cartridge or trim kit that is close but not exact can leak or fail to fit.
- Setting the valve at the wrong depth - Too deep and the trim will not seat correctly; too proud and the finish looks wrong.
- Mixing up hot and cold supplies - The shower may still run, but the control will feel wrong and may not balance properly.
- Skipping the pressure test - A tiny seep becomes a hidden wall leak once the patch goes in.
- Leaving debris in the line - Solder flakes, pipe shavings, and mineral grit can damage a new cartridge fast.
- Assuming the trim can fix a bad body - Fresh hardware on a failing valve is just a cosmetic delay.
The mistake I watch most closely is depth. A shower valve can be mechanically fine and still fail the job because the trim does not line up with the finished surface. That is why I keep measuring after the rough-in, not only before it. The next question is whether the project is still worth doing yourself or whether the risk has crossed a line.
When I stop and call a plumber
There are situations where I would not keep pushing through the repair. If the wall has no practical access, if the piping is heavily corroded, or if the shower is tiled in a way that makes patching more complicated than the plumbing itself, I bring in a plumber. The same is true when the job requires soldering in a tight cavity near framing, insulation, or other finished surfaces that can be damaged by heat.
I also call for help when multiple fixtures show pressure issues. At that point, the shower valve may not be the root cause, and replacing it alone can waste time and money. In many U.S. cities, plumbing alterations can also trigger permit or inspection requirements, so I check local rules before cutting into a wall that is already finished.
As a practical matter, the cost of a mistake is usually higher than the cost of getting the right person involved early. A plumber is not always necessary, but hidden water damage is expensive enough that I never treat this as a casual repair. Once the new valve is in, the final step is proving that it works the way it should.
What I check before closing the wall for good
I do not consider the job done until the shower passes a few simple checks. First, I run hot and cold separately, then I run them together and watch for stable temperature control. Next, I verify that the handle stops where it should and that the anti-scald limit, if present, is set sensibly for the home.
I also look for three kinds of leaks: drips from the shower head, moisture around the valve body, and seepage at the supply connections. If the shower has weak flow after the swap, I flush the line again before blaming the new valve, because debris is a common nuisance after a replacement. When everything stays dry and the handle feels smooth, I leave the access panel available if possible, because future service is much easier when the wall is not sealed shut permanently.
A clean valve replacement is really about sequence and restraint: choose the right body, set the depth correctly, test with the wall open, and only then finish the surface. That approach takes a little more patience up front, but it is the difference between a durable repair and a damp surprise inside the wall.