The essentials for a path that stays level and drains well
- Base depth matters more than surface style; most failures start underneath.
- 36 inches is the accessible minimum clear width, while 48 inches feels better for two people walking side by side.
- Build in about 1/4 inch per foot of slope away from the house, or about 2%.
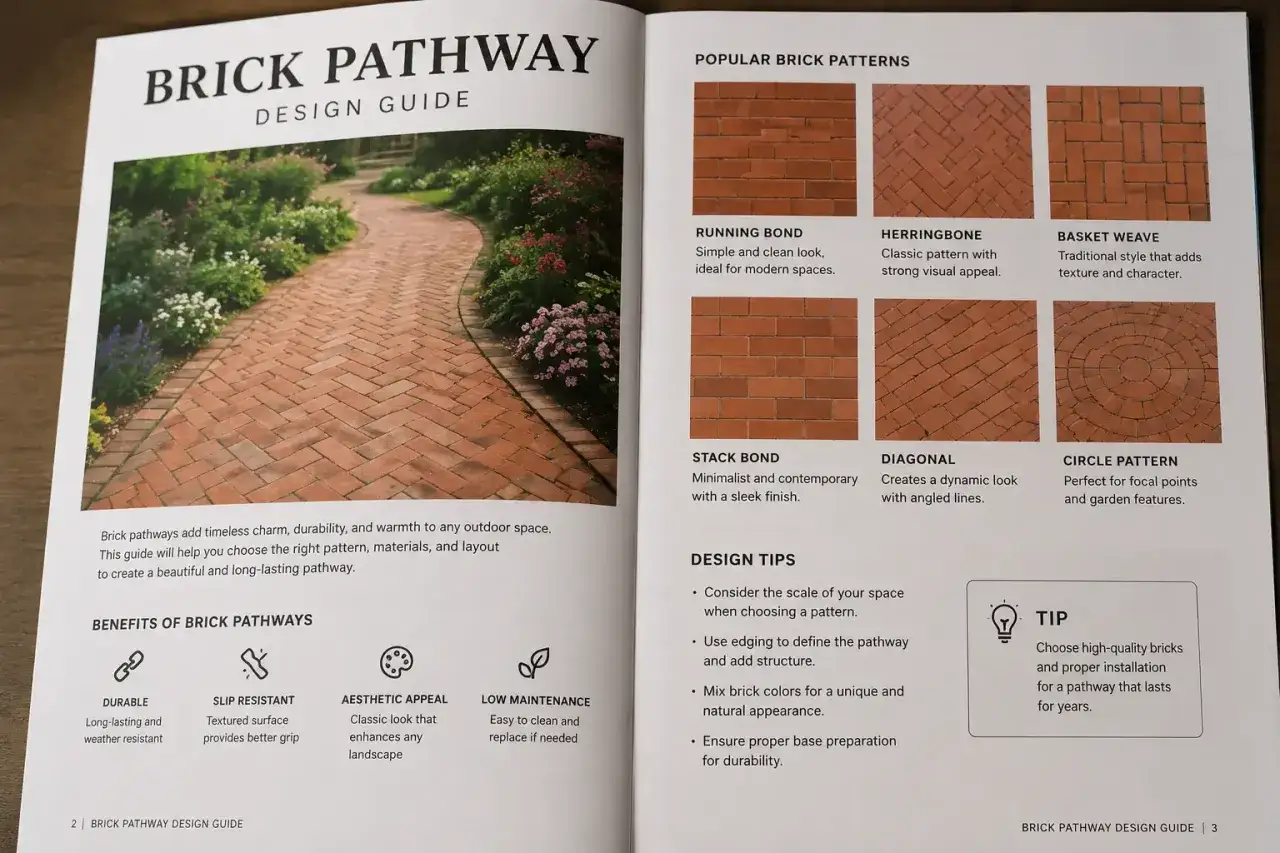
- Herringbone locks the surface together best, while running bond is easier to use on curves.
- Joint sand, edging, and early repair of low spots keep weeds and rocking to a minimum.
- Most problems show up after the first wet season, not on the day the work is finished.
Choose the width and pattern before you start digging
I usually start with width, because traffic decides the rest. A front route that only serves one person can be tighter, but if the path is your main entrance, 36 inches is the practical minimum and 48 inches feels far more comfortable; the Access Board keeps 36 inches as the accessible clear width for routes that need to stay compliant. For materials, I prefer full-depth paving brick or clay pavers over thin facing brick, since the surface has to survive foot traffic, snow shovels, and the occasional wheelbarrow.
Pattern matters too, but not only for looks. It changes how the field locks together and how easily you can follow curves.
| Pattern | Best use | Why I like it | Tradeoff |
|---|---|---|---|
| Herringbone | Main entrances and heavier foot traffic | Strong interlock and good resistance to shifting | More cuts and more layout care |
| Running bond | Curved or gently winding paths | Cleaner flow and easier handling around bends | Less locked-in than herringbone on long straight runs |
| Basketweave | Smaller decorative paths | Simple to lay and visually classic | Best when traffic is light and edging is solid |
| Stacked layout with border | Modern designs with sharp geometry | Works well when the surrounding landscape is very orderly | Needs excellent restraint so the field does not creep |
Once the layout and pattern are settled, the real work starts underneath.
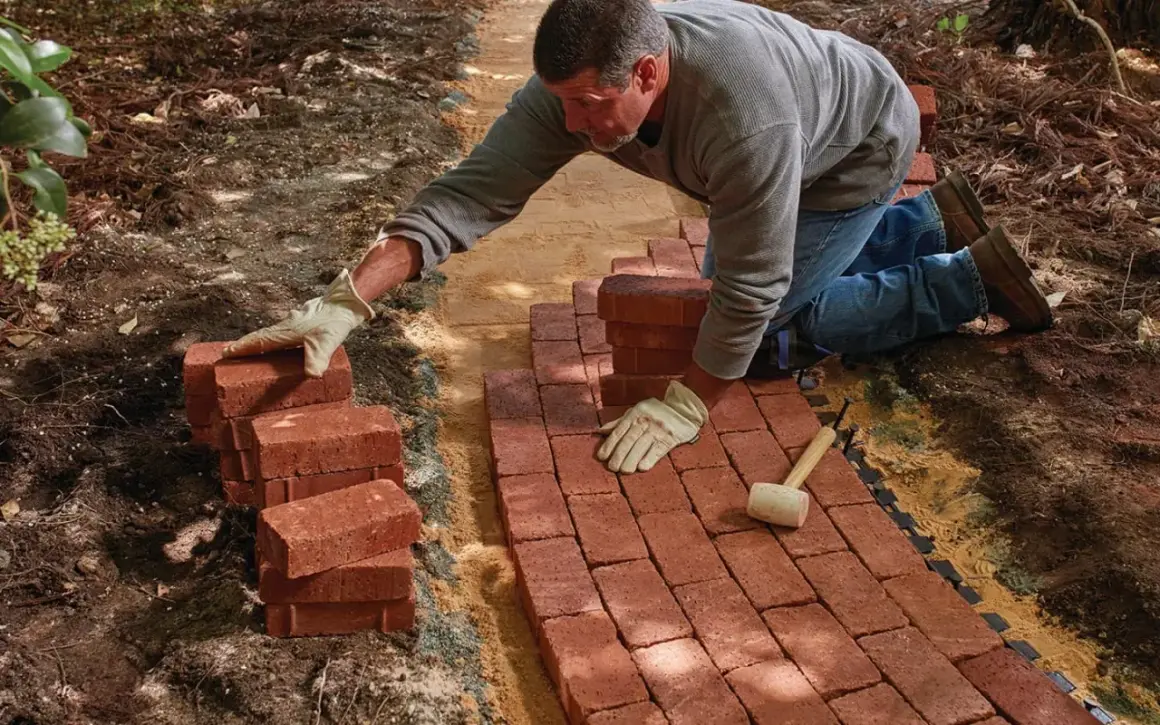
How I'd build the base and set the bricks
For most residential projects, the hidden assembly matters far more than the top layer. I excavate deep enough to make room for 4 to 6 inches of compacted base, about 1 inch of bedding sand, and the thickness of the paver, which usually puts total dig depth in the 7 to 10 inch range for a standard path.- Stake the route and mark the finished height with string lines.
- Excavate to the planned depth and remove all soft soil, roots, and organic material.
- Compact the subgrade, then place the base in lifts so each layer is firm before the next goes down.
- Screed the bedding sand flat, but do not overbuild it to fix low spots.
- Set the bricks tightly, checking both alignment and slope as you go.
- Install edge restraint, compact the surface, and sweep joint sand into the joints until they are full.
The mistake I see most often is a thick sand bed that was used to make the surface look level. That usually becomes the weak link later, because the path settles unevenly and the joints start opening. A clean cut at the border is worth the time too, since neat edges stop the field from creeping outward.
With the surface locked in, the next question is whether water can get out fast enough to protect it.
Why drainage and frost protection decide whether it lasts
Water is what usually destroys a good-looking path. If the grade holds moisture under the base, winter freeze-thaw cycles push bricks upward, sand washes out, and the surface starts to rock or sink in small pockets.
- Keep the finished surface sloped away from the house at about 1/4 inch per foot, or roughly 2%.
- Do not dump downspouts onto the path or onto the joints beside it.
- If walls, property lines, or a low yard prevent natural runoff, use a swale or drain instead of pretending water will move on its own.
- In clay soil or shady areas that stay wet, a little extra base preparation is cheaper than later repairs.
I also think region matters. In milder climates, a path may stay stable with standard prep; in freeze-prone states, the same shortcut can show movement after one hard winter. That is why I treat drainage as part of construction, not a maintenance afterthought.
Once water is handled correctly, keeping the surface clean becomes much easier.
Keep the joints tight and the surface easy to maintain
Routine care is simple, but it works only if you do it early and consistently. Sweep grit and leaves off the surface, pull weeds before they seed, and refill joints when sand starts disappearing after storms or winter cleanup.
- Inspect the path in spring and fall for sunken spots, loose edging, and open joints.
- Top up joint sand before weeds take root.
- Lift and reset any bricks that rock, rather than burying the problem with more sand.
- Avoid aggressive pressure washing, which can strip joint material and make the surface looser.
- Use a paver-safe cleaner for stains; harsh acids are rarely worth the risk.
If you want extra resistance to weed growth and washout, polymeric joint sand can help, but it has to be installed on a dry day and activated carefully. I like it most on paths that stay mostly stable and well drained; if drainage is poor, no joint material will save the base.
That is also where budget decisions start to matter, because repair prevention is cheaper than excavation twice.
What it usually costs in the U.S. and when DIY makes sense
A brick walkway in the U.S. usually lands in the range of $15 to $30+ per square foot installed; HomeGuide and Angi both point to that same broad band. A simple 100-square-foot path therefore often ends up around $1,500 to $3,000+, while curves, demo work, drainage fixes, premium brick, and difficult access can push it higher.
- DIY can make sense for a short, straight, well-drained path with easy access for a compactor and saw.
- Hire out if the route crosses roots, slopes, or bad soil, or if the walkway must connect cleanly to a foundation or accessible entry.
- Budget extra for edge restraint, base stone, bedding sand, cuts, and rental equipment; those items add up fast.
- If the site already sheds water poorly, I would rather spend money on grading than on decorative extras.
In practice, the cheapest path is not the one with the lowest brick price; it is the one that needs the fewest repairs over the next five years.
That brings me to the choices I would make first if I were starting from scratch.
The details that save the most repairs later
If I were building this for my own yard, I would keep the design simple and spend my energy where it matters: a stable base, a sensible width, and a pattern that matches the route. I would also make sure the path is slightly proud of the surrounding grade so mulch, soil, and runoff do not creep into the joints.
- Choose fewer curves if the path is primarily functional.
- Keep the route wide enough for the people who actually use it, not just for a site plan.
- Use edging that can be serviced, not buried and forgotten.
- Plan snow removal and wheelbarrow access before setting the first brick.
- Accept that a few small repairs every season are normal; waiting until the surface is obviously failing usually costs more.
When the work is done right, the surface feels almost boring in the best way: no rocking bricks, no puddles at the foundation, and no surprises after winter. That is the standard I would aim for every time.