A clean lawn cut depends more on blade condition than most people realize. Once the edge starts tearing grass instead of slicing it, the lawn looks duller, the mower works harder, and the turf takes more stress than it should. This guide walks through the safest way to restore the edge, how to keep the original bevel, how to balance and reinstall the blade, and when replacement is the smarter move.
The fastest way to get a cleaner cut
- Sharp blades cut grass cleanly, while dull ones fray the tips and leave brown edges.
- Keep the factory bevel, usually in the 30 to 45 degree range, instead of reshaping the blade.
- Disconnect the spark plug wire or battery first before you remove the blade.
- Work on the top side only; grinding the underside changes the cutting geometry and usually makes performance worse.
- Balance the blade every time before reinstalling it to avoid vibration and wear.
- Replace blades that are bent, cracked, or worn thin. Sharpening cannot fix structural damage.
Why a sharp blade changes the cut so quickly
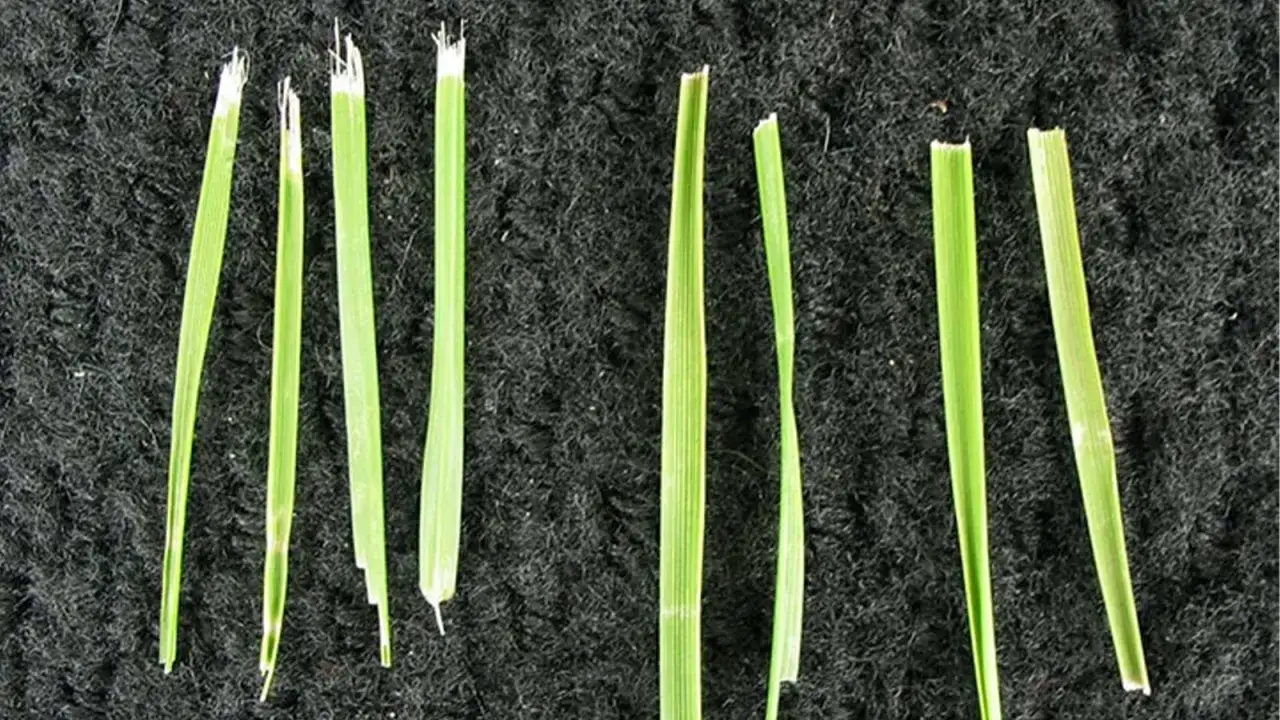
A mower blade does not need to look razor sharp to work well, but it does need a clean leading edge. When that edge is dull, it tears the grass blades instead of slicing them, and the lawn usually shows it in a day or two: pale tips, ragged texture, and more clippings clumping on top of the turf. The University of Minnesota Extension notes that dull rotary blades fray the ends of grass blades, which can leave brown tips and increase disease pressure.
I also see another side effect that homeowners miss: the mower itself has to work harder. That usually means more strain, poorer fuel efficiency on gas machines, and a less even cut across the yard. Once the blade starts shaving off more than it cuts, the whole mowing job gets less efficient. That is why I treat edge maintenance as part of lawn care, not a separate repair task. Once you know what dullness looks like, the next step is choosing the right tools and setup.
The tools and setup I trust for the job
You can sharpen a mower blade with a file, a bench grinder, an angle grinder, or a service shop. The best choice depends on how dull the edge is and how comfortable you are working with metal. I prefer the simplest tool that gets the blade back into shape without overheating or removing too much material.
| Method | Best for | Strengths | Tradeoffs |
|---|---|---|---|
| Hand file | Light dulling and routine touch-ups | Cheap, controlled, low risk of overheating | Slower on badly nicked edges |
| Bench grinder | Blades with more wear or small chips | Fast and consistent with practice | Easier to remove too much metal or overheat the edge |
| Angle grinder | Quick sharpening in a small workspace | Portable and effective for experienced hands | Noisier and easier to be heavy-handed with |
| Professional sharpening | Damaged blades or people who want less hassle | Convenient and usually balanced for you | Costs more and leaves you dependent on turnaround time |
How I restore the cutting edge without changing the blade’s shape
Purdue’s turfgrass guidance is the right mindset here: preserve the original angle instead of inventing a new one. On most homeowner mower blades, that means matching the existing bevel rather than trying to make the edge thinner, shinier, or more aggressive than it was designed to be. I only remove enough metal to restore the edge and take out small nicks.
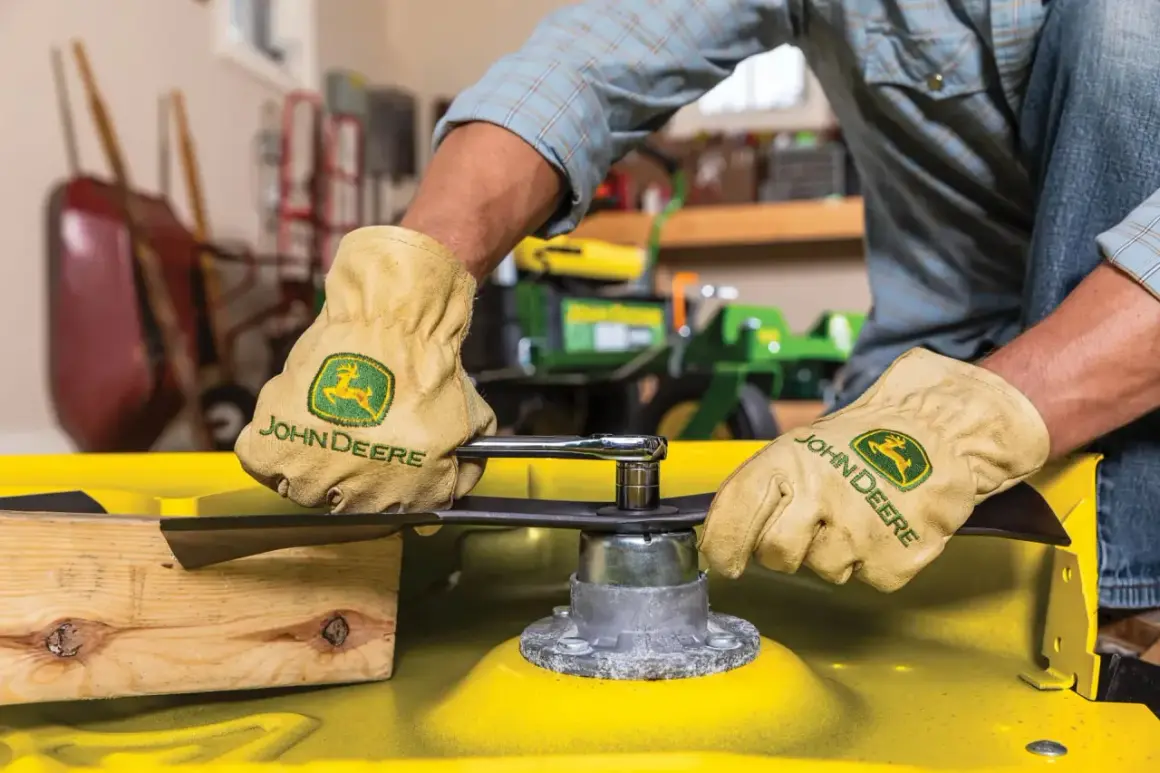
- Disconnect the spark plug wire on a gas mower, or remove the battery on an electric model if the design allows it.
- Turn the mower safely according to the manual and mark the underside of the blade before removal so you do not reinstall it backward.
- Remove the blade and clamp it securely in a vise with the cutting edge exposed.
- Sharpen the top surface only, following the original bevel. On many blades, that ends up near a 30 to 45 degree angle.
- Use smooth, even passes. If you are filing, work from the center toward the tip; if you are grinding, keep the tool moving so one spot does not overheat.
- Stop when the edge is consistent, not when it looks polished. A mower blade needs a durable cutting edge, not a fragile knife finish.
I avoid grinding the underside because it changes the blade’s profile and can make the mower cut worse, not better. A common mistake is chasing a perfectly shiny edge and thinning the metal too far. If the blade is badly nicked, heat-discolored, or already thin at the cutting edge, I would rather replace it than keep removing steel from a part that has reached its limit. Once the edge is restored, balance becomes the next critical step.
Balance and reinstall the blade the right way
A sharpened blade that is out of balance can create vibration, rough cuts, and unnecessary wear on the spindle and bearings. That is why I check balance every single time, even after a light touch-up. You do not need an expensive setup for this. A blade balancer is convenient, but a nail or screwdriver shank clamped horizontally in a vise also works well enough for a homeowner.
Set the blade on the balancer or pivot point through the center hole. If one end dips, that side is heavier. Remove a small amount of metal from the heavier end only, staying away from the cutting edge if possible, then check it again. The goal is simple: the blade should sit level instead of falling to one side. If it keeps dropping after a few passes, stop and inspect for damage, because an uneven blade may be bent rather than merely heavy.
When you reinstall it, pay close attention to orientation. The curved sail should face upward toward the mower deck, exactly as it came off. Tighten the retaining bolt to the torque specified in the owner’s manual rather than guessing. That last detail matters more than people think, because a loose blade can be dangerous and an overtightened one can complicate future service. If the blade balances properly and the mower is reassembled correctly, the cut quality usually improves immediately.
When sharpening stops being enough
There is a point where sharpening becomes the wrong repair. If the blade is bent, cracked, worn thin at the edge, or missing a chunk from a rock strike, I replace it. Toro’s service guidance is blunt on this point, and I agree with it: damaged blades should not be repaired back into service when the metal itself has failed.
Here is the line I use in practice:
- Bent blade that no longer sits straight on a balancer
- Cracks near the center hole, mounting area, or curved sail
- Deep gouges or missing sections from impact with stones, roots, or metal
- Edge wear so heavy that repeated sharpening would remove too much material
If the blade fails any of those checks, replacement is usually faster, safer, and ultimately cheaper than trying to stretch its life. That choice also protects the rest of the mower, because a damaged blade can hammer the spindle and leave the deck vibrating through the whole cut. Once you know when to stop sharpening, the final step is keeping the next edge in better shape for longer.
The small habits that make the next sharpening easier
I think the best mower maintenance is mostly about prevention. If you stay ahead of edge wear, you spend less time grinding metal and more time mowing. My usual rhythm is to inspect the blade after rough mowing, after any obvious impact, and again when I notice the lawn starting to look frayed instead of cleanly cut. For regular home use, I also like to check the edge after roughly 8 to 10 hours of mowing time, which is a practical benchmark for a season that sees normal wear.
Three habits make the biggest difference. First, mow before the grass gets overly tall, because forcing a blade through too much material dulls it faster. Second, keep the underside of the deck clean so packed clippings do not throw the blade off balance or trap moisture against the steel. Third, store spare blades clean and dry so you can swap one in quickly instead of pushing a worn edge too long. Those are small things, but they add up.
My rule is simple: sharpen for cutting quality, balance for machine health, and replace for damage. If you keep those three checks in order, a mower blade stays useful far longer, and the lawn looks better after every pass.