Key points to get right before the first board goes down
- The frame carries both live load and dead load, so joist spacing, beam size, and post layout have to work together.
- The American Wood Council’s prescriptive guide uses 40 psf live load and 10 psf dead load as a practical residential baseline.
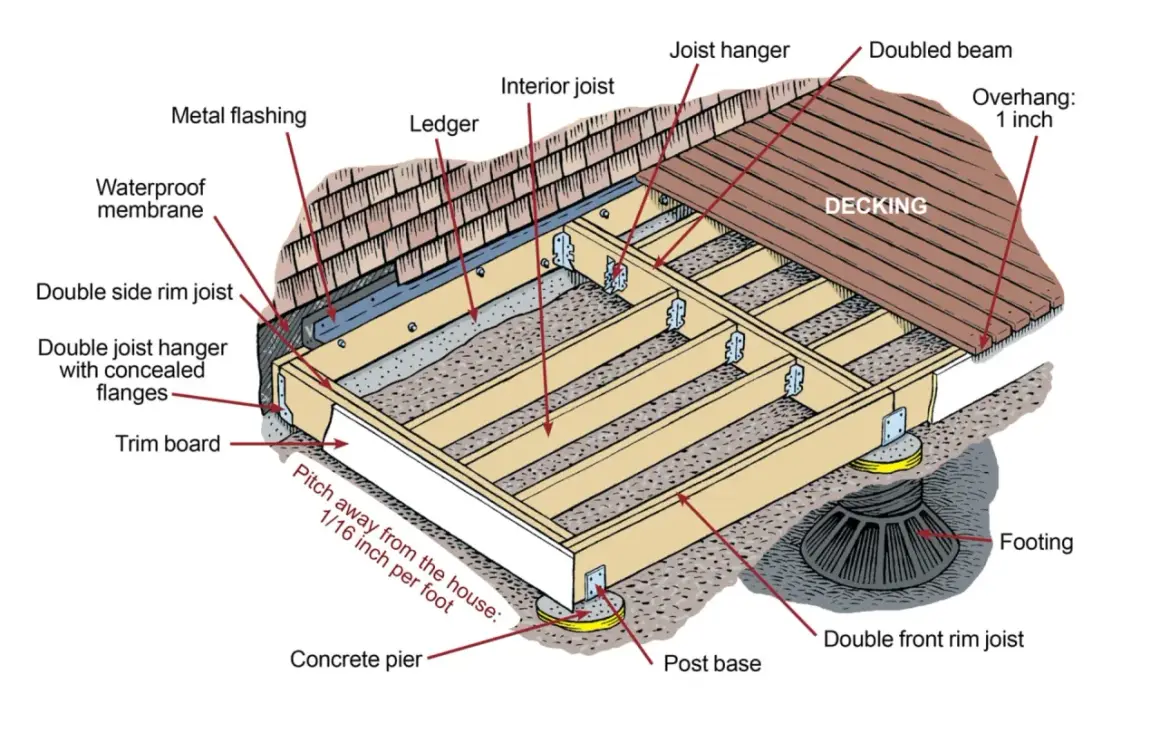
- Ledger attachment is efficient, but only when flashing, fasteners, and the house rim or band joist are sound.
- Footings should land below the frost line where it applies, and never on loose or disturbed fill.
- Guard posts, blocking, and lateral ties are structural parts, not accessories.
What the frame has to do before the deck ever looks finished
The frame is the part that decides whether a deck feels solid or hollow underfoot. The decking, railing, and stain all sit on top of a load path, which is the route the weight follows from people and furniture down to the soil. If that path is clean, the deck stays stable; if it is interrupted by weak connectors, shallow footings, or poor layout, the deck starts to move, squeak, or sag.
In practical terms, the frame is doing five jobs at once: carrying weight, resisting sway, keeping the surface flat, protecting the house connection, and giving the finished deck a durable base. That is why I do not think of framing as a rough carpentry step. It is the structural core of the whole outdoor space.
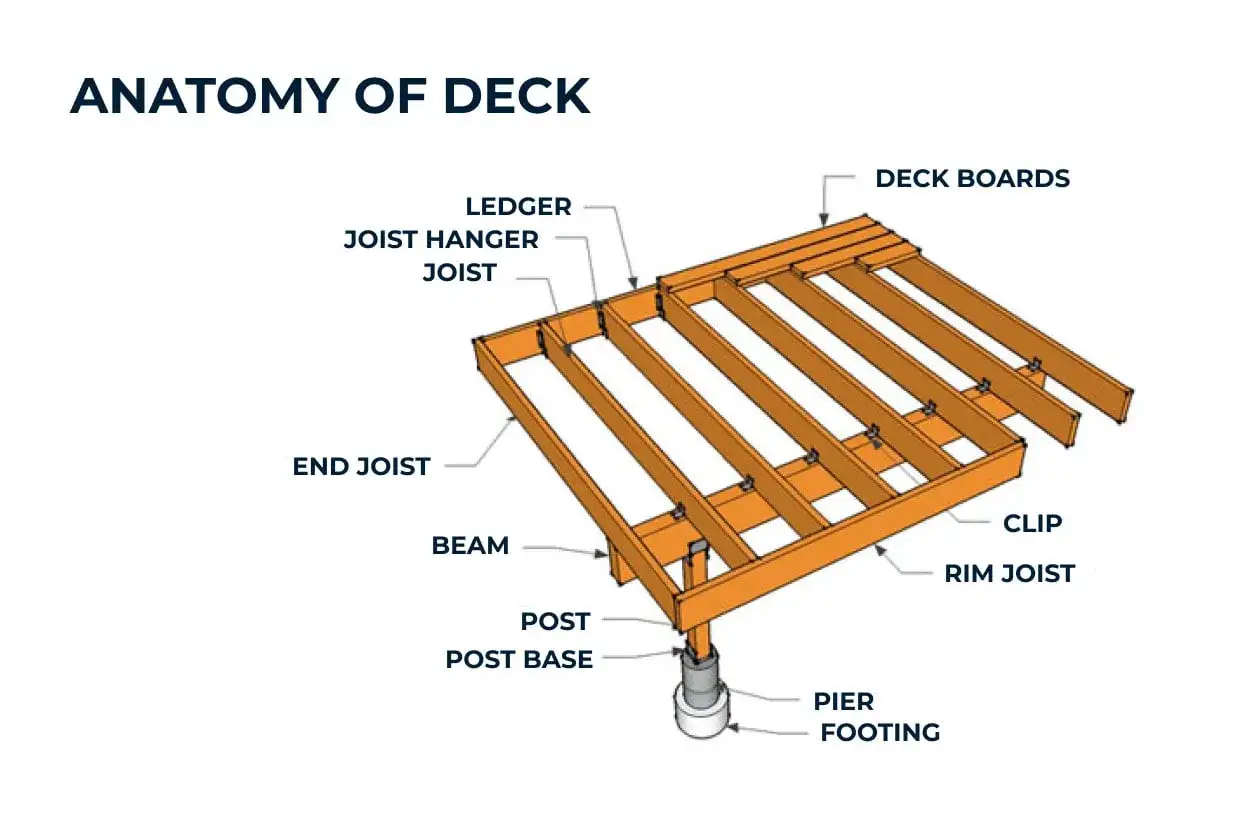
- Joists repeat the span and support the decking.
- Beams collect load from the joists.
- Posts move that load straight down.
- Footings spread the load into the ground.
- Blocking and ties keep the frame from twisting or drifting.
Once that load path is clear, the next decision is whether the deck should attach to the house or stand on its own.
How attached and freestanding decks differ
Both layouts can be strong. The right choice depends on the house wall, the grade, the desired height, and how much risk you want to take on with the ledger connection. I like to decide this early, because it changes the whole frame plan.
| Layout | Best fit | Main advantage | Main risk |
|---|---|---|---|
| Attached deck | Simple residential decks where the house rim or band joist is sound and accessible | Usually uses less material and can simplify the support layout | The ledger connection has to be flashed and fastened correctly, or the house side becomes the weak point |
| Freestanding deck | Situations with masonry walls, uncertain siding details, tricky waterproofing, or any ledger condition I do not fully trust | Reduces reliance on the house structure and avoids many ledger problems | Needs its own beam and post system, so the frame can use more lumber and more footings |
In the field, I often lean toward freestanding framing when the house envelope is complicated or the ledger would be difficult to detail cleanly. That extra structure is usually cheaper than repairing hidden water damage later. Once the layout choice is made, the next step is sizing the parts that actually carry the load.
The parts of a sturdy deck frame and what each one controls
Every deck frame is a combination of the same structural pieces, but each piece has a different job. If one member is undersized, the weakness usually shows up somewhere else, which is why a deck can look fine and still feel wrong.
| Part | What it does | What to watch for |
|---|---|---|
| Ledger | Anchors an attached deck to the house | Needs proper flashing, approved fasteners, and a sound band joist or rim joist |
| Joists | Span between supports and carry the decking | Spacing, species, and grade control bounce and deflection |
| Beam | Collects load from joists and transfers it to posts | Splices should land where the design intends, not wherever the lumber happens to meet |
| Posts | Carry the load straight down to the footing | 6x6 posts are common in prescriptive residential framing, especially where guard or beam loads are significant |
| Footings | Spread the load into the soil | Depth has to respect frost and soil conditions, not just convenience |
| Blocking and bridging | Stiffen the frame and support lateral loads | Helps prevent joist roll, especially in deeper joists and at rail or stair loads |
A small technical term matters here: a cantilever is the portion of a joist that extends beyond its support. It can help balance a layout, but it is not free extra span, and it should always stay within the approved limits for the lumber and spacing you are using. Once these pieces make sense individually, the build becomes much easier to lay out correctly on site.
How I would lay out the frame on site
I start with the site, not the lumber pile. Good framing is mostly smart decisions made before the first hole is dug.
- Confirm the permit and the code path. I check local rules, setback requirements, and any special snow, wind, or seismic conditions before drawing the final frame.
- Call utility locate services. If posts need footings, this is not optional. It is a basic safety step and it prevents expensive surprises.
- Set the finished deck height. That means checking the door threshold, siding, flashing space, and drainage so the deck does not trap water against the house.
- Mark the ledger line or beam line first. The beam location determines the post grid, so I want that line accurate before I worry about joist spacing.
- Square the layout. I use diagonal measurements or the 3-4-5 method to make sure the frame is actually square, not just close enough to look right.
- Plan railings and stairs early. Guard posts and stair openings create structural loads, so I want those points reinforced before the decking hides the frame.
That sequence keeps the frame honest. If you get the geometry right first, the lumber behaves better, the connectors fit cleaner, and the finished deck looks more intentional. From there, the code details are what separate a decent build from a deck that will hold up.
Code details that are easy to miss but expensive to ignore
Most deck problems I see are not dramatic failures. They are small misses that compound over time. The framing rules below are the ones I pay closest attention to because they affect durability, inspection results, and safety.
- Footing depth: In many U.S. jurisdictions, footings need to sit below the frost line, and a common prescriptive minimum is 12 inches below undisturbed ground where local frost conditions allow. Soil that has been backfilled loosely is not a reliable bearing surface.
- Guard strength: The IRC still drives the familiar residential guard requirements, including guards around 36 inches high in many cases, a 200-pound concentrated load at the top rail, and infill that resists 50 pounds on a 1-square-foot area.
- Fastener compatibility: Pressure-treated lumber and framing hardware need corrosion-resistant fasteners and connectors rated for that use. Wet lumber and the wrong metal are a bad combination.
- Flashing: Ledger flashing belongs behind the siding and over the ledger, not as a surface patch. Water management is structural work on a deck, not just finishing work.
- Blocking and lateral restraint: Deeper joists and railing areas often need solid blocking or bridging to keep the frame from rolling or racking under load.
- Engineering threshold: Wide spans, high decks, masonry attachments, hot tubs, and roof loads usually move the project beyond prescriptive framing and into engineered design.
The rule I keep in mind is simple: if the load is unusual or the attachment is uncertain, I stop pretending it is an ordinary deck. That is the point where the framing plan should get more conservative, not less. With those rules in place, the next problem is avoiding the mistakes that undo otherwise good work.
Framing mistakes that shorten a deck's life
These are the errors that show up again and again, and every one of them is preventable if you slow down before the deck surface goes on.
- Skipping ledger flashing: Water gets behind the deck and starts breaking down the house rim or band joist.
- Letting beams splice in the wrong place: A beam joint that misses support creates a weak point that no amount of decking can hide.
- Using undersized footings: The deck may look level at first, then settle unevenly after wet seasons or freeze-thaw cycles.
- Hanging guard posts off the rim alone: Guard loads are not decorative loads. They need proper framing support.
- Skipping blocking: The frame feels springy, and the railing area often becomes the first place to complain.
- Ignoring drainage: When water sits around posts or under low framing, the deck ages much faster than it should.
- Assuming all span tables are interchangeable: Lumber species, grade, spacing, and loading all matter. A chart is only valid when the assumptions match the build.
What I like about catching these early is that the fix is usually inexpensive compared with the repair. Once the decking hides the frame, every correction gets slower and more annoying, so the best time to audit the structure is now, before the surface boards start going down.
The last inspection before the decking goes on
Before I close up the frame, I do one final pass with the same mindset an inspector or a careful homeowner should use. This is the moment when small corrections still take minutes instead of hours.
- All posts are plumb and securely anchored.
- Beam bearing is centered where the design expects it.
- Joist crowns are aligned in the same direction so the surface settles evenly.
- Joist hangers and connectors are fully seated and installed with the correct hardware.
- Blocking is in place at railing, stair, and beam areas.
- The ledger is flashed, fastened, and separated from moisture paths.
- Frame diagonals match, so the deck is actually square.
When those checks are done well, the decking, railings, and finish treatment become the easy part. The deck feels solid because the structure underneath was designed for the load, the site, and the weather it will actually face. That is the difference between a deck that simply looks finished and one that keeps performing season after season.