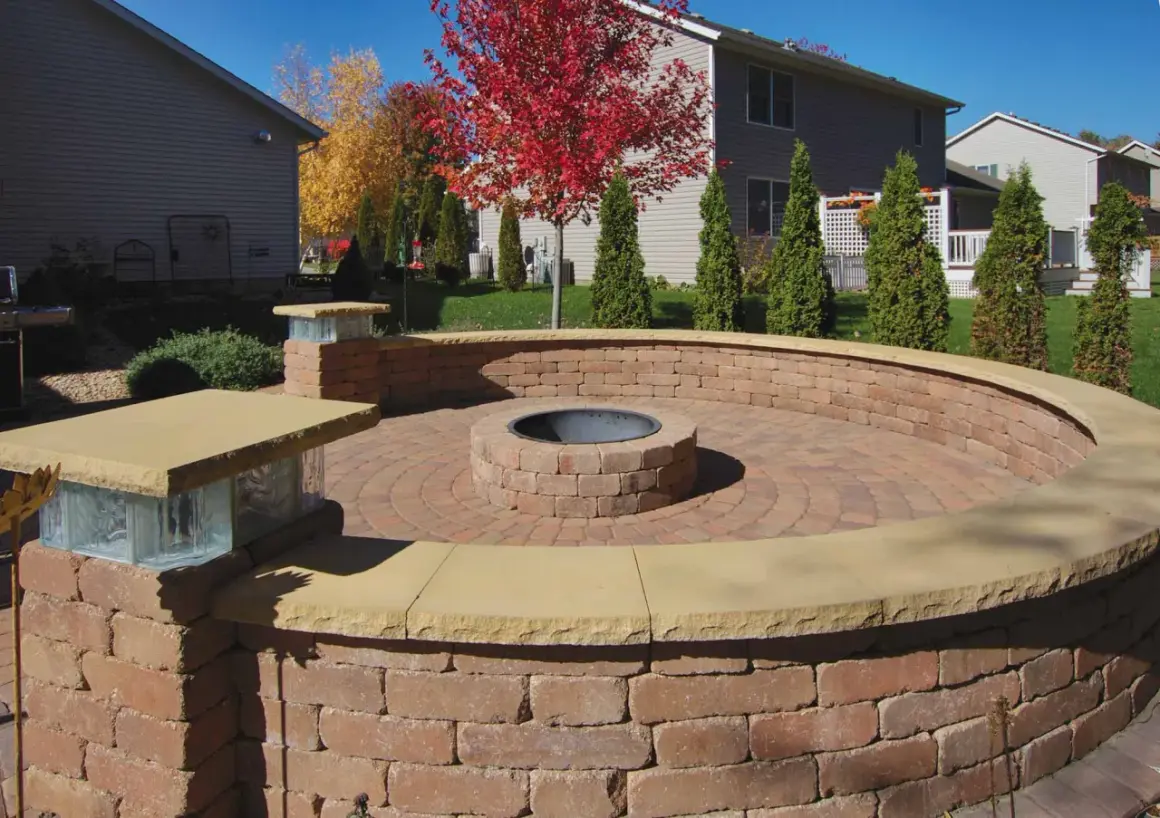
An in ground fire pit can turn a plain backyard into a real gathering space, but only if the layout, drainage, and safety details are handled with care. I’m focusing here on the parts that actually matter in the United States: where to place it, how deep to build it, which materials hold up, and what usually goes wrong when people rush the project.
What matters most before you break ground
- Keep the pit at least 10 feet from your home or anything that can burn; more room is better when the yard allows it.
- Drainage is not optional. Standing water leads to smoke, odor, mold, and mosquito problems.
- A practical DIY build is often about 18 inches deep, with heat-rated block or stone around the basin.
- Check local rules, HOA restrictions, and underground utilities before digging.
- Plan on a weekend or more, not a quick afternoon project.
What an in-ground fire pit needs to perform well
I look at three things first: air, water, and clearance. A wood-burning pit needs enough airflow to burn cleanly, enough drainage to keep rain from pooling in the basin, and enough separation from the house, fencing, branches, mulch beds, and patio covers. The U.S. Fire Administration recommends using fire pits outdoors at least 10 feet away from your home or anything that can burn, and that is the right baseline for any layout.
There’s also the practical side of how the yard is used. A recessed design can look finished and intentional, but if it sits in a low spot, catches runoff, or leaves no room for chairs, it becomes a nuisance fast. I would rather build a slightly smaller pit in the right place than a larger one that smokes, floods, or feels awkward to use.
Once those three basics are clear, the rest of the project becomes much easier to plan. The next step is choosing a site that works on paper and in real life.
How I would plan the location before digging
Before I put a shovel in the soil, I call 811. Underground utilities are not something to guess at, and no backyard project is worth hitting a line. I also check local building rules, open-burning restrictions, and HOA guidelines, because some towns require permits or specific setbacks from structures and property lines.
From there, I look for a spot that is open, level, and naturally dry. I want it away from low-hanging limbs, siding, sheds, wood piles, and anything else that can catch fire. If the yard slopes, I avoid the lowest point unless I am also building a proper drain. I also pay attention to wind direction; a beautiful pit in the wrong airflow can be miserable to use.
- I keep the pit out in the open, not under an overhang or patio roof.
- I leave enough room for seating, circulation, and a clear walkway in and out.
- I like the back legs of chairs about 6 to 7 feet from the edge so people do not crowd the heat.
- I stay away from grass-heavy corners, mulch beds, and places where runoff collects after rain.
If the location passes those tests, the project is usually worth building. From there, the real difference comes from how deep I dig and how I handle drainage.
Depth and drainage are what make or break the project
Depth matters more than most people expect. For a straightforward build, I think in terms of an excavated basin that is about 18 inches deep. Home Depot’s guide uses a 12-inch diameter, 18-inch-deep center hole when the soil drains well, then fills it with large gravel. That is a useful benchmark because it keeps the fire below grade without burying it so deeply that airflow suffers.
If the yard gets heavy rain or the soil holds water, I would not trust a gravel pocket alone. In that case, a drainage trench makes a real difference. The same guide describes a trench about 6 inches wide that slopes gradually from about 2 inches deep to 6 to 12 inches deep at the far end, with the run extended roughly 10 feet away from the pit if a drainpipe is being used. That setup gives water somewhere to go instead of letting it sit in the burn area.
| Site condition | What I would build | Key numbers | Why it works |
|---|---|---|---|
| Well-draining soil | Center gravel pocket | About 12 inches wide and 18 inches deep | Keeps the basin dry without overcomplicating the build |
| Heavy rain or slow-draining soil | Gravel basin plus trench drain | Trench about 6 inches wide, sloping from 2 inches to 6-12 inches deep | Moves water away before it pools in the fire area |
| Paved surround | Sloped patio field around the pit | Slope away from the pit | Prevents runoff from draining back into the bowl |
I also compact the base before I set any block or paver. Loose soil settles, and a settled ring shifts. A tamped base plus a slight outward slope is a lot more valuable than decorative finishes, because it keeps the fire usable after a storm. That leads directly to the materials I would trust for the ring and the surrounding patio.
Materials that survive heat, moisture, and freeze-thaw cycles
For the ring itself, I want heat-rated materials, not whatever happens to be left in the yard. The shell can be made with retaining wall block, concrete block, or a proper fire pit kit, but anything exposed to direct heat should be rated for that use. Inside the basin, coarse gravel or lava rock is useful because it improves drainage and airflow without turning into a mud pocket.
I also pay attention to the patio around the pit. The surrounding surface is not just cosmetic; it is what keeps chairs stable and keeps people from stepping into soft soil. Lowe’s uses a layered paver build with paver base, leveling sand, and polymeric sand in the joints, and that is the kind of structure I like because it feels finished instead of improvised.
| Material | Best use | Strength | What I would watch for |
|---|---|---|---|
| Retaining wall block | Outer ring | Easy to source and simple to stack | Use heat-rated options where flame contact is possible |
| Fire-rated liner or insert | Inner ring or burn chamber | Better heat resistance and cleaner edges | Costs more, but usually lasts longer |
| Coarse gravel or lava rock | Bottom of the pit and drainage area | Improves airflow and water movement | Keep the layer loose, not packed tight |
| Pavers with base and sand | Surrounding patio | Stable seating area and better drainage control | Needs proper slope and compaction |
I would avoid any material that traps moisture, crumbles under heat, or has no clear rating for fire use. That sounds cautious, but it is cheaper than replacing a cracked ring later. With the right materials chosen, the actual build is much less unpredictable.
A build sequence that keeps the work predictable
The cleanest way I know to build a sunken pit is to treat it like a small excavation project, not a decorative weekend craft. On a simple layout, I would plan the work in this order: mark the center, mark the outer patio, dig the basin, compact the soil, add drainage, set the ring, and then finish the surrounding pavers.
- Mark the pit center and outline the outer patio with string and paint.
- Dig the fire basin to roughly 18 inches deep.
- Excavate the surrounding patio area to the depth of the chosen pavers.
- Tamp the soil hard so the base does not settle later.
- Add gravel drainage, and if the site needs it, run a sloped drain away from the pit.
- Set the block ring level, then add gravel or lava rock inside the basin.
- Build the paver field around it with a slight slope away from the pit.
If I were building a wood-burning version, I would also think about airflow while the ring is going in. A recessed pit that is too sealed-off can burn smoky, especially if the sides are too tight and the base is not allowing enough air to move through. That is why a simple, open design often performs better than a fussy one that looks fancy but suffocates the fire.
Once the structure is in place, the next choice is fuel. That decision changes the project more than most people realize.
Which fuel choice fits a sunken pit better
For most backyards, wood is still the most straightforward option. It is cheaper to build, simpler to maintain, and it gives you the classic campfire experience people usually want from a recessed pit. The tradeoff is ash, smoke, and more hands-on cleanup.
Gas is cleaner and easier to turn on and off, but it changes the job. Once you add a burner, line, or ignition system, the project starts moving toward a more technical installation. In many cases, that means tighter code review, more planning, and sometimes professional help.
| Fuel choice | Best for | Main advantage | Main drawback |
|---|---|---|---|
| Wood | Simple DIY builds and a classic outdoor feel | Lower cost and a traditional fire experience | Smoke, ash, and more cleanup |
| Gas | Cleaner, more polished backyard spaces | Fast ignition and easier shutoff | More code issues, more parts, and more installation complexity |
| Gas-ready shell | Owners who may upgrade later | Lets the landscape design stay flexible | Still needs careful planning before any fuel work begins |
My general rule is simple: if the goal is a relaxed DIY feature, wood makes the most sense. If the goal is a more permanent outdoor room with low maintenance, I would budget more time and money and let a licensed pro handle the fuel side. Either way, the pit itself still needs the same disciplined maintenance once it is built.
The small finishing details I would not skip
The finished pit is only as good as its upkeep. I always keep a cover on hand when the pit is not in use, because rain and snow can turn a dry basin into a mess. After a fire, I let the ashes cool completely, then remove them instead of letting them pile up and block airflow. I also check the drainage path after a storm, because a little soil washout can slowly undo the whole project.
- Burn only clean, non-processed wood.
- Keep a hose, water bucket, or extinguisher close enough to reach the pit quickly.
- Never leave the fire unattended, even for a short break inside.
- Watch the wind before lighting anything.
- Re-level loose pavers or sand before they become trip points.
- Keep children and pets at a safe distance while the pit is hot.
Those details do not sound exciting, but they are what make the fire pit feel like part of the landscape instead of a maintenance problem. If I had to reduce the whole project to one sentence, it would be this: build for drainage first, fire behavior second, and looks third, because the good-looking version only matters if it stays dry, safe, and usable. A well-planned recessed pit can last for years, and the difference usually comes down to the parts nobody sees once the project is finished.