Knowing how to install a mailbox correctly saves time later, but it only works if the placement and support are right. I focus on the curbside version most homeowners need, with the measurements, materials, and small outdoor details that keep delivery smooth and the installation looking intentional. I’ll also show where wall-mounted or centralized options make more sense, so you do not build the wrong setup for the property.
Here are the essentials before you start digging
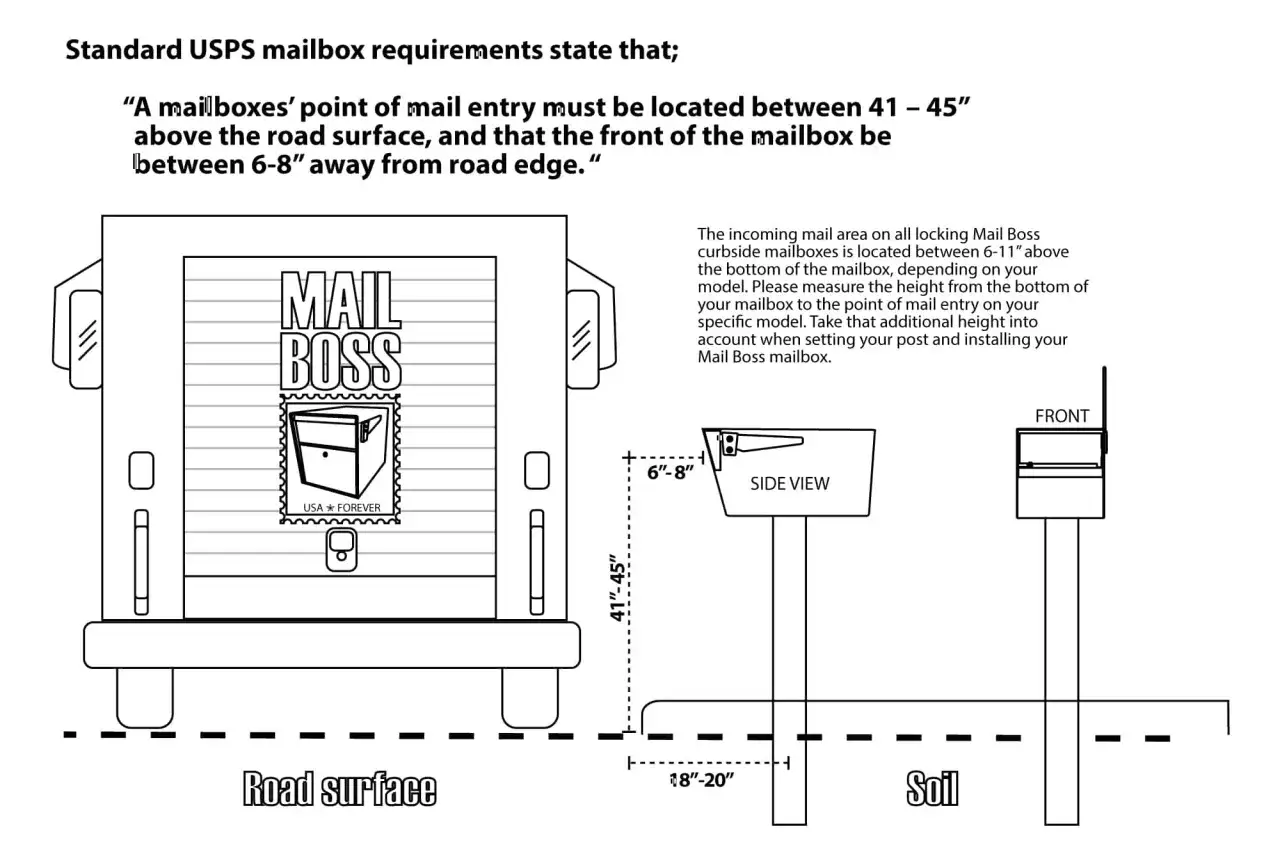
- Standard curbside placement is 41 to 45 inches from the road surface to the bottom of the mailbox or point of mail entry.
- USPS guidance places the box 6 to 8 inches back from the curb or road edge.
- A 4 x 4 wooden support or a 2-inch steel or aluminum pipe is the usual breakaway-style support, buried no more than 24 inches deep.
- Keep the approach clear so the carrier can reach the box without stepping into landscaping or around obstacles.
- Check with your local postmaster before changing delivery style or installing on a street with unusual curb conditions.
- Wall-mounted and centralized mailboxes follow different rules, so not every property should use the same setup.
Choose the mailbox style that fits the delivery setup
Before I touch a shovel, I decide whether the property actually needs a curbside post, a wall-mounted box, or a centralized unit. That matters because the right hardware can be completely wrong for the delivery pattern. If the home already receives street delivery, a standard curbside mailbox is usually the simplest answer. If the property uses door delivery, a wall-mounted mailbox or door slot may be the better fit. For many new developments, centralized delivery is the preferred model, which means the box location is often planned before landscaping ever begins.
| Mailbox type | Best fit | What to know |
|---|---|---|
| Curbside post | Single-family homes with street delivery | Must meet USPS height and setback guidance and use a support that can yield if struck |
| Wall-mounted box | Homes or apartments with delivery at the entrance | Replacing a curbside box with this style requires local postmaster permission |
| Centralized unit | New developments, townhome rows, multifamily sites | Usually planned by the builder and USPS, not treated like a simple DIY swap |
I like this decision first because it prevents wasted work. A beautiful post in the wrong place is still the wrong install, and once the delivery method is set, the rest of the job becomes much more straightforward.
Gather the right materials before you dig
The actual installation goes better when I stage everything before breaking ground. At minimum, I want the mailbox, a compliant support, mounting hardware, a tape measure, a level, stakes or marking paint, a post-hole digger or auger, a shovel, and a way to check the finished height after the ground settles. If the site is sloped, a string line helps more than people expect, because it gives you a clean visual reference even when the yard itself is uneven.
- Mailbox body that can hold a normal day’s mail volume.
- Support post that can break away or yield if a vehicle hits it.
- Mounting hardware sized for the mailbox and post style.
- Measuring and leveling tools to set height and plumb accurately.
- Hole-digging tools suited to your soil, which may be sandy, clay-heavy, or full of roots.
- Optional drainage material if your soil stays wet for long periods.
USPS says the support should be stable but not rigid enough to create a hazard if it is struck, which is why I avoid overbuilding this part of the job. Once the materials are on hand, the real work is getting the post set where the carrier can actually use it.
Set the post and mailbox at the right height and setback
This is the part that determines whether the project feels professional or fussy. I start by marking the final mailbox location, not just the post hole. The box should sit 6 to 8 inches back from the curb or road edge, and the finished mailbox height should land between 41 and 45 inches from the road surface to the bottom of the box or point of entry. That measurement is taken from the finished surface, so if the soil gets reshaped or mulch gets added later, I check the final grade again before calling the job done.
- Mark the spot where the box will sit, then confirm that the carrier can reach it safely from the road side.
- Dig the post hole deep enough for the support, but do not bury the post more than 24 inches deep.
- Set the post so it is plumb, then check the final mailbox height before tightening anything permanently.
- Attach the mailbox mounting arm or bracket according to the hardware style you bought.
- Mount the box and make sure the door opens freely without hitting the post or the siding of the box.
- Stand back and check the view from both the street and the walkway so the mailbox is obvious, level, and easy to reach.
If the street has no raised curb, or if road conditions make the standard setback awkward, I stop and ask the local postmaster for guidance. That step sounds small, but it prevents a lot of avoidable correction work, especially on rural roads, older neighborhoods, and properties with unusual grades.
Keep the landscaping useful instead of decorative clutter
Mailbox installation sits right at the edge of outdoor living and maintenance, which means the landscaping around it matters as much as the hardware. I want the box to look finished, but I do not want shrubs, edging, stone beds, or tall groundcover hiding the post. A mail carrier should be able to see the box clearly, reach it without stepping into planting beds, and pull away without clipping branches.There are a few practical choices that make a big difference. Low, tidy plantings can frame the mailbox without crowding it, but aggressive shrubs need regular trimming because they grow into the carrier’s path faster than homeowners expect. Mulch should stay neat around the post, yet I would leave enough open space for mowing, snow clearing, and simple inspection of the base. If you use irrigation, avoid spraying the box and hardware directly, since constant moisture shortens the life of fasteners and can stain the mailbox faster than people realize.
I also pay attention to the approach itself. A mailbox buried behind decorative stone, ornamental grasses, or a tight bed border may look designed, but it usually works poorly. The best outdoor mailbox setups feel obvious, not hidden, and that is usually the sign of good landscaping rather than bare utility.
Once the surroundings support the box instead of fighting it, the next step is to avoid the mistakes that force a do-over.
Avoid the errors that cause rework or delivery problems
Most mailbox problems come from a handful of avoidable mistakes. The first is measuring from the wrong surface. If the post is installed before final grading, the box often ends up too high or too low once the soil settles. The second is using a support that is too rigid, such as heavy metal or concrete-based construction, which creates a safety problem and goes against the breakaway idea behind the standard post recommendations.
- Wrong height makes the box awkward for the carrier and can lead to repeated adjustments.
- Bad setback puts the box too close to traffic or too far from the shoulder.
- Blocked access from shrubs, rock borders, or parked vehicles defeats the point of curbside delivery.
- Missing or hard-to-read numbers make delivery slower and can cause confusion if the house is not easy to identify from the street.
- Overbuilt supports create a hazard if the box is hit by a vehicle.
- Ignoring street layout can leave the mailbox on the wrong side for safe carrier access.
USPS asks that the house or apartment number be on the box, and if the mailbox is on a different street from the home, the full street address should be on it. I treat that as part of the install, not a later detail, because a well-placed box still works badly if the address is missing or unclear.
Use a different setup when curbside delivery is not the right fit
Not every home should get a standard roadside mailbox, and that is where a lot of DIY confusion starts. If the property already has door delivery, a wall-mounted mailbox may be the cleaner solution. USPS says you need local postmaster permission before replacing a curbside box with a wall-mounted one, so I would not buy hardware before checking that detail. Wall-mounted boxes also need to be near the main entrance so the carrier can see them easily and serve them without guesswork.
For new construction, I would take the bigger picture seriously. Centralized delivery often makes more sense for builders, townhouse rows, and multifamily sites because it reduces repeated roadside stops and simplifies package handling. That is a planning decision, not a weekend project, but it is worth mentioning because many homeowners assume every address should use the same kind of box. In practice, the delivery pattern decides the mailbox type first, and the design follows from there.
If your site has a steep driveway, a narrow shoulder, no curb, or a layout that makes a standard post awkward, that is a signal to pause and verify the right setup instead of forcing the curbside option.
What I check after the first storm and each season after that
Once the mailbox is in place, I do not treat the job as finished forever. Soil moves, lawns settle, and winter weather exposes weak hardware quickly. After the first heavy rain, the first mow, or the first plow season, I check the post for lean, the box for loose screws, and the surrounding grade for washout. If the post has drifted or the box no longer sits at the right height, I correct it before the problem becomes obvious to the carrier.
I also keep the area around the box clear enough for regular use. That means trimming back growth, removing obstructions, and making sure the mailbox remains easy to spot from the road. A good installation does not just meet a measurement once; it stays functional through the seasons. That is the part most people forget, and it is usually the part that separates a decent install from one that keeps working without attention.
When the measurements are right, the support is safe, and the landscaping stays out of the way, the mailbox becomes a simple part of the property instead of a recurring problem. That is the standard I aim for every time I set one.