The build works only if the deck framing can support it
- Inspect the deck structure first. The ledger, joists, beams, posts, and fasteners matter more than the pergola materials.
- Do not rely on deck boards. Load should transfer into framing or independent supports, not into trim or surface planks.
- Plan for wind, not just weight. Uplift and side sway are often the real problem on elevated decks.
- 6x6 posts are usually the safer default for permanent residential builds; 4x4s are better reserved for small, light structures.
- Budget for more than lumber. Hardware, connectors, blocking, finish work, and sometimes permit costs can change the total fast.
Check the deck structure before you add weight
I never start with lumber. I start with the deck itself. The International Residential Code uses a 40 psf live load for residential deck surfaces, but a pergola does not behave like people standing on the deck. It adds concentrated post loads, lateral forces, and wind uplift, which means the frame has to be checked as a system, not guessed at from the deck boards alone.
What I look for is simple: a solid ledger connection, joists that are straight and dry, beams that are not sagging, posts that do not move, and fasteners that are not corroded or loose. If the deck bounces when people walk across it, has soft spots, or shows signs of rot near the ledger or post bases, I treat that as a warning sign.
- Ledger and flashing: the connection to the house has to be sound, dry, and properly protected from water.
- Joists and beams: look for cracks, rot, over-notching, or undersized members.
- Posts and bracing: a pergola should not depend on railing posts or decorative trim for stability.
- Hidden framing: if you do not know where the joists and beams are, do not assume the deck can take the load.
- Water damage: if this is an elevated deck over living space, waterproofing becomes part of the structural decision.
If the structure is older or the framing is unknown, I would rather pause and confirm the layout than drill holes and hope for the best. Once the deck proves it can carry the new loads, the next question is how the pergola should actually be anchored.
Choose the mounting strategy that fits the deck
The attachment method matters more than the style of the pergola. A clean-looking build can still fail if the load never makes it into real structure. In practice, I narrow it down to three approaches, and only two of them deserve serious consideration.
| Mounting method | Best for | Main drawback | My take |
|---|---|---|---|
| Through-bolting into verified framing | Small to mid-size pergolas where you can access the framing below | Requires blocking, careful layout, and access under the deck | Good option if the frame is sound and the load path is clear |
| Posts that pass through the deck to independent footings | Larger, taller, or wind-exposed structures | More invasive and slower to build | The most reliable option for long-term stability |
| Fastening only to deck boards or railing posts | None for a permanent build | Movement, loosening, and failure risk | I would not use this for an overhead structure |
The rule is straightforward: load belongs in framing, not in surface decking. If the deck cannot give you a clear path into joists, beams, or separate footings, redesign the project. That may mean adding blocking, moving post locations, or switching to a freestanding support system. It is less glamorous than a quick install, but it is the difference between a structure that feels planted and one that rumbles in the first strong gust.
I also pay attention to uplift. On an exposed second-story deck, a pergola can act like a sail. That is why I prefer connectors and fasteners that are meant for structural outdoor use, not generic brackets from a mixed hardware bin. Once the anchoring method is settled, the next step is choosing the footprint and height so the structure fits the deck instead of overpowering it.
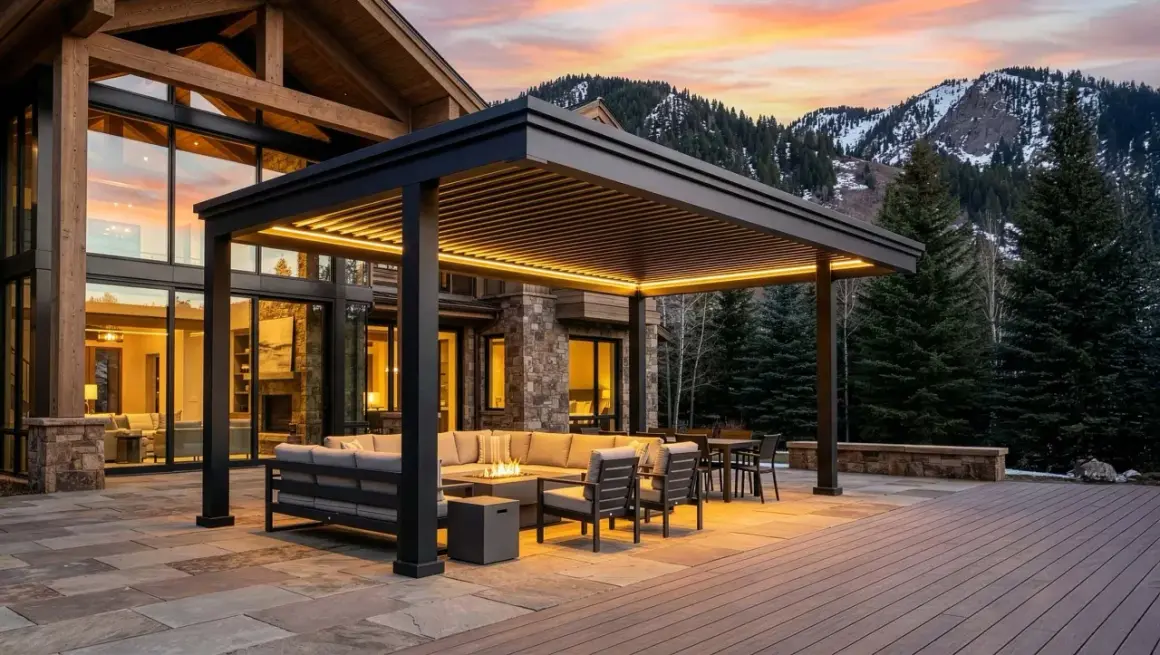
Size the footprint for shade, furniture, and clearance
A pergola should make the deck more useful, not just bigger on paper. I size it around how people will actually use the space: a reading corner, a dining table, a grill station, or a mix of seating and traffic flow. For most residential decks, the sweet spot is somewhere between 8x8 feet for a compact nook and 10x12 feet for a usable entertaining zone.
| Footprint | Works well for | How it feels |
|---|---|---|
| 8x8 feet | Two chairs, a small table, or a quiet seating corner | Compact and intimate |
| 10x10 feet | Bistro set, loveseat, or a pair of lounge chairs | Balanced for many average decks |
| 10x12 feet | Small dining setup or mixed seating | More functional for family use |
| 12x12 feet and larger | Entertaining, larger furniture, or layered shade | Only makes sense if the deck itself is generous |
Clearance matters just as much as footprint. I like to keep roughly 36 inches of easy walking space where people need to pass, and I avoid dropping the beams so low that the deck starts to feel compressed. In practice, a clear height of about 8 to 10 feet under the beams usually feels right for a residential deck pergola, though the exact height depends on the span, the look you want, and local structural requirements.
Orientation is the other overlooked detail. If the afternoon sun is the problem, I want the shade elements positioned to actually block that sun, not just decorate the frame. If you plan to grow vines, remember that plants add weight, catch wind, and need maintenance. A vine-covered structure is attractive, but it is not a zero-load design. With the size set, the build becomes a matter of choosing lumber and hardware that belong outdoors.
Use lumber and hardware that belong outdoors
For a permanent deck-mounted pergola, I usually lean toward 6x6 posts. They give better stiffness, more bearing area for connectors, and a more substantial look. Smaller 4x4 posts can work for compact projects, but they are easier to overbuild around and more likely to feel flimsy once the span gets wider or the site gets windy.
For the rest of the frame, the common small-project range is a mix of doubled beams and lighter rafters, often something in the 2x6 to 2x8 range for beams and 2x4 to 2x6 for rafters. I am intentionally vague there because the final size, spacing, and connector layout should match the span and the hardware you use. The important point is not the exact lumber size in isolation; it is whether the whole system works together.
| Material | Why I use it | Trade-off |
|---|---|---|
| Pressure-treated pine | Budget-friendly and widely available | More movement and maintenance than premium species |
| Cedar or redwood | Better appearance and natural weather resistance | Higher cost, still needs finish care |
| Aluminum or pre-engineered kit components | Cleaner install and lower maintenance | Less flexible if the deck footprint is unusual |
No matter which material I choose, I use exterior-rated connectors and corrosion-resistant fasteners. If the lumber is pressure-treated, the hardware has to be compatible with treated wood. In practical terms, that usually means hot-dip galvanized or stainless steel components in the exposed connection points. I also pre-drill near board ends, seal cut faces, and avoid trapping water where posts meet horizontal members. Outdoor structures fail faster when water is allowed to sit in the joints.
That brings me to the part where many DIY builds get rushed: the actual assembly order. A pergola is much easier to keep square if the structure goes together in the right sequence.
Build in the right order so the frame stays square
When I want a pergola to stay true, I work in a sequence that keeps the structure from fighting itself. The goal is to lock in the load path before the decorative parts go on. That means measuring carefully, checking diagonals, and resisting the urge to fully tighten every fastener too early.
- Mark the footprint. Confirm the location, check for door swings, stair access, and furniture clearance, then measure diagonals so the rectangle is square.
- Find the framing below. Locate joists and beams before drilling. If the post lands between structure members, add blocking or redesign the footprint.
- Install the bases or standoffs. Keep wood off the deck surface so end grain does not sit in water.
- Set the posts and brace them. Get them plumb, then clamp temporary braces so they cannot drift while the beams go on.
- Install the beams. Check level and square again before the hardware is fully tightened.
- Add rafters and any purlins or shade slats. Keep spacing even so the finished look feels deliberate.
- Finish the joints. Tighten everything, seal cut ends, and inspect the frame after the first wind or rain.
If the deck is elevated or built over a waterproofed area, I am even stricter. Penetrations through a membrane need a real sealing plan, not a hope-and-prayer dab of caulk. On those projects, the structural and waterproofing decisions are tied together. Once that sequence is clear, the remaining risk is usually avoidable mistakes, and those are what I want to call out next.
Avoid the mistakes that cause wobble and damage
Most pergola problems do not come from one dramatic failure. They come from a chain of shortcuts that looked harmless at the time. If I could only warn someone about a few, these would be the ones that save the most repairs.
- Fastening to deck boards only. Decking is a walking surface, not a structural anchor point.
- Ignoring wind uplift. A pergola can move more in a storm than it does under everyday use.
- Skipping blocking. Without solid blocking, concentrated loads can twist the deck frame.
- Using interior hardware outdoors. Corrosion ruins both strength and appearance.
- Making the pergola too large for the deck. Bigger is not better if the proportions and structure no longer match.
- Drilling through waterproofed upper decks without a sealing plan. One bad penetration can create a hidden leak that costs far more than the pergola.
- Leaving posts unbraced during assembly. Once a frame is out of plumb, the rest of the build becomes harder to correct.
I also see people underestimate how much shade elements change the behavior of the frame. A fabric cover, louvers, or dense climbing plants all increase wind load and maintenance. If the design is meant to stay open, keep it open. If you want real coverage, build for it from the start rather than adding it later and hoping the original structure can handle the change. That choice leads directly into the budget question, because the right solution is not always the cheapest box on the shelf.
Budget realistically and decide whether a kit is smarter
For a small to mid-size residential project in the U.S., I usually think in rough ranges instead of exact quotes. A straightforward DIY wood pergola can land around $800 to $2,500 in materials if the deck framing is already sound and the shape is simple. Cedar or redwood often pushes that closer to $1,500 to $4,500. Aluminum kits and cleaner hardware systems commonly sit around $2,500 to $8,000, and motorized or louvered systems can move into the $6,500 to $18,000+ range quickly once controls and installation are included.
| Project type | Typical budget range | Best fit |
|---|---|---|
| DIY pressure-treated wood | $800 to $2,500 | Simple footprint, modest shade, hands-on builder |
| Cedar or redwood build | $1,500 to $4,500 | Homeowners who want a warmer look and accept more maintenance |
| Pre-engineered aluminum kit | $2,500 to $8,000 | Faster build, cleaner finish, less ongoing upkeep |
| Motorized or louvered system | $6,500 to $18,000+ | Premium shade control and a more architectural result |
| Structural repair or reinforcement | $200 to $1,500+ | Older decks that need blocking, hardware upgrades, or inspection work |
A kit makes sense when the footprint is standard, the deck layout is clean, and you want fewer unknowns. It is especially practical for 8x8 or 10x10 builds because the hardware and cut list are more predictable. Custom work makes more sense when the deck is irregular, the site is windy, the deck sits higher off the ground, or you want integrated lighting, screens, or motorized shade. In my experience, the biggest money trap is not buying a kit or building from scratch. It is discovering halfway through that the structure needs more support than expected. That is why I always treat the framing check as part of the budget, not an optional pre-step.
The version I would actually build on a real deck
If I were doing this project on my own deck, I would keep the process boring in the best possible way. I would confirm the framing, choose an attachment method that moves load into real structure, size the pergola to match the deck instead of fighting it, and use hardware that is meant for outdoor structural work. Those choices do not make the project flashy, but they do make it last.
The simplest rule is the one I trust most: a pergola belongs to the structure, not to the surface. If the deck can carry it, the project becomes a solid outdoor room upgrade. If the deck cannot carry it cleanly, I redesign before I start cutting. That is the difference between a shade feature that feels permanent and one that becomes a repair job after the first storm.