Building an outdoor deck is mostly about making the right decisions in the right order. In this guide, I focus on the practical sequence that keeps the structure safe, square, and weather-resistant, from planning and permits to footings, framing, decking, rails, and stairs. If you want a deck that feels solid underfoot and holds up to real U.S. weather, the details matter more than the speed of the build.
The safest decks are planned before the first hole is dug
- Check permits and local rules first. Deck codes in the U.S. are IRC-based, but local amendments still control the final details.
- Decide early whether the deck is attached or freestanding. Ledger attachments demand more precision; freestanding decks avoid some house-framing risks.
- Use prescriptive framing basics as your default. A common starting point is 6x6 posts, corrosion-resistant connectors, and joist spacing around 16 inches on center.
- Protect the ledger area from water. Continuous flashing is one of the most important parts of the whole project.
- Build safety into the layout. Deck guards are commonly 36 inches high, stair guards 34 inches, and stair geometry needs to stay consistent.
Plan the deck around the house, the yard, and the code
I always start by asking what the deck needs to do. Is it a grill-and-dining platform, a small landing off the kitchen, or a larger outdoor room with a stair run into the yard? That answer shapes the size, the traffic flow, the post layout, and even the type of surface boards I choose. A deck that looks good on paper can still fail in use if the door height, step-down, or pathway to the yard feels awkward.
In the U.S., the permit conversation should happen before you buy lumber. Most building departments want a basic framing plan, footing layout, and information about decking and stair materials. Some departments also want existing framing exposed before an inspection, especially where the ledger attaches to the house. I treat that as normal, not bureaucratic noise. It is cheaper to adjust a plan than to rebuild a failed connection.
| Deck type | Best when | Main advantage | Main tradeoff |
|---|---|---|---|
| Attached deck | The house band joist is sound and the exterior wall can accept a ledger | Cleaner layout and usually less material | The ledger and flashing details have to be right |
| Freestanding deck | There is masonry veneer, a cantilever, a bay window, or any attachment concern | Removes the highest-risk house attachment point | Usually needs more posts and footings |
If the house attachment is questionable, I favor freestanding construction. It is not always the cheapest option, but it is often the cleaner long-term decision. Once the layout method is clear, the next step is picking materials that match the span, exposure, and maintenance level you actually want.
Pick the right lumber and decking before cutting anything
For framing, pressure-treated, No. 2 or better lumber is the practical baseline for most outdoor decks. That applies especially to members that see weather, moisture, or ground exposure. I also prefer corrosion-resistant hardware from the start. Stainless or hot-dip galvanized connectors cost more than generic fasteners, but they are cheap insurance when the deck is expected to survive decades of rain, freeze-thaw, and seasonal movement.
The walking surface deserves its own decision. The wrong board choice can force tighter joist spacing, more maintenance, or both. I think in terms of performance first and appearance second, because the surface you pick determines a lot of the hidden framing work underneath it.| Decking option | Best for | What to watch |
|---|---|---|
| Pressure-treated wood | Budget builds and straightforward DIY projects | Needs sealing and regular inspection |
| Cedar or redwood | A more natural look with moderate durability | Still needs care, and the cost is usually higher |
| Composite | Lower-maintenance outdoor living spaces | Follow the manufacturer’s joist-spacing and fastener rules |
| PVC | High-moisture areas and owners who want minimal upkeep | Can run hotter in sun and often costs more |
As a practical rule, I keep joists at about 16 inches on center unless the decking system says otherwise. If the boards will run diagonally, or if the product requires tighter support, 12 inches on center may be the smarter layout. That choice affects the whole frame, which is why the next step is getting the foundation geometry right.
Set footings and posts so the deck stays level over time
Frame the structure so the load path is clear
Footings are where the deck meets the ground, and this is one place where shortcuts show up fast. I want footings below the local frost line and on undisturbed soil whenever possible. If the soil is weak, the footing size or reinforcement has to change with it. There is no universal depth that works everywhere in the United States, which is why local inspection guidance matters here more than generic online advice.
Once the holes are right, I set the posts plumb and centered on the footings. For most prescriptive deck builds, 6x6 posts are the safest default, especially as the deck rises higher off grade. Smaller posts can be acceptable in some conditions, but they give you less forgiveness when the beam height increases or the deck starts carrying more live load.
I also treat cut ends and field cuts on treated lumber seriously. Any fresh cut, notch, or drilled hole in preservative-treated wood should be re-treated with an approved preservative. That detail sounds minor until the first trapped moisture cycles through the end grain and starts the decay process.
- Lay out footings from a square plan, not from the house siding. Siding is not a structural reference.
- Set posts after the concrete is properly cured and the anchors are aligned. A crooked post makes every later step harder.
- Use diagonal bracing where the layout and code allow it. It helps the frame resist lateral sway.
- Keep the beam path direct. The deck should clearly transfer load from joists to beam to post to footing.
When the support system is right, the framing goes faster and the deck feels stiffer immediately. With the foundation in place, the ledger and beam details become the real test of whether the build is clean or merely finished.
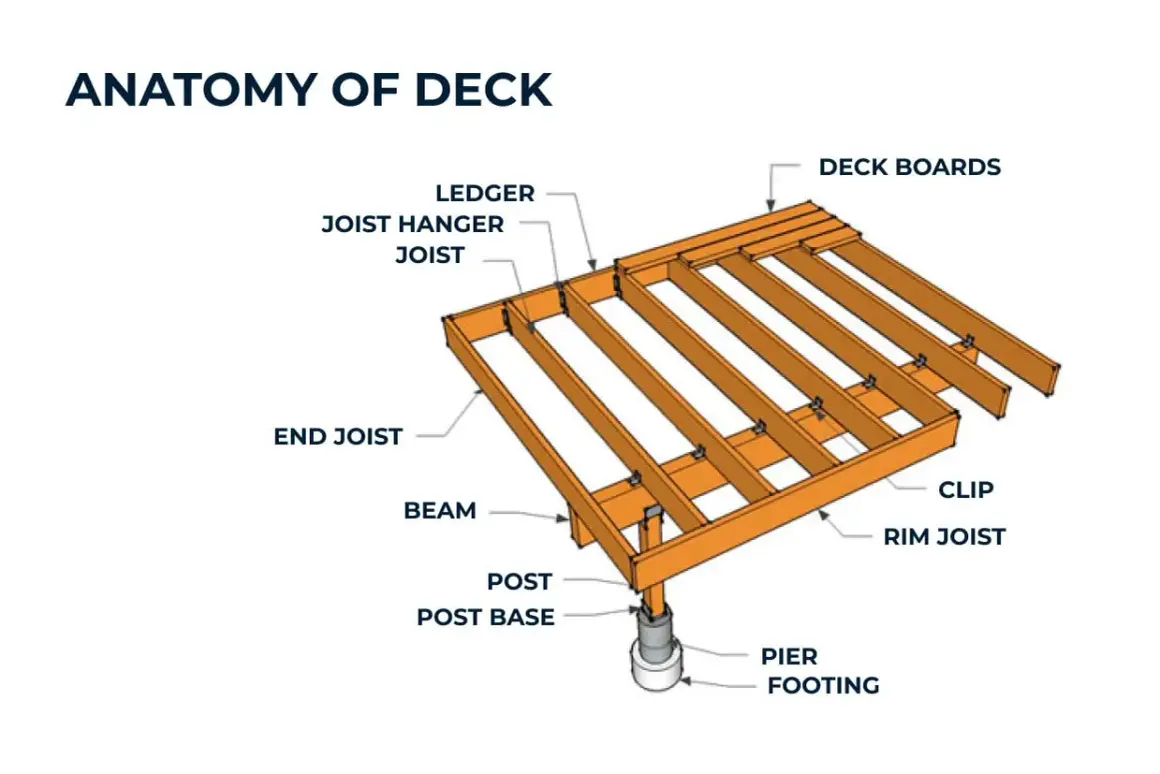
Get the ledger, beam, and joist details right
On attached decks, the ledger is the critical connection. I do not treat it like a trim board or a place to improvise. The ledger has to connect to suitable house framing, not to brick veneer, hollow masonry, bay windows, cantilevers, or other weak points that are not designed to take deck loads. If the wall assembly is questionable, a freestanding deck is often the better answer.
Ledger flashing is not optional. Water intrusion is one of the most common reasons deck assemblies fail early, and the ledger area is where that failure usually starts. I want continuous flashing that is compatible with the wall system and the decking materials, with siding removed as needed so the flashing can do its job instead of being pinched behind trim.
From there, I think in terms of fastener pattern, joist support, and connector quality. Joists that frame into the side of a beam or ledger should use approved hangers, and those hangers should be sized for the actual joist depth. Corrosion-resistant hardware matters here because concealed failures are the ones that surprise homeowners later.
- Use the proper ledger fastener schedule for the house wall type. Fasteners are not one-size-fits-all.
- Keep the ledger tight to the band joist without relying on caulk for structure. Caulk is a water-management aid, not a support system.
- Set joist spacing from the decking requirements, not from habit. The board choice can change the spacing.
- Use approved joist hangers instead of clip angles for primary support. The hanger is part of the load path.
My rule is simple: if the ledger area is vague, the whole deck is vague. Once that structure is locked in, the rest of the project becomes a matter of safe detailing at the walking surface, the edges, and the stairs.
Finish the walking surface, guards, and stairs without creating weak spots
The decking boards go on after the frame is checked for level, square, and spacing. I prefer to dry-fit a few boards first, because board width, gap, and fastener placement all affect the final look. Wood decking usually gets at least two fasteners per support, and composite boards should follow the manufacturer’s fastening pattern exactly. That is not the place to improvise.
For edge safety, the dimensions matter more than the style. Common residential guardrails are at least 36 inches high on deck surfaces, and stair guards are commonly 34 inches high measured from the tread line. Openings should not allow a 4-inch sphere to pass through. Those numbers are not decorative; they are there to keep the deck usable and safe for families, guests, and children.
| Stair and guard detail | Common U.S. requirement | Why it matters |
|---|---|---|
| Deck guard height | 36 inches minimum | Prevents falls from the main deck surface |
| Stair guard height | 34 inches minimum | Protects the stair run where people shift balance |
| Guard openings | 4-inch sphere should not pass through | Limits dangerous gaps |
| Stair stringers | 2x12 minimum, often 18 inches on center max | Keeps the stairs stiff and consistent |
| Riser and tread geometry | About 8 1/4 inches max riser, 9 inches min tread | Prevents awkward, trip-prone steps |
| Handrail height | 34 to 38 inches | Gives users a reliable grasp point |
I also pay attention to consistency on stairs. One odd riser can make the whole stair flight feel wrong, even when it technically passes inspection. The same is true for guard posts: they need to feel rigid, not like a separate railing bolted onto a deck. With the finish details in place, the last job is making sure the deck stays sound after the first season of weather.
The small checks that keep a deck solid after the first season
The day I like best is not the day the last board goes down. It is the day I walk the finished deck and check the parts that will age first: the ledger, the stair connections, the railing posts, and the places where water can sit. If those areas are clean, the deck usually settles into a long service life without drama.
After the first few heavy rains, I would inspect for any signs of movement, standing water, or staining near the house. That is the earliest warning system you have. If water pools near the ledger, if a post feels soft, or if a stair stringer shifts, the fix is much easier now than after a full season of freeze-thaw and sun exposure.
- Seal exposed cut ends and end grain. This is where moisture enters first.
- Keep drainage away from the house. Even a perfectly framed deck can fail if water is trapped against the wall.
- Recheck fasteners and connectors after the first winter. Movement tends to show up early.
- Plan maintenance by material. Wood needs periodic cleaning and resealing; composite needs cleaning and hardware checks.
If I were building this deck today, I would spend the most time on the ledger, the footings, and the stairs, because those are the details that determine whether the project feels professional five years later or merely looked good on installation day.