Building closet storage yourself is less about carpentry flair and more about making the closet work for the wardrobe you actually live with. A DIY closet organizer works best when every shelf, rod, and bin has a job, because clutter usually comes from bad layout rather than lack of space. In the sections below I cover the measurements that matter, the materials that hold up, a realistic build sequence, and the mistakes that turn a promising project into wasted room.
The essentials that keep the project from going sideways
- Start by sorting clothing into long hang, short hang, folded items, shoes, and accessories before you buy materials.
- Use about 24 inches of depth as the standard hanging baseline, and keep shelves around 12 to 16 inches deep.
- Plan a single rod around 60 to 66 inches high, or a double-rod setup around 40 inches and 80 inches.
- Choose materials for strength first and appearance second, especially if the shelves will carry heavy folded clothes or bins.
- Anchor the structure into studs and add center support when a rod or shelf span gets wide.
Start with the clothes, not the wood
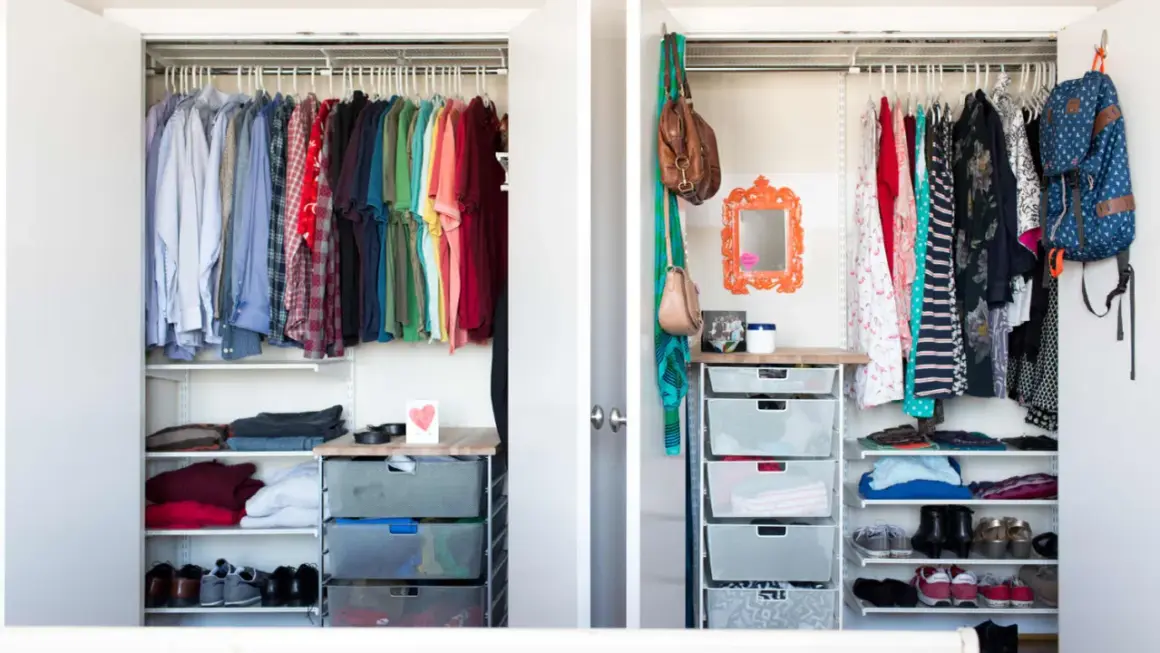
When I plan a closet, I start by counting what has to fit, not by sketching cabinets. That means separating long garments, short hanging pieces, folded clothing, shoes, and small accessories. It sounds basic, but it tells you whether the closet needs more rod space, more shelf space, or a mix of both.
The easiest way to do this is to measure your wardrobe in real terms. Long dresses and coats need uninterrupted hanging height. Shirts, blouses, and folded pants on hangers can live in a double-hang zone. Sweaters, denim, and T-shirts usually deserve shelves or drawers, because they stack better than they hang.
I also like to count linear hanging space, not just item count. Ten bulky jackets need more room than ten light shirts, and wide hangers change the math again. If you build around guesswork, you end up with a closet that looks organized for a week and then starts fighting the clothes it was supposed to contain. Once you know what has to be stored, the measurements become much easier to set.
Measure the closet around real-world dimensions
Closet dimensions matter more than most people expect. In a typical U.S. reach-in closet, 24 inches of depth is the safe starting point for hanging clothes, because it gives standard hangers enough room without brushing the back wall. For shelves, 12 to 16 inches is the useful range: 12 inches works well for folded clothing, while 14 to 16 inches is better for bins, linens, and bulkier items.
| Dimension | Good starting point | Why it matters |
|---|---|---|
| Closet depth | 24 inches | Fits most standard adult hangers without crowding the back wall |
| Rod-to-back-wall clearance | About 12 inches | Leaves room for hangers to move freely |
| Single hanging rod height | 60 to 66 inches from the floor | Works for long garments and most full-length hanging storage |
| Double-rod setup | Lower rod around 40 inches, upper rod around 80 inches | Doubles hanging capacity for shirts, blouses, and folded pants on hangers |
| Shelf depth | 12 to 16 inches | Keeps folded stacks accessible without wasting depth |
| Shelf spacing | At least 12 inches | Prevents stacks from collapsing or dragging on the shelf above |
| Wide rod span | Add support beyond 48 inches | Reduces sag and keeps the rod from flexing under load |
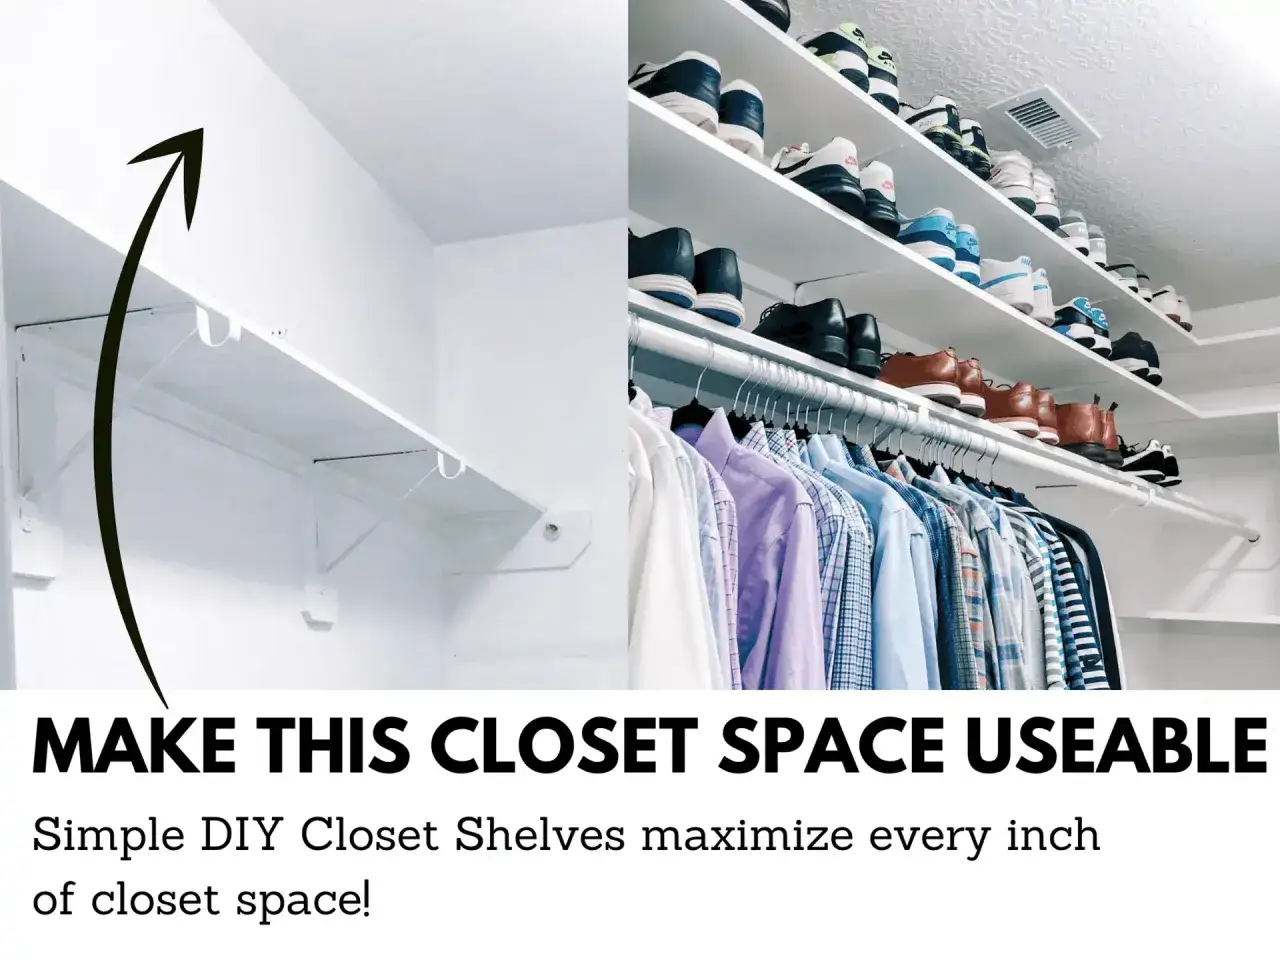
| Top shelf height | Around 84 to 87 inches if the ceiling allows | Uses dead space above the hanging zone for seasonal storage |
If your walls are not perfectly square, leave a little scribe room at the sides instead of forcing a millimeter-perfect fit. That small allowance saves a lot of frustration during installation. Once the measurements are locked, the next decision is how ambitious the build should be.
Choose the build level that matches your budget and patience
I treat closet projects as three different levels, because the right answer is not always a full built-in. A simple rod-and-shelf setup is fast and cheap. A modular kit gives you a cleaner look with less layout work. A true built-in takes more time but can fit awkward spaces and feel like part of the house.
| Build level | Typical material cost | Time | Best for | Main tradeoff |
|---|---|---|---|---|
| Rod and shelf | $50 to $150 | A few hours | Basic reach-in closets and rental-friendly upgrades | Least flexible and least refined |
| Modular kit | $150 to $700 | Half a day to one day | Most bedroom closets that need a cleaner, more finished result | Fixed module sizes limit some layouts |
| Built-in plywood or melamine system | $300 to $1,500+ | One to two weekends | Custom spaces, uneven walls, and homeowners who want a built-in look | Requires more cutting accuracy and better installation discipline |
My rule is simple: if the closet is straight and the budget is tight, a kit is usually smarter. If the room has odd angles, a sloped ceiling, or a mix of hanging, shelf, and drawer needs, a custom build earns its keep. After that, the material choice decides whether the system feels flimsy or built-in.
Materials and hardware that prevent sag and wobble
The materials you choose matter more than decorative trim or fancy handles. For shelves, I usually prefer 3/4-inch plywood or melamine because both hold up better than thin board and stay flatter over time. MDF can look excellent once painted, but I only use it in dry spaces because moisture is not its friend. Wire systems are light and affordable, but they are less polished and can be less forgiving with small items.
| Material | Strengths | Weaknesses | My take |
|---|---|---|---|
| Plywood | Strong, stable, easy to paint or veneer | Costs more than basic sheet goods | My default choice for shelves that need to stay flat under weight |
| Melamine | Clean finish, budget-friendly, easy to wipe down | Edges chip if you cut it carelessly | Great for crisp white closet systems if you can make clean cuts |
| MDF | Smooth surface for paint, inexpensive | Heavy and vulnerable to moisture | Fine in dry rooms, but I avoid it near basements or leak-prone walls |
| Wire or steel | Light, ventilated, often cheaper | Less refined and can feel less sturdy for clothing | Good for fast upgrades, not my first pick for a premium look |
| Solid wood | Strong and attractive | More expensive and more reactive to humidity | Best when appearance matters and the budget allows it |
Hardware is where many projects quietly fail. I use sturdy shelf supports, proper rod sockets, and real fasteners into studs whenever possible. If a rod spans more than 48 inches, I add center support instead of hoping the rod will behave. For shelves, I like a front stiffener or edge banding when the span gets long, because that small detail helps stop sag before it starts.
If you are building a painted closet, seal cut edges and prime everything before final assembly. That extra step takes time, but it pays back in durability and a cleaner finish. With the parts chosen, the build itself is mostly a matter of sequence.
The build sequence I follow from empty closet to loaded shelves
I prefer a clean order because closets get messy fast once the tools come out. First, empty the space completely and remove the old rod and shelf. Patch holes, check for loose drywall, and paint the interior if it needs freshening up. A clean box is easier to measure and far easier to install into.
- Mark the finished heights on the walls before you cut anything.
- Find studs and note outlets, baseboards, vents, or door trim that affect the layout.
- Cut shelves and vertical panels to size, then seal or edge-band the exposed cuts.
- Install cleats, standards, or side panels with a level so the system does not lean.
- Mount the shelves first, then the hanging rods, then drawers or baskets.
- Load-test the system with a few heavy items before you fill it completely.
For most closet builds, I trust studs more than drywall anchors, especially under a loaded hanging section. If I cannot land a fastener where I want it, I add blocking or a backer rather than pretending the wall will carry the weight anyway. I also predrill melamine and similar sheet goods so the edges do not blow out during assembly. That little bit of care makes the whole project feel like a cabinet installation instead of a weekend compromise.
Once the structure is up, the real test is not whether it looks good empty. It is whether you can use it without thinking about it every morning. That is where the common mistakes become obvious.
Mistakes that quietly ruin closet storage
Most bad closet systems fail for boring reasons. The layout looked reasonable on paper, but the clothes tell a different story once everything gets loaded. The easiest mistakes to avoid are the ones that show up before installation if you look for them.
- Making shelves too deep. A shelf that is too deep turns folded clothes into a back-row problem, and the front row starts hiding everything behind it.
- Ignoring door swing. A beautiful drawer bank is useless if a bifold or hinged door hits it every time you open the closet.
- Placing rods too high. People often overestimate how much lift they want and then discover they cannot reach the top shirts comfortably.
- Skipping support on wide spans. Long shelves and rods sag slowly, which makes the system look tired even if it was built only a few months ago.
- Relying on drywall alone. Drywall is not structural support. If the load matters, tie into studs or add backing.
- Forgetting light and airflow. A dark, stuffy closet is harder to use and easier to ignore, which is how clutter comes back.
I also see people design for their ideal wardrobe instead of their actual one. They build too much hanging space when they really need drawers, or too many shelves when they own more dresses and jackets than sweaters. When you avoid those errors, the next question is whether you should build at all or let a kit do the heavy lifting.
When a kit is the smarter move
I am not dogmatic about custom builds. If the closet is a plain rectangle and the goal is a faster upgrade, a kit often wins on time and hassle. Modular systems are especially useful when you want shelves, rods, and maybe one drawer tower without spending a weekend cutting parts to exact width.
A kit is usually the better choice when:
- The closet is straight and standard-sized.
- You want a finished look without a lot of carpentry.
- You may move in a few years and do not want a permanent built-in.
- The budget is modest and the priority is speed.
A fully custom build is better when the room has odd corners, sloped ceilings, or a layout that standard modules cannot solve cleanly. It also makes sense when you want the closet to look like built-in cabinetry instead of an organizer that happens to fit the room. Once those tradeoffs are clear, the last step is deciding what a good first version should actually include.
The version I would build first in a typical bedroom closet
If I were starting from scratch in a typical U.S. bedroom closet, I would keep the first version simple and strong. I would use one long-hang zone, one double-hang zone, a full-width top shelf, and a narrow shelf stack or drawer unit for folded items. That layout handles most wardrobes without turning the project into a cabinetry exercise.
- One section for long items like dresses, coats, and longer jackets.
- One double-hang section for shirts, blouses, and shorter pieces.
- A top shelf for seasonal bins, luggage, or spare bedding.
- One shelf stack for sweaters, denim, or shoes, depending on the wardrobe mix.
- Optional drawers only if the closet truly needs concealed storage.
If I had to spend extra money anywhere, I would spend it on solid supports, good rods, and lighting before I spent it on decorative trim. Those three upgrades change how the closet works every day. Build the structure around the clothes you own now, leave a little flexibility for the future, and the space will keep paying you back long after the sawdust is gone.