DIY floating shelves are one of the cleanest ways to add storage without adding visual bulk. The trick is that the “floating” look only works when the hidden support is strong enough for the wall, the load, and the shelf depth. In this guide I walk through the hardware choices, the build process, the mounting sequence, and the mistakes that usually separate a sharp shelf from one that sags a month later.
Key points to know before you cut the first board
- The shelf should be designed around the bracket or cleat, not the other way around.
- Mount into studs whenever possible; drywall-only installs are for very light loads.
- A 1.5- to 2.5-inch shelf thickness usually hides hardware well without looking bulky.
- Depth changes stress fast: the deeper the shelf, the stronger the support needs to be.
- For most homes, one shelf takes an afternoon plus drying time for finish.
Choose the support system before you buy wood
I start with the support because that choice controls everything else: shelf thickness, depth, weight limit, and even the final look. If the hardware is wrong, no amount of sanding or stain will make the shelf reliable. The goal is simple enough: the wall should carry the load, while the shelf skin hides the structure.
| Support method | Best for | Strength | Tradeoff | My take |
|---|---|---|---|---|
| Hidden rod bracket | Most living rooms, entryways, and light kitchen use | Strong when anchored into studs | Needs accurate drilling and a snug fit | This is the best all-around choice for a clean floating look. |
| Heavy-duty bracket with wall blocking | Books, dishes, or deeper shelves | Very strong | More wall work, but worth it for load-bearing shelves | If I know the shelf will carry real weight, I like this approach most. |
| French cleat inside a box shelf | Long shelves or wide spans | Strong and forgiving | Not as slim as rod-only systems | Great when you want easier leveling and a little extra support margin. |
| Drywall anchors only | Very light decor | Limited | Least reliable for real storage | I avoid this as a primary solution. It looks easy, but it is not the right answer for weight. |
In U.S. homes, studs are commonly 16 inches on center, but I never assume the spacing will cooperate with the shelf layout. If the shelf has to land between studs, I prefer to move the shelf, add blocking, or change the design rather than asking anchors to do structural work they were not meant to do. That decision usually saves time later, and it leads naturally to the part people underestimate most: building the shelf body to fit the hardware.
Build the shelf body so the hardware disappears
For the shell itself, I usually choose between a hollow box and a laminated slab. A hollow box is lighter and easier to hide hardware inside, which makes it the practical option for most projects. A laminated slab can look great too, but it adds weight fast and gives you less room for error when you drill for the rods.
For a typical shelf, I like these materials:
- 3/4-inch plywood for the top, bottom, and back of a hollow box.
- 1x2 or 1x3 hardwood for the front edge if I want a clean face.
- Paint-grade plywood or hardwood veneer plywood if the shelf will be painted.
- Oak, maple, or poplar if the shelf will be stained and left visible.
- Wood glue, brad nails, clamps, and finish screws for assembly.
My build sequence is straightforward. First I cut the top, bottom, sides, and back to size. Then I mark the rod locations on the back piece and drill the holes squarely so the shelf slides on without forcing it. After that I dry-fit the box around the hardware, glue and clamp the joints, and add a face strip to hide the plywood edges. I always sand and finish all sides before installation, because once the shelf is on the wall, the inside corners are annoying to reach and easy to miss.
If I want the shelf to look thicker and more custom, I make the front edge 1.5 to 2.5 inches deep overall. That range hides most hidden brackets well and still looks proportional in a normal room. The next step is where the shelf becomes real storage instead of a wood box: attaching it securely to the wall.
Mount it to studs and level it carefully
This is the part that decides whether the shelf feels built-in or temporary. I always locate the studs first, then mark the final shelf height with a level line instead of relying on the eye. A shelf that is perfectly built but slightly off-level still looks wrong, and a shelf that is level but under-anchored is worse.
- Find the studs with a stud finder, then confirm them with a small pilot hole if needed.
- Mark the centerline of the shelf and the exact height you want on the wall.
- Hold the bracket or cleat in place and check the level before drilling.
- Drill pilot holes into the studs and fasten the hardware with appropriately sized screws.
- If the wall is uneven, use shims so the bracket sits flat instead of twisting the shelf.
- Slide the shelf onto the support, check the fit, and lock it in place with set screws if the hardware provides them.
I also check depth before final assembly. A bracket that is too short for the shelf shell creates a weak front edge, and a bracket that is too deep forces the shelf to sit awkwardly on the wall. If the stud locations do not match the shelf layout, I do not improvise with hope; I either change the width, add blocking between studs, or choose a different mounting point. That discipline matters even more once you decide how the shelf will be used in the room.
Size the shelf for the room and the load
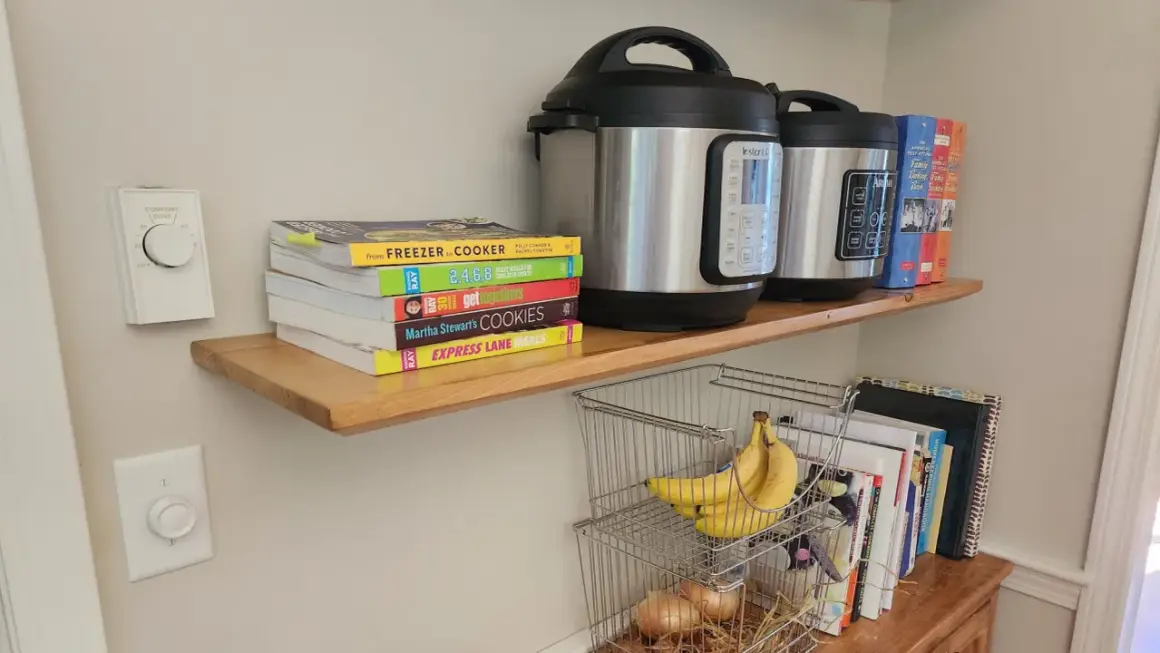
Floating shelves are not one-size-fits-all. A shelf that works beautifully for keys and candles can fail quickly if someone loads it with hardback books or stacked dishes. When I size one, I think in terms of depth, spacing, and weight, not just style.
| Room | Good shelf depth | Typical use | Practical note |
|---|---|---|---|
| Bathroom | 4 to 6 inches | Toiletries, small décor, hand towels | Use a sealed finish so humidity does not beat up the wood. |
| Entryway | 6 to 8 inches | Keys, mail, small plants, framed photos | Keep it shallow so it feels light and does not crowd the walkway. |
| Living room | 6 to 10 inches | Frames, candles, medium décor, small speakers | Two-stud mounting is the baseline I want here. |
| Kitchen | 8 to 12 inches | Plates, mugs, bowls, jars | Use stronger hardware and keep heavier items close to the wall. |
| Office or library | 10 to 12 inches | Books, binders, storage bins | This is where blocking or extra studs starts to pay off fast. |
When stacking shelves, 10 to 18 inches of vertical spacing works well in most spaces, and 18 to 24 inches above a counter is a sensible starting point in kitchens. I would rather make a shelf slightly smaller and more stable than chase a dramatic span that turns into a maintenance problem. Once those proportions make sense, the next job is avoiding the small mistakes that cause the big failures.
Avoid the mistakes that cause sagging and pull-out
Most bad installs fail for boring reasons. They are not dramatic design failures; they are tiny technical misses that compound over time. The good news is that nearly all of them are preventable.
- Relying on drywall anchors as the main support - use them only where the hardware is designed for it, and never as the entire structure for a load-bearing shelf.
- Ignoring wall flatness - if the bracket rocks even slightly, shim it before tightening.
- Making the shelf too deep for the bracket - deeper shelves create more leverage, which means more stress at the wall.
- Skipping test fits - a dry fit catches rod alignment problems before glue or finish locks you in.
- Using soft wood where the front edge needs strength - the shelf face should resist dents and flex, especially in kitchens.
- Loading it too quickly - let finishes cure and then add weight gradually, not all at once.
One more thing I watch closely is hardware quality. Cheap rods and thin backplates can work for a decorative shelf, but they become the weak link once books, ceramics, or glassware enter the picture. If the shelf is supposed to hold real storage, the hidden hardware should be treated like the structural part of the project, because that is exactly what it is. From there, the finish and final details are what make the shelf feel intentional instead of improvised.
The details I would not skip on a real project
If I were building one today, I would keep the process simple and disciplined: choose the support first, build the shelf around it, mount into solid framing, and finish every surface before hanging. I would also resist the urge to oversize the shelf just to make it look more dramatic. A clean, well-proportioned shelf almost always looks more expensive than a bulky one.
- Pre-finish the shelf before installation so the inside corners are sealed and the color stays consistent.
- Use a level line, not the edge of the wall, because walls are rarely truly straight.
- Leave a little tolerance for the hardware so the shelf slides on snugly without scraping the finish.
- Test the shelf with light load first, then increase weight over a few days.
The best floating shelves do two jobs at once: they store useful things and they disappear into the room. When I build them that way, the structure stays honest, the look stays light, and the shelf keeps doing its job long after the finish has cured.