
The quick answer for most U.S. walls
- 16 inches on center is the standard assumption for many wood-framed walls.
- 24 inches on center appears in some one-story, advanced-framing, or engineered wall assemblies.
- On-center means center to center, not the open gap between studs.
- A nominal 2x4 is actually 1.5 inches thick, so the clear space between studs is smaller than the spacing number suggests.
- For shelves, cabinets, and wall storage, I prefer to hit multiple studs or add blocking instead of trusting drywall alone.
What the standard spacing looks like in real framing
When I say a wall is framed at 16 inches on center, I mean the centerline of one stud sits 16 inches from the centerline of the next. The American Wood Council notes that stud spacing is normally 16 inches in exterior walls, with 24-inch spacing allowed in some one-story buildings when the wall assembly is designed for it. That is the baseline most homeowners should assume unless they have proof the wall was built differently.
| Stud layout | Center-to-center spacing | Approximate clear space between 2x studs | Typical use | Why it matters for storage |
|---|---|---|---|---|
| 16 inches on center | 16 inches | 14.5 inches | Most interior walls and many exterior walls | More predictable fastening points for shelves, cabinets, and rails |
| 24 inches on center | 24 inches | 22.5 inches | Some advanced-framing walls, one-story assemblies, garages, and certain energy-focused builds | Fewer studs to catch, so planning and blocking matter more |
The gap between studs is the part people often misread. A 16-inch layout does not give you a 16-inch open bay, because the stud itself takes up 1.5 inches of that span. Once you understand that, the wall starts making sense fast, and the next step is learning how to verify the pattern without guessing.
How to measure stud spacing without guessing
I usually start with one confirmed stud and work outward from there. Once you trust the first location, the rest of the wall becomes much easier to map. The key is to measure from center to center, not from edge to edge, and to confirm the pattern before you drill large holes or fasten anything heavy.
- Find one stud with a stud finder, magnet, or a small test hole.
- Mark both edges of the stud, then mark the center line between them.
- Measure 16 inches or 24 inches from that center line, depending on the wall layout you expect.
- Confirm the next stud with a second check instead of trusting the tape alone.
- Repeat the pattern across the wall so you know where the reliable fastening points are.
Outlets and switches can help because electrical boxes are often attached to a stud, but I still treat them as clues, not proof. Near corners, doors, windows, and plumbing walls, the rhythm can shift just enough to ruin a mount if you assume every mark will land cleanly. That is where the reason for 24-inch layouts becomes more important.
Why some walls use 24 inches on center
Twenty-four-inch spacing is not a shortcut or a mistake. In advanced framing, it can reduce lumber use and leave more room for insulation, which helps cut thermal bridging through the wall. APA says 2x6 framing with 24-inch on-center spacing is recognized in the IRC, but I still tell people to check local requirements before treating that spacing as universal.
The trade-off is straightforward:
- You gain more insulation space and use fewer studs.
- You lose some nailing surface and have to plan more carefully for finishes and storage.
- You may need added blocking behind drywall for cabinets, rails, or accessories that need broader support.
For carpentry work, that trade-off is acceptable when the wall is designed for it. For storage, it means I plan the mount first and the fasteners second. That becomes especially important when the load is not a picture frame but a shelf full of dishes or a cabinet packed with tools.
What the spacing means for shelves, cabinets, and storage
Stud spacing changes the way I approach wall storage. A light item can sometimes get by with a drywall anchor, but shelves, closet systems, wall cabinets, and garage storage usually deserve direct attachment into wood. The wider the spacing, the more I think about distributing the load across several attachment points instead of depending on a single stud.
- For floating shelves: I try to land the bracket on at least two studs whenever the design allows it.
- For cabinets: I prefer a ledger, mounting rail, or a continuous backer so the weight is spread out.
- For closet systems: I check the stud map first, then place rails and uprights so they do not fight the framing.
- For garage storage: I plan around the heaviest expected load, not the lightest one.
- For between-stud accessories: I only trust anchors when the manufacturer rating fits the real load and wall type.
If I expect a wall to carry repeated weight, I would rather add blocking during the project than patch failed drywall later. That simple choice usually makes the difference between a clean install and one that loosens after a few months, and the places where spacing breaks down are the next thing to watch.
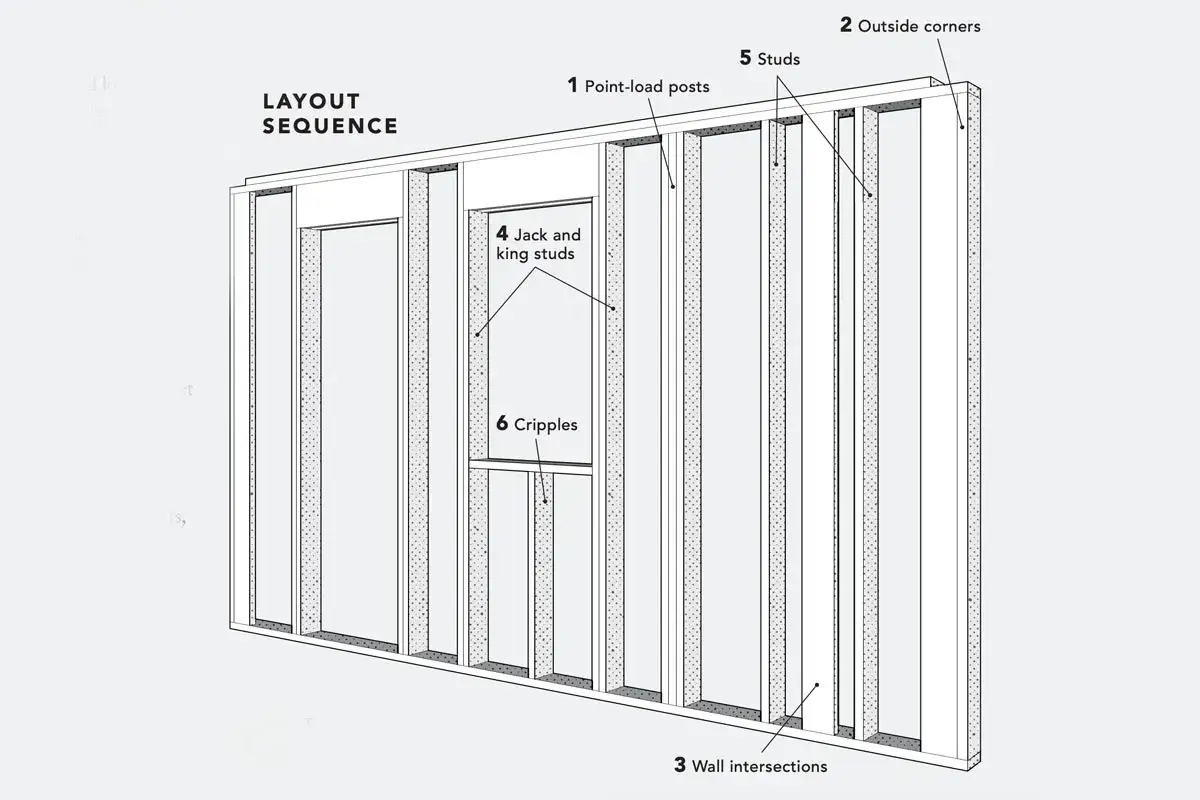
Why the pattern breaks around corners, openings, and older remodels
Stud spacing looks orderly on a plan, but real walls are full of exceptions. Corners often contain extra framing for rigidity and for attaching drywall and trim. Door and window openings use king studs, jack studs, and cripple studs, which means the normal rhythm stops and starts around the opening. Interior partitions, plumbing walls, and fire-blocked sections can also interrupt the pattern in ways that are not obvious from the surface.
Older homes are a category of their own. I have seen walls that drift from the expected layout because of past remodels, repairs, or built-in features hidden behind the finish. In those situations, I do not trust a single measurement from one end of the wall. I confirm several points, especially if the project involves weight-bearing storage or a long run of shelving.
That is why a wall can look standard and still surprise you. Once you know where the pattern tends to break, you can work more safely and avoid drilling blind into framing that is not where you expected it to be.
The checks I make before I hang anything heavy
Before I mount shelves, cabinets, or any storage that will carry real weight, I run through a short checklist. It is faster than repairing a failed install, and it catches most of the mistakes people make when they assume every wall is laid out the same way.
- I confirm whether the wall is wood-framed, metal-framed, or something less predictable.
- I locate at least one stud and map the rest from that confirmed point.
- I check for outlets, switches, plumbing walls, and other spots where drilling needs extra caution.
- I decide whether the load needs one stud, two studs, or a backer board across several studs.
- I use blocking or a ledger when the storage system will stay in place long term.
For me, that is the real answer behind stud spacing: it is not just a number on a tape measure, it is the structure that decides how safely a wall can hold weight. If I am planning storage, I treat the framing as the foundation of the project and build the fastening plan around it, not the other way around.