Learning how to build a bookshelf is mostly about getting the structure right before you think about stain or paint. A good bookcase needs the right depth, enough support under each shelf, and a square case so the edges, back, and trim all line up cleanly. I’m going to walk through the decisions that matter most for a durable DIY build: style, dimensions, assembly, reinforcement, finish, and safe anchoring.
The build choices that matter most before you start cutting
- 3/4-inch plywood is the safest default for the main carcass of a home bookcase.
- A general-purpose shelf depth of 10 to 12 inches works well for most books in U.S. homes.
- For most DIY builds, I keep unsupported shelf spans around 30 to 36 inches unless I add extra support.
- A 1/4-inch back panel does more than hide the wall; it helps lock the case square.
- Tall freestanding units should be anchored to wall studs or properly rated anchors.
Choose the version of the bookshelf that suits the room
Before I cut a single board, I decide what kind of storage the room actually needs. A bookshelf that will hold heavy hardcovers in a family room should be built differently from a slim display unit in a hallway. The more honestly you define the job, the less likely you are to overbuild one part and underbuild another.
| Style | Best for | What I like about it | Tradeoff |
|---|---|---|---|
| Freestanding bookcase | Most living rooms, offices, and bedrooms | Easy to build, easy to move, and strong enough for real book weight | Needs anti-tip anchoring if it is tall |
| Wall-mounted shelving unit | Smaller rooms or lighter loads | Opens floor space and looks clean | Depends on stud layout and hardware quality |
| Built-in look case | Rooms where trim and custom fit matter | Makes the space feel intentional and finished | More layout work and more chances for fit problems |
If your main goal is storage rather than display, I usually steer toward a freestanding case with a solid back and a straightforward rectangular shape. It is the easiest version to make strong without specialized tools. Once the style is fixed, the next decision is size, because that is where most DIY mistakes start.
Use dimensions that fit books, not just the wall
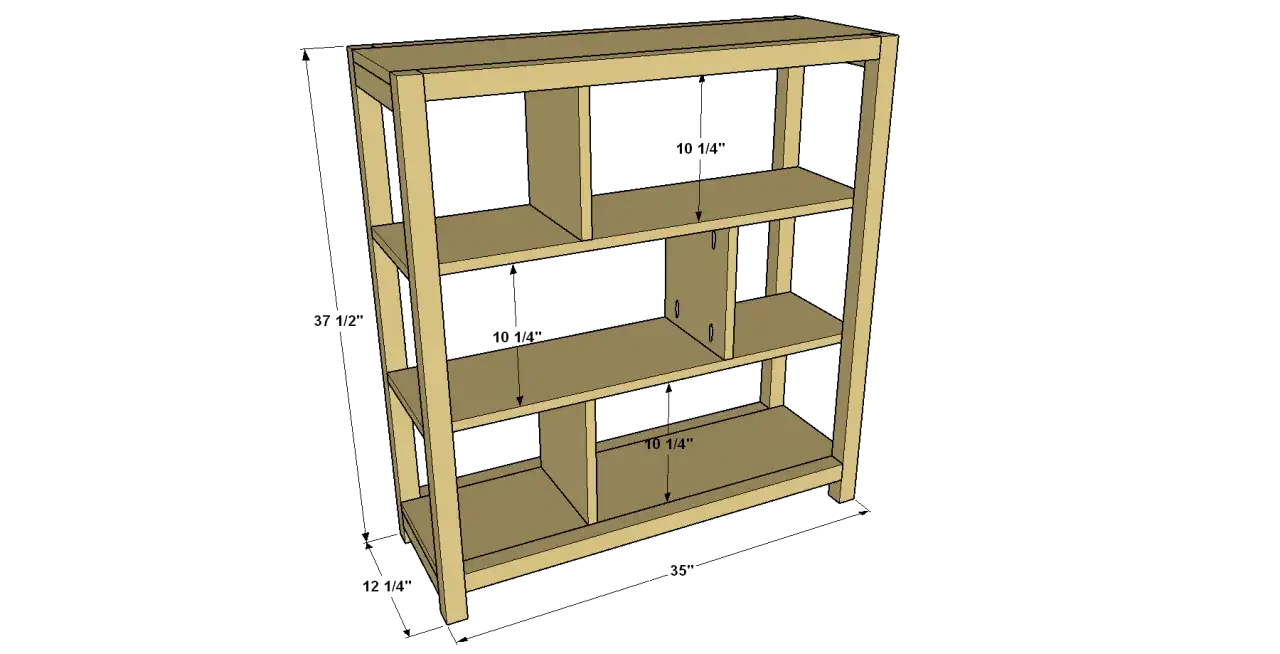
I start with the books, not with the wall opening. That sounds basic, but it keeps the case from becoming a shallow display shelf or a deep catchall for clutter. For most home bookcases, 10 to 12 inches of usable depth is the sweet spot, and 8 to 12 inches of vertical space per shelf handles the majority of hardcovers and paperbacks without wasting room.
| Dimension | Practical target | Why it matters |
|---|---|---|
| Shelf depth | 10 to 12 inches | Deep enough for most books, not so deep that items disappear in the back |
| Shelf spacing | 8 to 12 inches | Fits standard books while leaving enough room to pull them out |
| Unsupported span for 3/4-inch stock | 30 to 36 inches | Longer spans need a center divider, thicker material, or a stiffened front edge |
| Back panel thickness | 1/4 inch plywood | Light, stable, and very effective at keeping the case square |
| Front edge reinforcement | Hardwood strip or face frame | Adds stiffness and improves the look of plywood edges |
For a standard DIY project, I like a case that lands somewhere around 30 to 36 inches wide, 60 to 72 inches tall, and 12 inches deep. That keeps the build manageable and still gives you a useful amount of storage. If you want a wider shelf than that, plan for reinforcement instead of hoping the material will magically hold itself straight.
A fully loaded 3-foot shelf can end up carrying a surprisingly heavy stack of books, so sag resistance is a structural issue, not a cosmetic one. That is why I avoid treating shelf width as a pure design choice. With the size settled, the real work becomes cutting accurately and assembling the box square.
Cut the parts and assemble a case that stays square
This is the point where a bookshelf becomes either solid furniture or a frustrating little wobble box. I keep the workflow simple: cut carefully, dry-fit everything, then lock the case together only after the diagonals are right. If you are using plywood, I also keep the best face visible on the outside panels and shelves, because it is easier to work cleanly now than to try to hide flaws later.
- Break down the sheet goods into manageable panels first, then trim to final size.
- Label every piece before assembly so the top, bottom, sides, and shelves do not get mixed up.
- Cut any rabbets, dados, or shelf-pin rows before the case goes together.
- Dry-fit the carcass on a flat surface and check that the front edges are flush.
- Use glue plus pocket screws, confirm screws are appropriate for 3/4-inch stock, and clamp the box before driving fasteners home.
- Measure the diagonals from corner to corner; when both diagonals match within about 1/16 inch, the case is square enough to close up.
- Attach the back panel once the frame is square, because that back locks the whole structure together.
If I am building a plain, strong home bookcase, pocket-hole joinery is often the easiest route. Dados are stronger and cleaner, but they take more setup and better tool control. Either way, the case has to be square before the glue cures, because no finish later on will hide a twisted carcass.
After the box is true, the next concern is how the shelves behave under load, which is where most DIY bookcases either feel solid or start to disappoint.
Reinforce the shelves before you add finish
Books are dense, and shelves fail slowly. They usually do not snap; they sag. That is why I pay close attention to the front edge of each shelf and the span it has to cover. A hardwood nosing or face frame makes a bigger difference than many beginners expect because it stiffens the shelf and hides the plywood edge at the same time.
| Reinforcement method | What it fixes | When I use it |
|---|---|---|
| Hardwood front edge | Sagging and edge wear | On most plywood shelves, especially anything over 30 inches wide |
| Fixed center shelf or vertical divider | Long unsupported spans | When the case is wider than 36 inches or the load will be heavy |
| Thicker material or laminated shelf | Overall stiffness | When I want a premium look or the shelf must carry a lot of weight |
| Captured back panel | Racking, which is side-to-side twisting | Almost always, because it keeps the case square over time |
I also like to leave at least one shelf fixed in place, even if the rest are adjustable. A completely open interior looks flexible, but a fixed shelf gives the unit a stronger spine. If you want the case to hold heavier art books, encyclopedias, or old hardcovers, I would rather shorten the span than trust thin material to carry everything alone.
This is one of the few places where restraint matters more than cleverness. A simpler shelf layout with a good stiffener usually lasts longer than a fancier layout that relies on weak spans. Once the structure is stable, finish and anchoring turn the project from a shop piece into furniture.
Sand, finish, and anchor the unit safely
A clean finish starts with sanding, not with the topcoat. I usually sand through 120, 180, and 220 grit, breaking every sharp edge lightly so the bookcase feels finished in the hand instead of raw at the corners. If the piece will be painted, I seal the edges first; if it will be stained, I pay extra attention to plywood edges and pine, because both can telegraph imperfections fast.
- Fill screw holes and visible fasteners before the final sanding pass.
- Use a primer or sanding sealer on paint-grade projects.
- On pine, use a pre-stain conditioner if you want to reduce blotching.
- Apply two thin coats instead of one heavy coat, which dries more evenly and looks cleaner.
- Let the finish cure before loading the shelves, especially if you are using film-forming topcoats.
For safety, I always think about anchoring as part of the build, not an afterthought. In many U.S. homes, studs are commonly laid out 16 inches on center, but I still verify the exact wall before drilling. A tall freestanding bookcase should be fastened to wall studs whenever possible, and if studs are not available where you need them, use anchors that are rated for the real load, not just the empty cabinet. Drywall alone is not a structural support system for a loaded case.
With finish and anchoring handled, there are still a few small choices that make the project feel more custom and much easier to live with.
The small upgrades that make the project feel custom
These are not dramatic changes, but they affect daily use more than people expect. I would rather add one of these details than spend the same time on decorative trim that does nothing for the shelf’s function.
- Use adjustable shelf pins if you own books of mixed heights, because that gives the unit more flexibility later.
- Cut a toe-kick or raised base if the bookcase will sit against baseboards and you want it to hug the wall more cleanly.
- Use iron-on veneer or hardwood edging on exposed plywood, because that edge treatment changes the whole look of the piece.
- Put heavier books lower and lighter display items higher, which lowers the center of gravity and keeps the case stable.
- Shim the base before anchoring if the floor is uneven, since a slightly twisted base makes the doors, shelves, and trim feel wrong afterward.
In practice, the best bookcases are usually not the most elaborate ones. They are the ones that are sized honestly, kept square during assembly, reinforced where the load actually sits, and anchored before the first row of books goes in. If I were building one for an American home today, I would start with 3/4-inch plywood, keep the shelf depth around 12 inches, respect the 30 to 36 inch span rule, and treat the back panel and wall anchor as part of the structure rather than optional extras.