When water shows up around the toilet base, I treat it as a leak until proven otherwise. The fix is often straightforward, but the right repair depends on whether the seal, the flange, the bolts, or the floor has failed. This guide walks through the checks I would make first, the repair sequence I trust, and the warning signs that mean the problem is bigger than a simple reset.
The quickest fix starts with finding the real source before you replace anything
- Water only during flushing usually points to the wax seal, closet bolts, or flange height.
- Water that appears even when the toilet has not been used may come from condensation or a supply-line drip.
- Loose closet bolts can worsen movement, but they do not rescue a seal that has already failed.
- A solid DIY reset usually takes about 1 to 2 hours if the flange and floor are sound.
- Basic parts are inexpensive; the costly part is damaged flange or subfloor work.
How to tell whether you really have a base leak
My rule is simple: if water appears only when the toilet flushes, I assume the seal has failed until I prove otherwise. If the floor gets wet without flushing, I look harder at the tank, supply line, or condensation before I touch the toilet base. That distinction matters, because a lot of people replace the wrong part and end up with the same leak a week later.
| What you notice | Likely cause | What I would check first |
|---|---|---|
| Water appears right after a flush | Wax ring or wax-free seal is failing | Inspect closet bolts, toilet movement, and flange height |
| Toilet rocks when pushed | Loose bolts, uneven floor, or damaged flange | Stop tightening blindly and plan to reset the bowl |
| Water runs down the outside of the tank | Condensation or a tank connection leak | Dry the tank and watch for fresh moisture before blaming the base |
| Wetness near the supply line or shutoff valve | Supply-line leak | Check the connection at the valve and the tank fill valve |
| Sewer smell near the toilet | Compromised seal at the drain connection | Assume the bowl needs to come up and be reseated |
If the toilet is dry until it flushes, the drain seal is almost always the first suspect. Once that is clear, the next step is deciding which small fixes are worth trying before you pull the bowl.
The small fixes worth trying before you pull the toilet
I do not waste time on cosmetic fixes when the bowl is clearly moving, but there are a few quick checks that can save a lot of work. They take minutes, cost almost nothing, and help separate a true base leak from a spill or a tank-side issue.
- Dry everything completely with paper towels or a small fan, then flush once and watch where the first droplets appear.
- Tighten the closet bolts gently if the toilet is only slightly loose. Stop as soon as the bowl stops shifting; overtightening can crack porcelain.
- Check the supply line where it enters the tank and the shutoff valve. A drip there can travel under the toilet and look like a base leak.
- Inspect the tank-to-bowl area if your toilet is a two-piece model. A leaking tank gasket can send water down the back of the bowl and onto the floor.
- Test for rocking by pressing on opposite sides of the bowl. Any movement tells me the seal is being stressed and probably will not last.
These checks tell you whether the leak is external or coming from the drain seal itself. If the bowl rocks, the repair usually stops being a tightening job and becomes a reset job, which is where the real fix begins.
How I replace a wax ring without creating a new problem
When I get to this point, I assume the seal is compromised and I reset the toilet rather than chase the leak with caulk. A wax ring is not complicated, but the details matter: the flange has to be intact, the bowl has to sit level, and the toilet needs to come down squarely on the seal the first time.
Remove the toilet cleanly
Turn off the water, flush to empty the tank, and sponge out the remaining water from the bowl. Disconnect the supply line, remove the nut caps, and back off the closet bolts. Then lift the toilet straight up. If the bowl feels stuck, rock it only enough to break the seal, not enough to twist the flange or smear waste water across the floor.
Inspect the flange and the floor
Once the toilet is off, scrape away the old wax and look closely at the flange, which is the ring anchored to the floor that holds the closet bolts and connects the toilet to the drain. I am checking for cracks, corrosion, missing bolt slots, and any sign that the flange sits too low relative to the finished floor. I also press around the subfloor. If it feels soft, the leak has already done more than cosmetic damage.
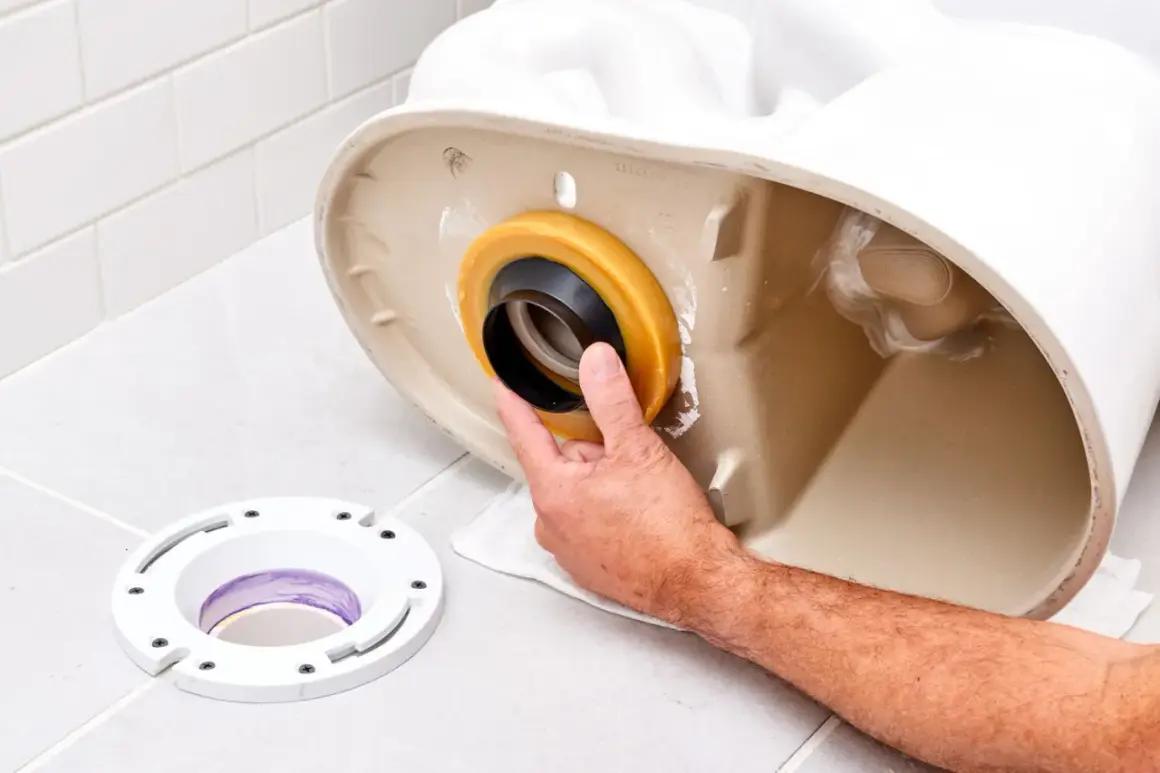
Set the new seal and reset the bowl
For a standard repair on a solid flange, a new wax ring is still the most common choice. A wax-free seal can be a good alternative when the toilet may need to be repositioned or removed again, but it still depends on proper alignment and a stable flange. I place the new seal, lower the bowl straight down, and avoid twisting it once the horn or wax starts to compress. After that, I tighten the nuts evenly, a little at a time, until the toilet is stable.
Read Also: Kitchen Faucet Replacement - Your DIY Guide to No Leaks
Test before you caulk
I always test the bowl before finishing the floor. A few flushes, a dry paper towel around the base, and a flashlight will tell you more than guesswork. If everything stays dry, I wait to caulk until I know the toilet is not rocking and the leak is gone. Caulk is for finish and cleanliness; it is not a substitute for the seal under the bowl.
That repair works well when the flange and floor are still serviceable. If the leak keeps coming back, the issue is usually not the ring alone, which is why I look at the flange and subfloor next.
When the flange or floor is the real issue
This is the part people often miss. If the flange is broken, too low, or no longer firmly anchored, a new wax ring may buy you a little time but not a durable repair. The same is true when the subfloor has started to rot. In those cases, the toilet is not failing by itself; the structure underneath it is failing.
| Problem | What it looks like | Typical fix |
|---|---|---|
| Cracked or broken flange | Closet bolts will not stay tight, or the bowl moves after reset | Flange repair ring or full flange replacement |
| Flange sits below the finished floor | Wax ring fails early or the toilet rocks even when tightened | Flange extender, thicker seal, or repair kit |
| Soft or rotten subfloor | Floor feels spongy around the toilet base | Subfloor repair before reinstalling the toilet |
| Bolt holes or slots are worn out | Closet bolts spin or pull through | Replace the flange or use a proper repair kit if the damage is minor |
If the flange damage is minor, a repair ring or extender can save the install. If the floor is soft or the flange has separated from the subfloor, I stop treating it as a routine toilet repair and start treating it as a flooring and plumbing problem. That distinction matters when you compare the cost of a simple reset with the cost of a real rebuild.
What the repair usually costs in the U.S.
For a standard toilet reset, the parts are cheap and the labor is the real expense. In the U.S., I usually expect a straightforward DIY repair to cost under $40 in parts, while a plumber often charges about $150 to $300 for a simple pull-and-reset. If the flange or floor is damaged, the bill can move well beyond that.
| Repair path | Typical cost range | What drives the price |
|---|---|---|
| Wax ring, bolts, and supplies | $15 to $40 | Standard parts from a home center or hardware store |
| Wax-free seal kit | $10 to $30 | Sealing kit and new mounting hardware |
| Professional pull-and-reset | $150 to $300 | Labor, disposal, and service-call minimums |
| Flange repair or extender | $20 to $80 | Extent of flange damage and hardware needed |
| Flange plus subfloor repair | $300 to $800+ | Rot, access, flooring replacement, and structural work |
The reason I give a wide range is simple: access changes everything. A toilet on a clean slab is a very different job from a toilet over rotted plywood or a flange that has torn away from the floor. Once you know the likely cost, the real goal is preventing the leak from coming back after the toilet is back in place.
How to keep the leak from coming back
The best prevention is boring, and that is exactly why it works. A toilet should sit flat, stay stable, and never need to be forced into position. If it starts rocking later, I do not ignore it. That movement is what kills seals.
- Make sure the toilet does not rock after installation.
- Snug the closet bolts evenly, but never crank them down hard.
- Use a quality supply line and replace it when it looks worn, bulged, or corroded.
- Check the toilet after a day or two of normal use, because a seal can compress slightly after the first flushes.
- Keep an eye on the floor around the toilet after any clog, plunge, or spill.
- Do not use caulk as a substitute for a sound flange or a proper seal.
These habits are simple, but they make the difference between a repair that lasts and one that starts leaking again as soon as someone leans on the bowl. The last thing I watch for is the point where a small leak becomes a floor problem.
The warning signs that tell me the repair is bigger than the seal
If the leak returns after a proper reset, I stop assuming it is just a bad ring. Repeated wetness, a bowl that keeps shifting, discoloration in the flooring, or a soft spot near the base usually means the toilet is sitting on damage that needs more than another seal swap.
- The toilet still rocks after new bolts and a fresh seal.
- The floor feels soft, swollen, or uneven around the toilet.
- Water appears again after several careful flush tests.
- You smell sewer gas even though the bowl looks dry.
- Closet bolts will not hold tension because the flange or subfloor is failing.
When I see those signs, I bring in a plumber before the leak spreads farther into the subfloor. A toilet base leak is usually fixable, but the longer it is ignored, the more likely it is to turn into a flooring job instead of a plumbing job.