A proper shower pan installation is mostly about the hidden layers: drain alignment, support, slope, and waterproofing. I treat the base as the part that decides whether a shower works for years or starts leaking behind the walls. In this guide, I break down the base options, the prep work, the setting sequence, the code checks, and the mistakes that usually turn a small job into a big repair.
The safest base job is the one you can inspect before tile closes it in
- Match the base type to the shower design, not the other way around.
- Make the subfloor flat, level, and stiff before the pan goes in.
- Dry-fit the drain first; bad alignment causes most of the frustration.
- Use the support method the manufacturer specifies, especially under acrylic and fiberglass pans.
- Flood-testing catches leaks before tile, trim, and drywall hide them.
- When the drain moves, the framing is rotten, or code is unclear, a plumber is cheaper than a tear-out.
What the base has to do before any finish work begins
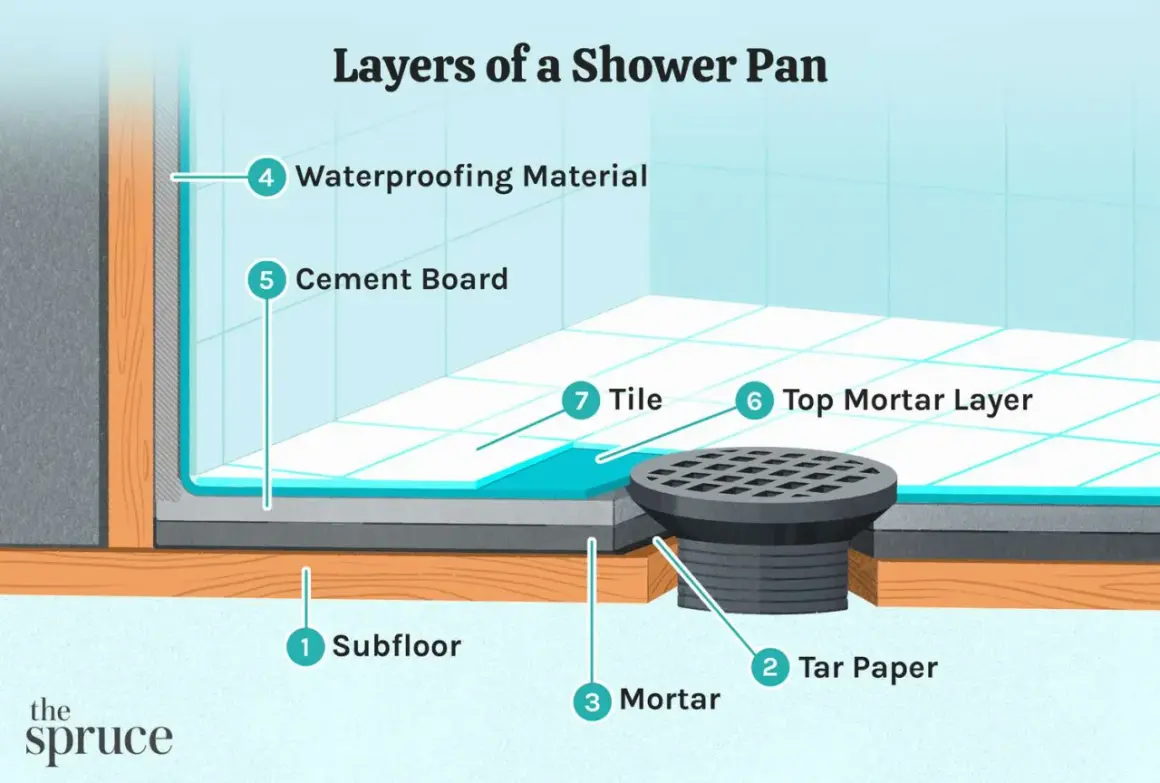
The shower base is doing three jobs at once. It has to contain water, send water to the drain, and stay rigid under daily foot traffic. If one of those fails, the shower may still look fine for a while, but the damage usually shows up in the subfloor, the framing, or the ceiling below.
I think of the base as a plumbing component, not just a finished surface. The pan, drain body, trap, and waterproofing layer work together. That is why a good-looking shower can still fail if the drain is off by even a little, the base flexes, or the waterproof layer is interrupted at the curb or flange. Once that system makes sense, choosing the right base becomes much easier.
Choosing the right base for the shower layout
There is no single best base. The right choice depends on the framing, the drain location, your budget, and how much tile work you want to take on. In practice, I narrow it down to four common options.
| Base type | Best for | What it does well | Tradeoffs |
|---|---|---|---|
| Acrylic or fiberglass receptor | Fast remodels, standard alcoves, lower budgets | Lightweight, simple to set, usually faster to install | Can flex if unsupported, limited shape choices, surface can scratch |
| Solid-surface or composite base | Midrange projects that need a sturdier feel | More rigid, easier to keep clean, often feels more substantial | Costs more than basic fiberglass and still needs accurate drain work |
| Mortar bed with tile | Custom showers, unusual dimensions, design-heavy builds | Maximum flexibility in size and tile layout | Highest skill level, slowest build, easiest to get wrong if waterproofing is weak |
| Curbless or low-threshold system | Accessibility, modern bathrooms, aging-in-place plans | Easy entry, clean look, often paired with linear drains | Requires very accurate floor work and more planning under the finished surface |
If I am working on a conventional U.S. alcove shower, I usually want the simplest system that still fits the drain and framing cleanly. If the project is accessible or fully custom, the framing and drainage plan matter even more than the finish choice. Once that decision is made, the next step is making sure the floor and drain can actually accept the base.
Preparing the subfloor and drain rough-in
This is where a lot of jobs are won or lost. Before the base goes in, I want the framing sound, the floor flat, and the drain placed where the pan expects it to be. Kohler’s installation instructions are blunt on two points I agree with every time: the subfloor needs to be level, and the base needs full support, not just rim support.
Here is the prep sequence I follow:
- Remove the old receptor, debris, and any wet or damaged underlayment.
- Inspect the subfloor and framing for rot, movement, or soft spots.
- Check the floor for level and correct any dips before the pan goes in.
- Confirm the drain centerline and trap height against the new base layout.
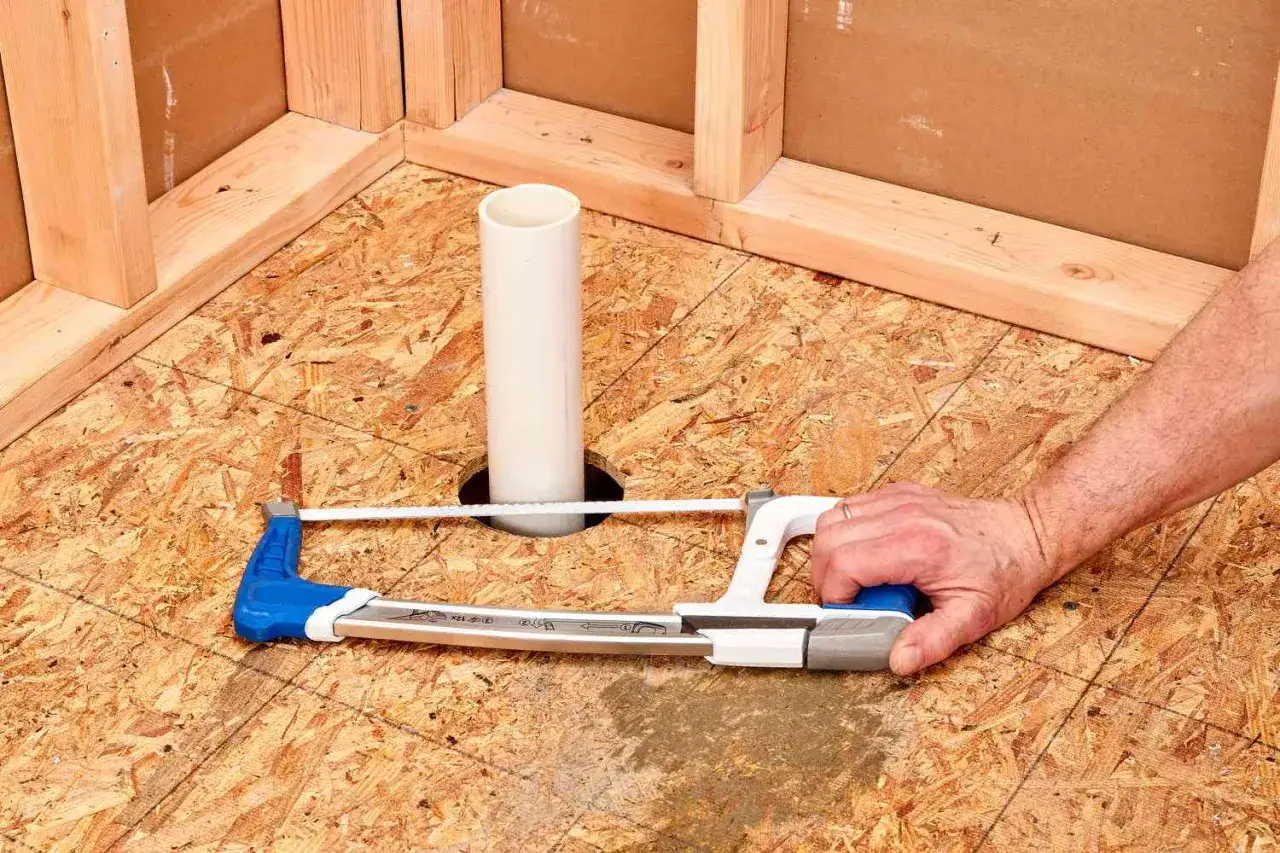
- Dry-fit the drain parts so the pipe does not have to be forced into position.
- Verify there is enough clearance for the wall system, flange, and curb detail.
If the drain needs to move, I stop treating the job as a simple replacement. Once the trap or waste line is being relocated, venting, access, and inspection requirements can enter the picture. That is the point where a licensed plumber often saves time and avoids expensive rework. With the rough-in confirmed, setting the base itself becomes much more straightforward.
Setting the base without building in a leak
The exact installation order depends on the manufacturer, but the general sequence is consistent. I dry-fit first, commit only after the drain lines up, and keep the base fully supported from underneath. The goal is a pan that does not rock, twist, or telegraph movement into the finished walls.
- Dry-fit the base in the opening and confirm that the drain lines up without stress.
- Mark reference lines so the pan returns to the exact same position after adhesive or setting material is applied.
- Apply the support material the system calls for, whether that is mortar, adhesive, or an approved foam bed.
- Lower the base into place carefully and press it only as much as the instructions allow.
- Check level across the threshold, along both sides, and around the drain area.
- Connect the drain assembly with the proper gasket, solvent weld, or compression fit specified for that product.
- Fasten only at the points the manufacturer allows, then leave the pan alone until the support layer cures.
For prefabricated receptors, the support details matter more than people expect. A pan that is only supported at the edges can flex, and flex is what breaks seals over time. For tile-ready systems, the sequence changes, but the rule does not: the base has to be stable before anything decorative goes on top. That leads directly to the part many DIY installs handle too casually, which is waterproofing.
Waterproofing and slope are not the same thing
I see this confusion all the time. Slope moves water; waterproofing keeps water from escaping the shower assembly. You need both. A pan can drain well and still leak if the waterproof layer is wrong. It can also be watertight and still hold standing water if the slope is off.
| System | Where the waterproof layer sits | What must be done right | Main risk if it is done badly |
|---|---|---|---|
| Traditional liner and mortar bed | Below the final mortar surface | Pre-slope, liner, clamping drain, and open weep holes | Water gets trapped under the tile and feeds mold or rot |
| Surface waterproofing membrane | Right under the tile or finish layer | Compatible drain, sealed seams, and correct thinset or adhesive coverage | Gaps or bad seams let water reach the framing quickly |
| Prefabricated receptor | Built into the base itself | Proper drain seal, full support, and correct wall transition details | Movement or poor sealing at the drain can show up later as leaks |
In many U.S. jurisdictions that follow the IRC or IPC, the liner or receptor is expected to hold water for at least 15 minutes with no leakage, and some inspectors want the test water to reach roughly 2 inches at the threshold. For traditional liners, the slope toward the drain is typically about 1/4 inch per foot, or 2 percent. That is not a detail to improvise. It is the difference between a shower that dries properly and one that keeps a hidden reservoir under the floor. Once those water-management details are right, it is easier to spot the mistakes that tend to cause callbacks.
The mistakes that cause leaks and callbacks
Most shower failures do not come from one dramatic event. They come from a string of small compromises that add up. The same few problems show up again and again:
- Setting the base on an uneven or soft subfloor.
- Forcing the drain to meet the pan instead of aligning the plumbing correctly.
- Relying on caulk where the product actually needs a mechanical seal.
- Skipping the flood test because the pan “looked good.”
- Using fasteners where they should not penetrate the waterproof layer.
- Assuming grout is waterproof enough to protect the assembly below.
The hardest part of these mistakes is that they often do not fail immediately. A shower can work for months while moisture slowly damages the subfloor, then suddenly you are dealing with swelling, staining, or a soft spot in the bathroom floor. I would rather spend an extra hour checking support and seals than spend a weekend tearing out a brand-new shower. That is also why cost matters so much when people decide whether to DIY or hire out the work.
What it costs and when I would call a plumber
Recent Angi cost guides put a manufactured shower base at roughly $250 to $400 for the unit itself, while installed replacement jobs often land around $900 to $2,300. The reason the numbers spread so much is simple: the pan is rarely the expensive part. Drain work, underlayment repair, waterproofing, and finish materials drive the real total. A full shower build can climb far higher once tile, backer board, fixtures, and labor enter the picture.
I would bring in a plumber when any of these are true:
- The drain must be moved, not just reconnected.
- The shower sits over a slab and the trap or waste line needs modification.
- The existing pipework is corroded, cracked, or poorly vented.
- The test fails and the leak source is not obvious.
- The project needs permit coordination or inspection sign-off.
That lines up with the kind of guidance you see in manufacturer instructions too. Kohler, for example, stresses that the base should sit on a level subfloor and be fully supported. I read that as a practical warning, not a technicality: if the pan is not happy on the floor, the rest of the shower will not stay happy either. Before the walls are closed, I still want one last round of checks.
What I would verify before closing the walls
Before I cover anything, I recheck the parts that are hardest to reach later. I want the drain tight, the base stable, the waterproof transitions complete, and the shower tested while everything is still visible. If a problem appears at this stage, it is a repair. If it appears after tile and drywall, it is a demolition job.
- The base does not move when I step around the perimeter.
- The drain connection is dry after the test period.
- The curb or threshold transitions are sealed exactly as the system requires.
- The wall board stops where it should and does not force the pan out of plane.
- Photos are taken before the assembly is hidden, especially around the drain and support points.
That final inspection is cheap insurance. If the shower base is level, supported, and tested before the walls close, the rest of the project is much more likely to stay dry, quiet, and easy to maintain.