Getting a toilet replacement right comes down to a few measurements, not guesswork. Knowing how to measure a toilet before you order one helps you avoid the most common mistake I see: buying a fixture that looks fine online but lands too long, too tall, or incompatible with the rough-in in your bathroom. In this guide, I cover the dimensions that matter in a U.S. home, the tools you need, and the shortcuts that keep the job clean and predictable.
The measurements that decide whether a toilet fits
- Rough-in is the first number I check: it is the distance from the finished wall to the center of the floor bolts or flange.
- Most U.S. homes use a 12-inch rough-in, but 10-inch and 14-inch setups still show up in older or tighter bathrooms.
- Round bowls are shorter front to back than elongated bowls, and those extra 2 inches can matter in a small room.
- Seat height, tank projection, and clearances around the toilet can matter just as much as the rough-in.
- If you are replacing only the seat or adding a bidet seat, measure the hinge spacing and bowl shape separately.
Start with the rough-in, not the bowl shape
If I only had time to take one measurement, I would start with the rough-in. That is the distance from the finished wall to the center of the closet bolts or the centerline of the toilet flange, depending on whether the toilet is installed or already removed. The finished wall matters because baseboard, trim, and uneven paint buildup can make a bathroom look deeper than it really is.
When the toilet is still in place, measure from the wall behind it to the middle of the bolt caps. When the toilet is out, measure from the wall to the center of the flange opening in the floor. Do not measure to the edge of the baseboard, and do not guess from the front of the bowl. That is how people end up ordering the wrong rough-in size and discovering it only after unboxing the replacement.
| What I measure | Where to measure | Why it matters | Typical U.S. size |
|---|---|---|---|
| Rough-in | Finished wall to the center of the bolts or flange | Determines whether the toilet will fit at all | 12 inches, sometimes 10 or 14 inches |
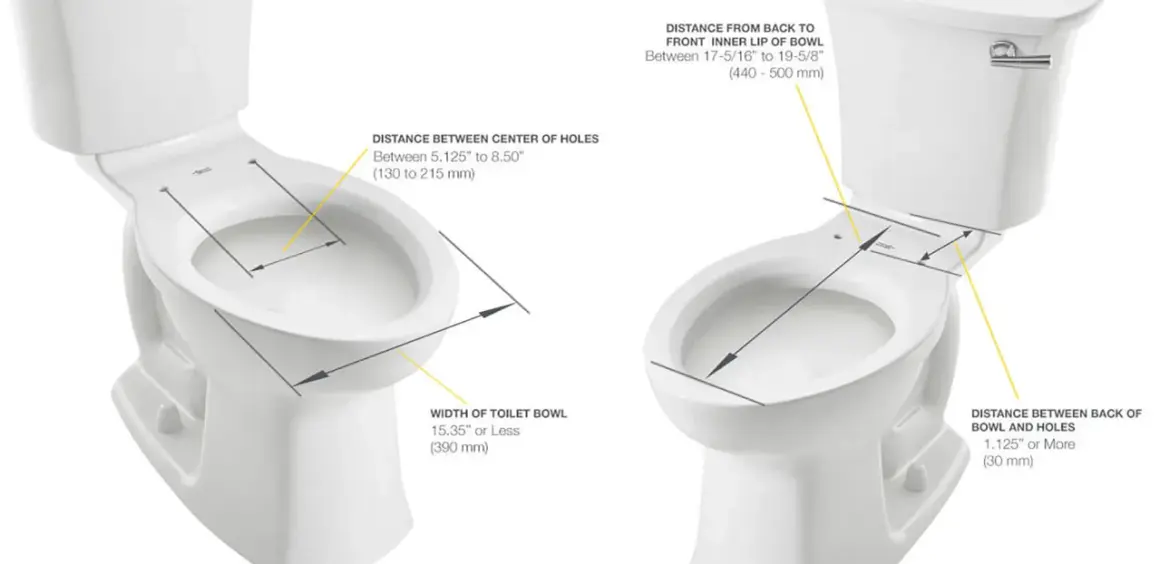
| Bowl length | Seat mounting holes to the front rim | Controls how much knee room the toilet takes up | About 16.5 inches round, 18.5 inches elongated |
| Seat height | Floor to seat top or bowl rim, depending on the spec | Affects comfort and accessibility | 14 to 15 inches standard, 16 to 19 inches chair height |
| Front clearance | Front of the toilet to the nearest obstruction | Keeps the bathroom usable instead of cramped | 21 inches minimum, 30 inches preferred |
| Side clearance | Centerline of the toilet to a wall or fixture | Prevents awkward tight spacing | 15 inches minimum |
Once the rough-in is confirmed, the next question is how much room the toilet body itself will take up, because that is where round and elongated bowls start to diverge.
Compare bowl shape before you commit to a replacement
Round and elongated bowls can share the same rough-in, but they do not occupy the same amount of space. A round bowl is usually the safer pick in a tight powder room because it saves a couple of inches at the front. An elongated bowl feels roomier at the seat and is often the more comfortable option for adults, which is why I see it specified so often in remodels.
I think of this as a comfort-versus-clearance tradeoff. In a cramped bathroom, 2 inches is not a small amount. It can be the difference between a door that clears cleanly and a door that nudges the bowl, or between a vanity that feels manageable and one that feels squeezed.
| Shape | Typical length | Best for | Main tradeoff |
|---|---|---|---|
| Round | About 16.5 inches | Small bathrooms and tight clearances | Less seating surface |
| Elongated | About 18.5 inches | Comfort and a more modern feel | Uses more front-to-back space |
When I measure for a replacement, I measure the bowl length from the seat bolt area to the front rim, not to the lid and not to the tank. That keeps the reading honest and prevents a lot of bad assumptions. With shape settled, height and surrounding clearances become the next practical filter.
Check height, tank depth, and the room around the toilet
Seat height changes how a toilet feels far more than many buyers expect. Standard-height toilets usually land around 14 to 15 inches, while chair-height models are often 16 to 19 inches. If the toilet will be used by someone with knee, hip, or back issues, I pay attention to that number early, because a taller bowl can make daily use noticeably easier.
Tank depth matters too, especially with one-piece or skirted designs. A toilet can pass the rough-in test and still feel oversized if the tank projects too far into the room. I like to measure from the finished wall to the farthest point of the tank or lid when space is tight, because that is the dimension people actually bump into.
- Side clearance: keep at least 15 inches from the toilet centerline to a wall or fixture.
- Front clearance: 21 inches is the minimum I would treat as usable; 30 inches feels much better in practice.
- Seat height: 14 to 15 inches is standard, while 16 to 19 inches is commonly called chair height.
Those numbers are not just theory. They affect how the room feels when the toilet is in place, and they often determine whether a model that technically fits is actually a good fit. After that, the last details are the ones that trip up seat replacements and bidet upgrades.
Measure the seat, bolts, and supply line before buying accessories
If you are replacing only the seat or adding a bidet seat, do not assume every toilet uses the same hardware. Measure the distance between the seat hinge holes from center to center, and confirm whether the bowl is round or elongated. A seat that is too short on an elongated bowl will look wrong and feel unstable, even if the bolt holes line up.
I also check the water supply location before I commit to a new toilet, especially with skirted or one-piece models. The supply valve should not end up buried behind the bowl or pressed so tightly that installation becomes awkward. A compact bathroom can hide that problem until the last minute, which is exactly when it becomes a return or a reroute.
For bidet attachments, the hinge spacing and the rear clearance behind the seat matter even more. Some units need extra room behind the bowl, and some lids will not open cleanly if the tank shape is too aggressive. That is why I always treat accessory measurements as separate from the toilet’s own rough-in.
Avoid the mistakes that make a simple replacement go sideways
The biggest measurement errors are usually small, but they snowball fast. Measuring to the baseboard instead of the finished wall can add false depth. Measuring the old toilet instead of the room can hide a clearance issue. And measuring the tank instead of the rough-in can make a toilet look compatible when it is not.
- Do not measure to trim. Baseboards can make a 12-inch rough-in look like 12.5 inches or more.
- Do not confuse rough-in with bowl length. They answer different questions.
- Do not skip front clearance. A toilet can fit and still make the room miserable to use.
- Do not assume a 12-inch model is universal. If the bathroom is older, the rough-in may be 10 or 14 inches.
- Do not ignore the seat and lid. Some shapes need more room than the porcelain footprint suggests.
My rule is simple: if a reading is close enough to make you hesitate, re-measure from the finished wall and the true centerline of the flange or bolts. That extra minute is far cheaper than a return trip to the store or a forced compromise in a bathroom that already feels tight.
Keep these numbers handy before you order the new toilet
When I help someone choose a toilet, I keep four figures in front of me: rough-in, bowl shape, seat height, and available clearance. Those numbers tell me more than the marketing copy on a box ever will. If they all line up, the rest is mostly about style and flushing performance.
For a floor-mounted toilet in a U.S. home, the usual decision path is straightforward: confirm the rough-in, choose round or elongated based on room size, check the height for comfort, then verify front and side clearances. If the bathroom is especially tight, I lean toward compact designs and I pay closer attention to tank projection. If the room is generous, comfort-height elongated models are often the easiest long-term choice.
What I would not do is force a near-match and hope the wax ring or trim will make up the difference. Plumbing does not reward optimism. It rewards exact measurements, a clear understanding of the room, and a little restraint before clicking buy.