
I start with the parts you can reach by hand, because that is where odor usually lives: the splash baffle, the upper lip of the grind chamber, and the drain opening. A good cleaning also protects the plumbing, since grease and food film can build up in the trap and branch line even when the disposal sounds fine. Here is the routine I use, the products that actually help, and the warning signs that tell me the problem is bigger than a dirty chamber.
The safest routine is a short manual scrub, a mild flush, and regular cold-water use
- Turn off the power first before putting a hand or brush near the sink opening.
- Scrub the splash baffle and chamber lip, because that is where most odors start.
- Use cold water while the disposal is running; it helps move food waste through the drain line.
- Baking soda, ice, and citrus can freshen the unit, but they work best after a physical scrub.
- Avoid bleach and harsh drain cleaners unless your appliance manual specifically allows them.
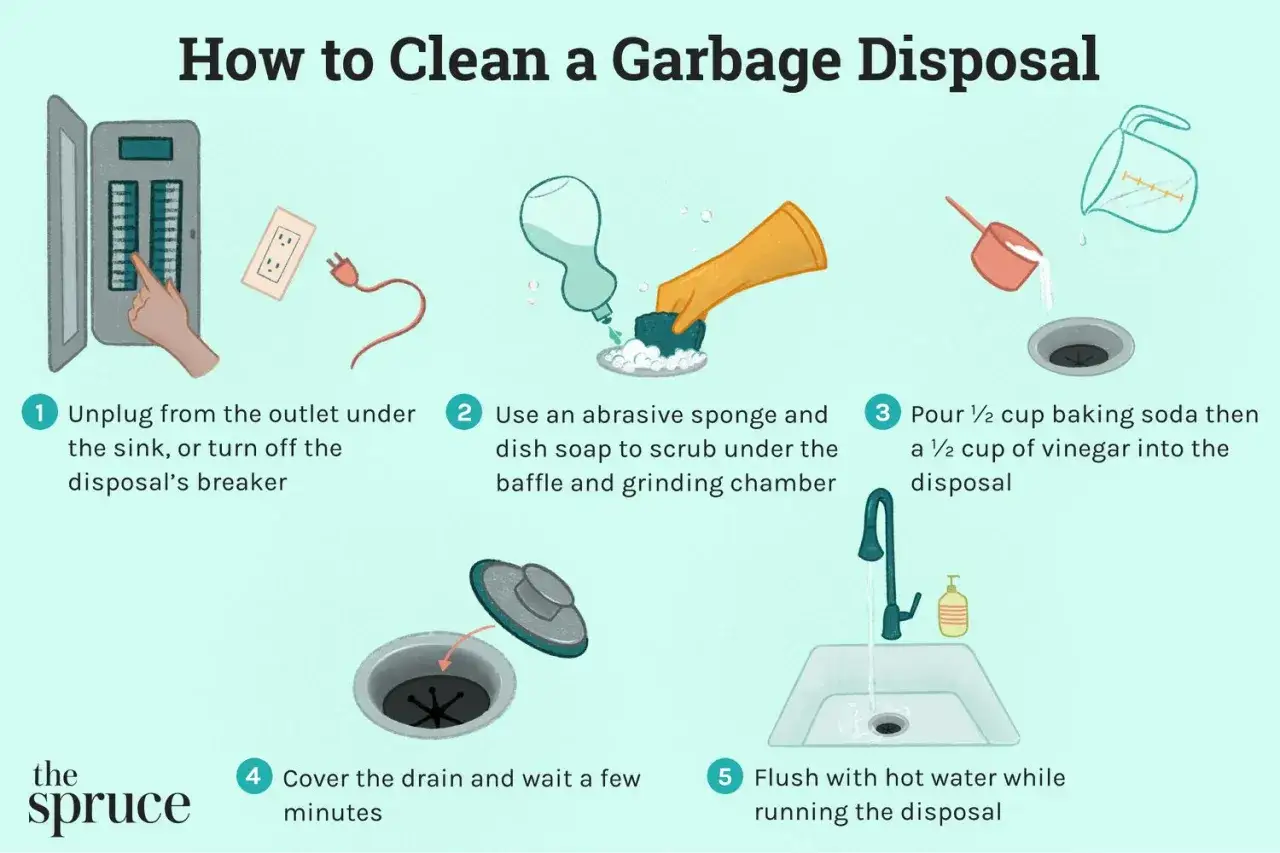
A step-by-step cleaning routine that actually reaches the dirty spots
Most disposal smells come from a thin film on parts you can see, not from the motor itself. I clean the unit the same way I would clean any small plumbing fixture: remove the residue first, flush what remains, then deodorize only if needed.
- Cut the power. Turn off the wall switch, and if the breaker is easy to reach, shut that off too. I never clean a disposal while I am guessing whether it might start.
- Lift and scrub the splash baffle. The splash baffle is the rubber ring at the sink opening. Clean the underside, the top edge, and the rim of the sink with warm soapy water and a small brush or old toothbrush.
- Wipe the upper lip of the grind chamber. That narrow ring around the opening collects sticky residue fast. A damp scouring pad or brush gets into that seam better than a sponge.
- Rinse with water the right way. Warm water is fine for the hand-cleaning part, but I use cold water when the disposal is running. Cold water helps keep grease solid enough to flush through instead of coating the pipe walls.
- Do a mild deodorizing flush. Fill the sink about halfway with warm water, add about 1/4 cup of baking soda, then run the disposer while pulling the stopper so the mixture moves through the chamber.
- Finish with ice and citrus. A few ice cubes with lemon or lime peels can help knock loose small bits of residue. I treat this as a finishing step, not the main cleaning method.
- Dry the area and check the baffle. Wipe the rim dry and make sure the splash baffle sits snugly. If it is cracked, stiff, or permanently grimy, replacing it often makes more difference than another round of deodorizer.
That routine handles the usual kitchen buildup without stressing the plumbing, and it gives you a cleaner baseline before you decide whether to use a product or stick with basic soap. Once that part is clear, the next question is which cleaners are worth keeping under the sink.
Which cleaners are worth using and which ones I skip
I do not think every disposal needs a specialty product. In many kitchens, a brush, dish soap, and baking soda do most of the real work. The table below is how I sort the common options.
| Method | Best for | My take | Limit |
|---|---|---|---|
| Dish soap and a soft brush | Daily grime, slime on the splash baffle, and surface residue | Best first step. It removes the actual buildup instead of masking it. | Won't fix a deeper clog or a worn part. |
| Baking soda and water | Light odor and loose residue in the chamber | Useful for a monthly refresh, especially after greasy cooking. | It helps with smell, but it is not a substitute for scrubbing. |
| Ice cubes with citrus peel | Knocking loose tiny bits and freshening the smell | A decent finishing step after cleaning. | It does not dissolve grease or fix a dirty baffle. |
| Manufacturer-approved disposer cleaner | People who want a packaged routine with clear directions | Fine if the label is disposal-safe and the instructions are simple. | Follow the label exactly and do not assume every cleaner works the same way. |
| Bleach or harsh drain opener | Nothing I recommend for routine cleaning | I skip it. The chemistry is harder on the unit and the drain than a mild cleaner. | Can damage parts and create plumbing risk instead of solving the odor. |
My rule is simple: if a cleaner is doing the job, I should be able to explain what it removes, not just what it smells like afterward. That makes the next piece easier too, because frequency matters just as much as the product itself.
How often to clean it depends on how hard the kitchen works
There is no reason to deep-clean a lightly used disposal every few days, but there is also no reason to wait until it smells like a drain. I usually match the routine to the way the sink is actually used.
- After greasy cooking: Run cold water for 10 to 15 seconds after the last grind so fat does not settle in the line.
- Weekly: Scrub the splash baffle and run a few ice cubes through the unit.
- Monthly: Do the baking soda flush and inspect the opening for stuck residue.
- Every few months: Check under the sink for damp spots, loose mounting, or a slow drip around the disposal body.
A family kitchen that sees daily cooking will need the weekly rhythm. A guest suite or lightly used sink can usually stretch farther. The point is not to be obsessive; it is to stay ahead of the film that turns into odor. From there, the bigger issue is what should never go into the unit in the first place.
Foods and habits that keep the drain dirty
Cleaning helps, but the disposal will only stay clean if I stop feeding it the wrong material. The most common problems are not dramatic. They are the small, repeated habits that slowly load the chamber, trap, and branch line.
| What to avoid | Why it causes trouble | Better habit |
|---|---|---|
| Grease and cooking oil | Coats the chamber and pipe walls, then traps other debris | Scrape pans into the trash and wipe them with a paper towel before washing |
| Rice, pasta, and potato peels | They swell, thicken, or turn paste-like in the drain | Keep them out of the disposal, especially in large amounts |
| Celery, onion skins, corn husks, and similar fibrous scraps | They can wrap, tangle, or bunch up in the chamber | Trash or compost them instead of grinding them |
| Coffee grounds | They settle, mix with grease, and create a heavy sludge | Put them in the trash or compost if your local program allows it |
| Large handfuls of scraps at once | Overloads the grinding chamber and reduces flushing | Feed small amounts gradually with cold water running |
| Non-food items | Can damage the unit or lodge farther down the plumbing | Keep them out entirely |
Once the wrong foods stop going in, the smell usually becomes much easier to control. If it does not, I stop blaming the chamber and start looking for a plumbing problem instead.
When odor points to a plumbing problem instead of surface grime
A dirty disposal smells bad, but a plumbing issue often smells different and behaves differently. If the odor comes back quickly after a proper cleaning, I look beyond the visible opening.
- Persistent sewer smell: That can point to a dry or weak P-trap seal. The P-trap is the curved section of pipe under the sink that holds water and blocks sewer gas.
- Slow draining or gurgling: This often means there is a partial clog downstream, not just a dirty chamber.
- Water backing up into the sink: That is not a cleaning issue anymore. It suggests a blockage or venting problem in the line.
- Humming, repeated reset trips, or leaking from the bottom: Those signs suggest a mechanical fault, and the disposal itself may need repair or replacement.
When I see those symptoms, I stop using chemical drain openers. They rarely solve the real problem, and they can make a plumber’s job harder later. The next section is the maintenance rhythm I would actually keep in a normal home, because simple habits beat emergency cleaning every time.
The cleaning rhythm I would keep on a kitchen calendar
If I were setting up a low-maintenance routine for a working kitchen, I would keep it brutally simple. After each use, I would run cold water for 10 to 15 seconds. Once a week, I would scrub the splash baffle and toss in a few ice cubes. Once a month, I would do the baking soda flush and check the sink opening for buildup.
That is enough for most disposals that are otherwise in good shape. It keeps the unit neutral instead of masked with perfume, and it reduces the odds that food residue turns into a plumbing complaint. If odor still survives that routine, I stop treating it as a cleaning problem and start looking for a worn part, a clog in the line, or a drain issue that needs a plumber.