Good router table plans should solve the boring problems before they become expensive ones: a dead-flat top, a fence that stays square, and storage that keeps bits, wrenches, and collets where your hands can reach them. This article walks through the layout choices, the materials that matter, the build sequence I trust, and the safety and dust-control details that make the finished table usable in a real shop.
The best build is rigid, adjustable, and easy to keep clean
- Start with the insert plate or lift before you cut the opening.
- A general-purpose table usually works well around 24 x 32 inches to 24 x 36 inches.
- Use 3/4-inch plywood or MDF for the structure, then protect the top with laminate or another durable surface.
- Put dust collection in the fence first, then add a cabinet port if the design allows it.
- Build storage into the base, but keep it shallow enough that the cabinet stays stiff.
- Test everything on scrap before routing project parts.
What the plan really needs to solve
When I look at a router table, I am not looking for a cabinet with a hole in it. I am looking for a small machine station that lets me repeat cuts safely, with enough support in front of the bit to keep stock controlled. That means the design has to answer a few questions up front: fixed router or lift, benchtop or cabinet, portable or stationary, and how much storage you really need.
The quickest way to waste time is to draw the box first and the working surface second. I start with the bit location, fence travel, and dust path, because those three choices determine almost everything else. Once those are fixed, the side panels and drawers become straightforward instead of decorative.
That is also why a good plan feels more like a workflow map than a piece of shop furniture. Once the workflow is clear, the layout decision becomes much easier.
Choose a layout that fits the shop
The best layout depends on how often you use the table and how much room you can give it. I like to compare three versions before I cut anything, because each one solves a different problem.
| Layout | Typical size | Best for | Main trade-off |
|---|---|---|---|
| Benchtop | About 16 x 24 inches to 24 x 36 inches | Small shops, trim routers, occasional use | Less storage and weaker dust collection |
| Cabinet-style | About 24 x 32 inches to 30 x 40 inches | Frequent use, larger bits, better work support | Heavier and harder to move |
| Mobile hybrid | Often around 18 x 30 inches to 24 x 36 inches | Shared shops and multi-purpose spaces | Needs good locking casters and careful leveling |
For height, I treat 34 to 36 inches as a sensible starting point for many woodworkers, then adjust if the table feels too low or too high for the way I stand. Taller users sometimes prefer a bit more height, especially if the table is not tied to another machine. If the router table will live beside a workbench or saw, the working surface should feel intentional, not accidental.
I also prefer to think about footprint before finish. A smaller table is easier to place, but a cramped top makes long stock feel awkward. Once you know the size and height, the next question is what the top and fence should actually be made from.
Build the top and fence around the hardware, not the other way around
The top is where accuracy starts, so I do not cut it until I know the exact plate or lift I am using. Most router tables and lifts are built around a standard insert opening of 9 1/4 x 11 inches, but you should verify the actual template before making the cut. That opening needs to be centered, square, and clean, because any slop shows up every time you raise a bit.
For the top itself, I like 3/4-inch MDF or good plywood with a durable skin on top. MDF is very flat, which is a real advantage, but it needs sealed edges and protection from moisture. Plywood is tougher and lighter, which matters if the table will move around. If I want the surface to last, I add laminate or another slick top layer so stock slides smoothly and the top cleans up easily.
| Component | Practical target | Why it matters |
|---|---|---|
| Top size | 24 x 32 inches to 24 x 36 inches | Enough support without eating the whole shop |
| Top thickness | 3/4 inch substrate, sometimes doubled or laminated | Stiffness and flatness |
| Insert opening | Match the plate or lift template exactly | Prevents gaps, chatter, and misalignment |
| Fence height | About 3 to 4 inches | Good support without too much bit exposure |
| Fence length | About 24 to 36 inches | Stable reference for longer workpieces |
| Fence dust port | 2 1/2 inches is a solid starting point | Captures chips at the source |
For the fence, I build two flat faces that can open and close around the bit. That split-fence setup gives me a safer opening and makes dust collection more effective. I also like to leave room for T-track or a similar slot so featherboards can lock in place without improvisation. If I am being strict about the build, I want the fence to be square, stiff, and easy to adjust with one hand.
The point is not to make the fence complicated. The point is to make it predictable. Once the top and fence are set up correctly, the hardware underneath starts to matter a lot more.
Choose the hardware before cutting the cabinet parts
There are two broad ways to mount the router: a lift or a fixed base. A lift gives you finer height adjustment and makes repeat setups easier, which is especially helpful for joinery and repeated profiles. A fixed base can work well on a tighter budget, especially with a trim router or a router that is easy to adjust above the table, but it usually asks more from the user every time the bit height changes.
I would not buy decorative trim, drawer pulls, or fancy casters before I sorted out the plate, router mounting, and power control. A reliable paddle switch or remote switch is worth more than polished edges, because it lets me stop the machine fast without reaching for a router body under the table. I also like to leave enough room inside the cabinet so I can actually get to the collet, bit wrench, and motor locks without contorting my hands.
- Buy the insert plate or lift first.
- Confirm the router fit and the mounting pattern before cutting anything permanent.
- Use a switch that is easy to hit with a knee or hip.
- Leave space for featherboards, a starter pin if needed, and fence accessories.
- Plan a cord route that does not drape across drawers or dust hoses.
If the budget is tight, I would spend on the top, fence, and switch before I spent on almost anything else. Those three choices decide how the table feels to use, and that is harder to fix later. Once the machine parts are chosen, the cabinet can be shaped around the storage you actually need.
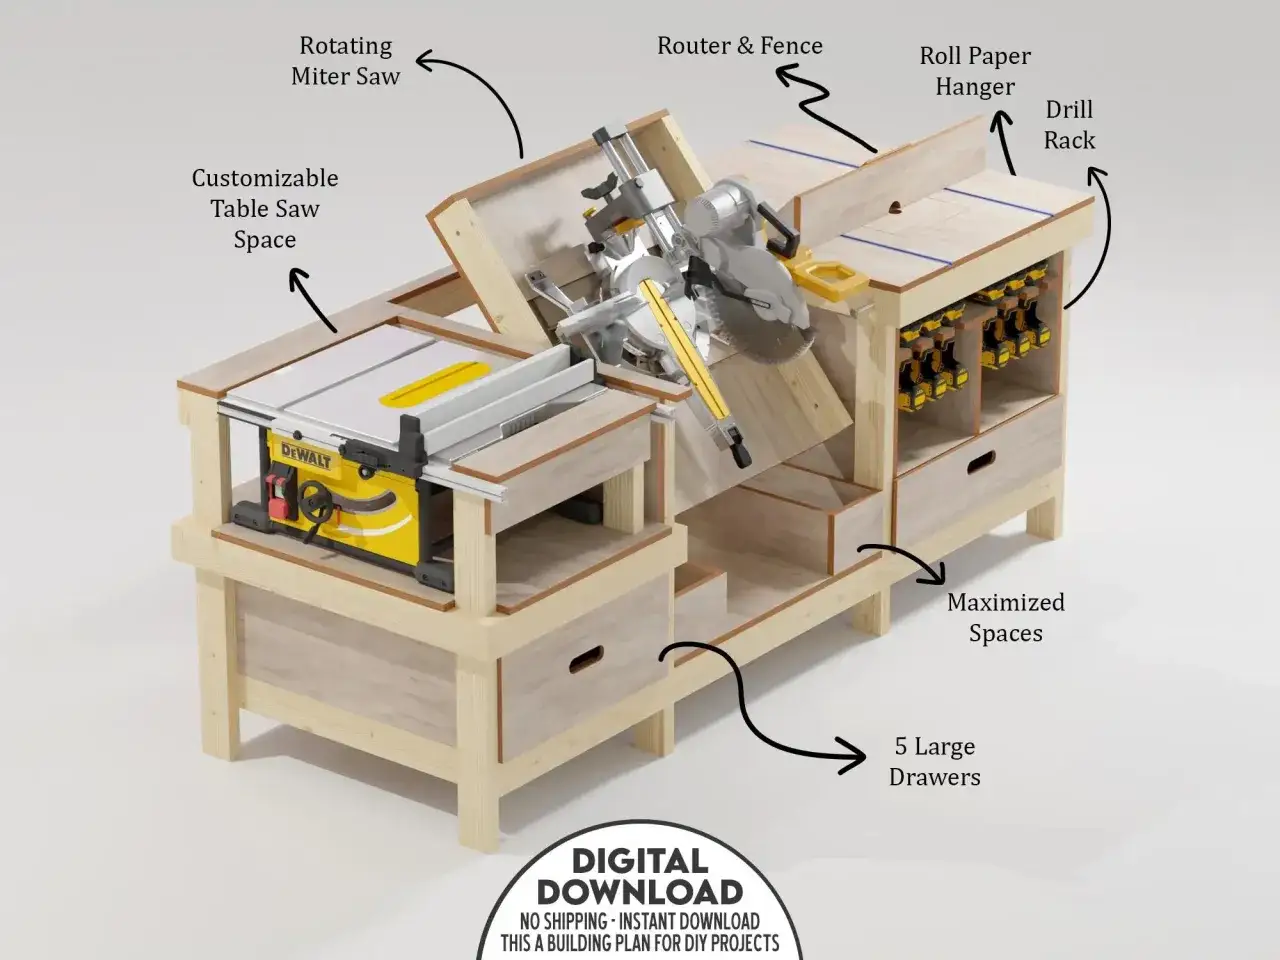
Add storage without weakening the cabinet
Storage is where a router table becomes more than a platform. A shallow drawer for bits, a space for the wrenches, and a home for collets and setup blocks make the table faster to use and less cluttered. I prefer storage that is organized, not oversized, because large drawers add weight and can invite vibration if the cabinet is not stiff enough.
My usual layout is simple: shallow upper storage for bits and setup tools, a lower shelf or drawer for larger accessories, and hooks or clips for the power cord. Bit drawers only need a few inches of depth, but they need dividers so cutters do not bang into each other. That small detail saves edge damage and makes it easier to grab the right profile without sorting through a pile of steel.
- Use a shallow bit drawer, usually 2 to 4 inches deep.
- Keep the heaviest storage low for better stability.
- Separate cutters with dividers or foam inserts.
- Store fence faces, featherboards, and setup blocks close to the front.
- Avoid overbuilding the drawer hardware if the table will move often.
There is a limit here, and I think it matters. Storage helps only when it stays out of the way of dust flow, motor access, and structural stiffness. If the cabinet starts to feel like a dresser with a router in it, I have gone too far. The next section is where the build either becomes genuinely clean or stays annoying forever.
Dust collection and safety are part of the design
Router tables create a lot of chips, and most of them come from a very small area. That is why I put dust control near the top of the priority list. A fence-mounted port is the first thing I would add, and a cabinet port below the bit is the next step if the base is enclosed. A 2 1/2-inch fence port works well with many shop vac setups, while a 4-inch cabinet port can improve overall capture if the enclosure is designed for it.
On safety, I keep the routine boring on purpose. I use featherboards to hold work against the fence and table, a push block for narrow pieces, and conservative passes when removing a lot of material. If I am routing hardwood or making a deep profile, I would rather take two or three lighter passes than force the bit to do everything at once. I also keep my body slightly out of the direct line of the bit, because that habit matters more than most people admit.
- Use the fence dust port first, then add under-cabinet capture if possible.
- Keep the bit exposed only as much as the cut requires.
- Take multiple passes on hardwood or deep profiles.
- Use a push block for narrow stock.
- Wear eye protection and hearing protection, and use dust protection appropriate to the task.
- Unplug the router before changing bits or adjusting mounting hardware.
I am also careful about climb-cutting. It has a place, but it is not the default choice, and it is not where I would send a new setup or a new user. If the workholding is not solid, the cut should stay conventional and controlled. That caution leads naturally to the last step, which is calibration.
Calibrate it before you trust the first cut
Even a well-built table can cut poorly if it is not tuned. I check the top with a straightedge first, then I confirm that the fence sits square and that the faces are aligned to the bit. A small amount of error shows up fast when you are making moldings or joinery, so I treat alignment as part of the build, not a final bonus.
- Lay a straightedge across the table in several directions and correct any visible dip or crown.
- Set the insert plate flush so stock does not catch on the edges.
- Square the fence to the top and confirm that both faces move evenly.
- Set the bit height on scrap, not on a project board.
- Run test cuts in the same species and thickness you plan to use.
- Write down the settings that worked if the cut will be repeated later.
What surprises many woodworkers is that a router table does not need to be fancy to cut well. It needs to be flat, aligned, and easy to adjust. If those three things are right, the rest of the shop-made details start to feel like useful upgrades instead of distractions. That is the version I would build first in a small shop.
The version I would build first in a small shop
If I had one weekend and a modest budget, I would build a 24 x 32-inch cabinet with a laminated MDF top, a standard insert plate, a split fence with a 2 1/2-inch dust port, and one shallow drawer for bits and setup tools. I would use a sturdy paddle switch, leave room for a shop vac hose or dust line, and skip anything decorative until the table had proven itself in use.
That order gives me the best return on effort: flat surface first, fence second, dust collection third, storage fourth. It is not glamorous, but it works, and in a woodworking shop that is the point. Once those foundations are in place, upgrades like a router lift, better casters, or deeper storage become improvements instead of repairs.
Build the station you will actually use, not the one that looks best in a render. If the top stays flat, the fence stays square, and the chips go somewhere other than the floor, the table will earn its space quickly.