Removing discoloration from wood is rarely a one-step job. The right fix depends on whether you are dealing with a water ring, a tannin mark, a greasy patch, or an old finish that needs to come off entirely. In this guide, I break down how to remove stain from wood safely, when a gentle cleaner is enough, and when sanding or stripping is the better move.
The safest fix depends on whether the mark is on the finish, in the finish, or in the wood
- Start by identifying the stain type; the wrong method can make the damage larger.
- For finished furniture, mild soap, soft cloths, and quick drying solve more problems than aggressive scrubbing.
- Dark water marks and tannin stains usually respond better to oxalic acid or a wood-bleaching step than to ordinary cleaners.
- If the color is part of an old finish, you will need stripping, sanding, or both before refinishing.
- Storage matters: stable humidity and dry air prevent the same problem from returning.
Identify the stain before you start
I always begin with diagnosis, because wood tells you what it needs if you look closely enough. A cloudy white ring on a coffee table is not the same problem as a black patch around a nail hole or a greasy imprint on a cabinet door. If you treat them all the same, you waste time and can permanently damage the surface.
Here is the quick way I separate the common cases:
| What you see | Likely cause | Best first move | What to avoid |
|---|---|---|---|
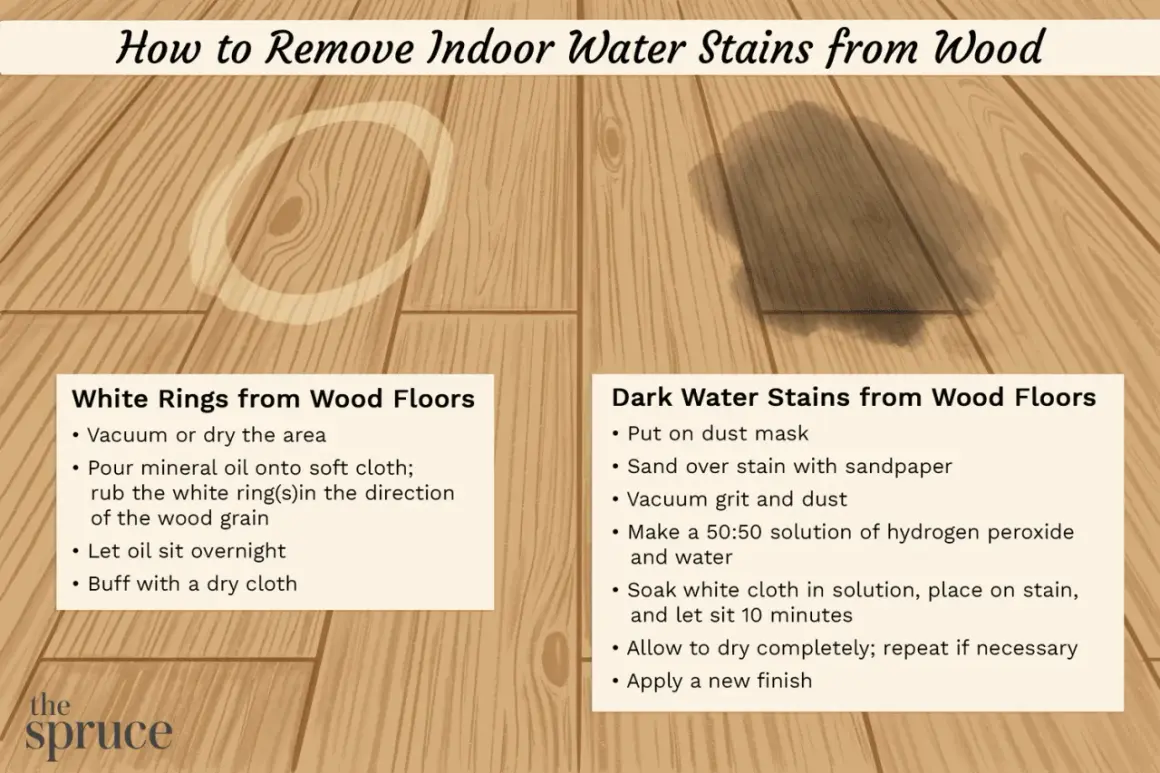
| White cloudy ring on a finished surface | Moisture trapped in the finish | Gentle cleaning, then mild heat or a light paste treatment | Heavy scrubbing and soaking the wood |
| Dark brown or black halo | Tannin reaction, iron, or deeper water damage | Oxalic acid or a wood bleach spot treatment | Household bleach on a random guess |
| Greasy or sticky patch | Oil, food residue, polish buildup | Dish soap solution and a soft cloth | Dry sanding before the residue is gone |
| Gray, dull, weathered area | UV exposure and surface oxidation | Cleaner, brightener, or sanding depending on depth | Assuming stain alone will fix the color |
| Color that appears built into the wood | Penetrating stain or aged finish | Stripper or sanding | Over-cleaning a finish that needs removal |
My rule is simple: if the mark changes the finish, I clean first; if the mark has migrated into the finish or wood, I move to a targeted treatment; if the color is built into the surface, I strip or sand. Once that is clear, the rest of the job gets much easier.

Start with the least aggressive cleaning method
For many finished pieces, the safest answer is basic cleaning done correctly. I use a soft cloth, a little patience, and as little water as possible. On wood furniture, a mild soap mix works surprisingly well: 1 tablespoon of dish soap per gallon of water. Wipe the surface, do not flood it, and dry it immediately with a clean cloth.
For a fresh water ring or a light cloudy mark, I like to test a few low-risk approaches before I reach for chemistry. A small amount of equal parts white vinegar and olive oil can help on some clear-finished surfaces, and a paste made from 2 parts baking soda to 1 part water can lift a stubborn ring if you rub gently with the grain. If the mark is recent, a low heat method through a cotton cloth can also help draw out trapped moisture.
- Dust first so you are not grinding grit into the finish.
- Test any treatment on an underside or back edge before touching the visible face.
- Work with the grain, not across it.
- Keep cloths damp, not wet.
- Stop as soon as the mark fades; overworking the area often creates a larger dull spot than the original stain.
On veneer, I am especially careful. The top layer is thin, so an aggressive pad or hard sanding can cut through it fast. If cleaning does not move the mark, the next step is not more pressure; it is a more targeted treatment.
Treat dark stains, tannin marks, and mildew with targeted chemistry
Once a mark has gone dark, ordinary soap rarely reaches it. At that point I think in terms of the chemistry behind the discoloration. Oxalic acid is one of the most useful spot treatments for tannin streaks, iron marks, and some black water stains. It is not a universal cleaner, but when it fits the problem, it works better than brute force.
Use oxalic acid for tannin and rust-related marks
Redwood, oak, cedar, and other tannin-prone woods can show dark streaks after moisture exposure or metal contact. In those cases, oxalic acid is usually the right correction because it targets the discoloration instead of just scouring the surface. I apply it only to the affected area, let it work according to the label, then rinse and dry thoroughly before deciding whether a second pass is needed.
Use oxygen bleach for exterior wood and organic staining
For decks, patio furniture, and other exterior wood, oxygen bleach is often a better first choice than harsher household cleaners. A deep-cleaning solution can foam for 15 to 20 minutes before scrubbing and rinsing, which gives it time to lift dirt, mildew, and weathering without the same risk of over-whitening the wood. This is especially useful when the discoloration sits on the surface rather than deep inside the fibers.
Read Also: DIY Platform Bed - Build a Sturdy, Quiet Frame
Be cautious with chlorine bleach
I avoid chlorine bleach on interior wood unless a product specifically calls for it. It can leave the surface blotchy, weaken fibers, or create a color change that is harder to blend than the original mark. If the stain is on a finished piece, I would rather start gentle, then step up to a product designed for wood than gamble with an all-purpose cleaner.
If a targeted treatment lifts part of the stain but leaves the surface uneven, that is a sign the problem is deeper than the top layer. When that happens, sanding or stripping becomes the more honest fix.
Strip or sand when the color is part of the finish
Sometimes the wood is not stained in the sense most people mean. The color you see may actually be an old finish, a penetrating stain, or a failed refinish that sits inside the pores. In those cases, cleaning will only make the surface cleaner-looking. It will not change the color.
For flat areas, I usually start with sanding. A practical progression is 120 grit to break through the old layer, then 150 or 180 grit, and finally 220 grit if I want a smoother surface before refinishing. Sand with the grain, remove dust between grits, and keep the pad moving so you do not create divots or rounded edges.
- Use a chemical stripper on carved trim, grooves, or detailed furniture parts where sanding would ruin the profile.
- Use a scraper carefully on flat sections, then sand the residue away.
- Do not over-sand veneer; if you see the substrate changing color too quickly, stop.
- Vacuum dust and wipe with a tack cloth before you judge the result.
- If the wood still looks patchy after sanding, the stain may have penetrated too deeply for sanding alone.
In my view, this is the point where many DIY repairs go wrong. People keep sanding because they expect the stain to disappear like dirt, but wood does not work that way. Once the color layer is embedded, the surface has to be rebuilt, not just cleaned.
Refinish the surface so the discoloration does not come back
After the stain is gone, the surface still needs protection. Bare wood absorbs moisture and future stains far too easily, which is why the repair often looks good for a week and then fails. If I have taken a piece back to bare wood, I treat refinishing as part of the correction, not a separate cosmetic step.
Softwoods like pine and many blotch-prone woods need extra help. A wood conditioner can reduce uneven absorption and help the new color lay down more evenly. On softwood projects, I apply conditioner, let it sit for about 15 minutes, wipe off the excess, and wait for it to dry before staining. That small step often makes a bigger difference than switching stain colors.
For storage pieces, shelves, cabinets, and furniture, a clear finish matters as much as the stain itself. A protective topcoat helps resist water, household chemicals, food stains, and routine wear. I prefer to build the finish patiently rather than trying to get full coverage with one heavy coat, because thin, even layers are easier to repair later.
Once the surface is sealed properly, the next problem is not the finish recipe. It is the environment the wood lives in.
Keep stored wood and furniture dry enough to stay clean
This is the part most people ignore, especially when a piece goes into a basement, garage, or storage unit. Wood and moisture are constant negotiation partners, and if the storage space swings too hard, discoloration comes back. For finished wood in a home or shop, I try to keep the room stable, with indoor humidity roughly in the 35% to 55% range.
- Keep wood off concrete floors with blocks, shelves, or pallets so moisture cannot wick upward.
- Use breathable covers such as cotton sheets or moving blankets instead of plastic wrap, which traps condensation.
- Leave some air space around stored furniture so humidity does not sit against one side.
- Use a dehumidifier in damp basements and a humidifier in dry winter storage spaces if the room swings too far.
- Wipe spills right away; even a short exposure can leave a mark on an unfinished or damaged finish.
For carpentry stock, the principle is the same: stable conditions are worth more than quick fixes. If the wood stores cleanly, it finishes more cleanly, and you spend less time correcting problems that should never have appeared in the first place.
The practical repair path I would use on a real piece
When I am standing in front of a stained table, cabinet door, or shelf panel, I work from least invasive to most invasive. First I identify the mark. Then I try gentle cleaning. If the discoloration is dark or chemical in nature, I move to a targeted treatment. If the color is really the finish, I strip or sand. That sequence saves time and keeps me from damaging the wood while chasing the wrong problem.
There is one exception I respect every time: valuable antiques, thin veneer, painted details, or water-damaged joinery deserve a slower decision. On those pieces, a hidden test spot is not optional, and in some cases the right move is to stop before the damage gets worse. A good repair is the one that leaves the wood stable, clean, and ready for use, not the one that simply looks aggressive.
So the shortest honest answer is this: match the method to the stain, and do not jump past the diagnosis. If you do that, most wood discoloration is repairable, and the result will hold up far better in storage, in daily use, and under the next round of real-life wear.