
Learning how to reupholster a chair is mostly about control: remove the old cover cleanly, inspect the frame, rebuild the padding, and stretch the new fabric so it stays smooth over time. I focus on the simple sequence first because that is what keeps a DIY chair from looking homemade in the wrong way. In this guide, I walk through the tools, materials, fabric choices, removal process, stapling technique, and the practical limits that tell me when a chair is worth saving and when it is better left alone.
The practical essentials before you start
- Start with a sturdy frame. If the chair rocks, has cracked wood, or loose joints, fix the structure before you touch the fabric.
- Use upholstery-grade material. For regular use, I look for fabric rated for at least 30,000 rubs and wide enough to handle the chair shape.
- Keep the old cover as a template. It is the fastest way to preserve shape, grain direction, and staple allowances.
- Rebuild the seat in layers. Foam gives structure, batting or Dacron softens the edges, and the outer fabric creates the finish.
- Work from the center outward. That is the simplest way to avoid wrinkles, pulled corners, and uneven tension.
- Plan for storage as you go. A labeled bag for screws and a tray for hardware saves time when it is time to reassemble.
Start with the chair, not the fabric
The first mistake I see is people choosing fabric before they know whether the chair is worth the labor. A simple dining chair with a removable seat is a strong beginner project; a damaged armchair with curved arms, loose joints, or decorative trim is a different level of work. If the frame is sound, the rest is mostly clean execution. If the frame is weak, new fabric only hides the problem for a while.
| Chair type | DIY fit | Typical fabric need | What to expect |
|---|---|---|---|
| Dining chair with removable seat | Best for beginners | About 1/2 to 1 yard | Usually no sewing, just removal, padding, and stapling |
| Dining chair with seat and back | Moderate | About 1 to 1.25 yards | More alignment work and more corners to manage |
| Armchair | Advanced | About 2.5 to 3 yards or more | More curves, more cutting, and often more repair work |
| Chair with cracked frame or failing joints | Only if you can repair wood confidently | Varies | Carpentry comes first; upholstery should not hide structural damage |
I usually tell people to begin with the easiest chair in the room, not the prettiest one. A seat-only project teaches the process without forcing you into complex sewing or pattern matching, and that matters when you are learning to control fabric tension. From there, the next question is what you need on the bench before you pull the first staple.
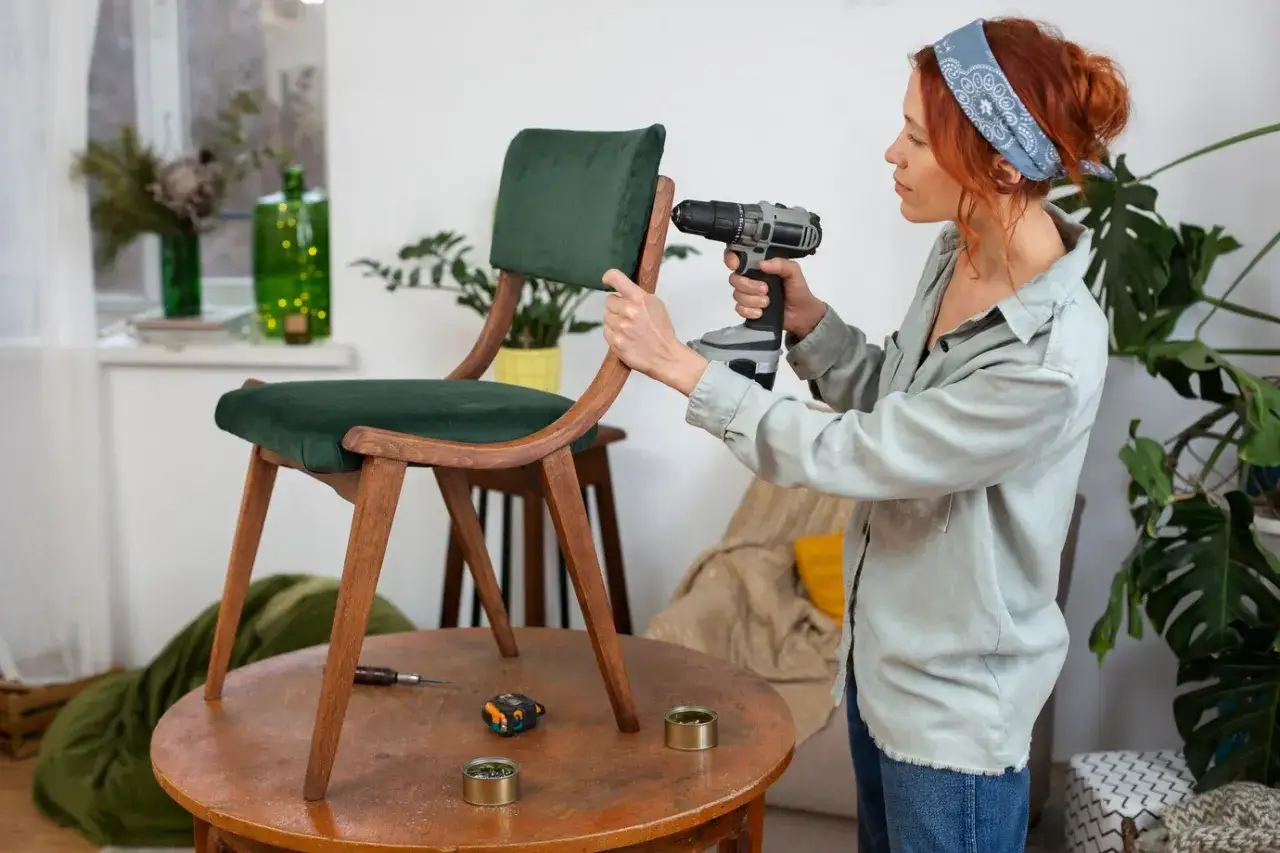
Gather the right tools and materials before you remove a staple
Good upholstery work is about preparation, and I treat the hardware stage like a small storage system. I keep screws in a labeled container, loose brackets in a separate bag, and the old fabric pieces stacked flat so they can double as templates. That one habit saves me from losing the original shape or mixing up the reassembly order.
- Screwdriver or drill for removing the seat
- Staple remover, tack puller, or sturdy pliers
- Heavy-duty staple gun, ideally one that drives staples cleanly into the seat base
- Scissors or a sharp utility knife
- Foam padding, usually 1 to 2 inches thick for a standard seat
- Batting or Dacron to smooth the edges and soften the profile
- Upholstery fabric, preferably wide enough for the chair width and depth
- Dust cover fabric for the underside
- Spray adhesive for attaching foam to the base
- Measuring tape, chalk, and a marker
For the fabric itself, I look for upholstery-grade material that can handle daily use. A rub count of 30,000 or more is a sensible target for a chair that gets sat in every day. If the fabric has a large repeat or a directional pattern, I buy extra rather than hoping to stretch a tight cut across the whole seat. For a plain seat-only chair, I usually expect about 1/2 to 1 yard of 54-inch-wide fabric; once the chair includes a back or arms, the yardage climbs quickly.
Once the materials are ready, the real work begins with taking the chair apart in a way that preserves the old shape instead of destroying it.
Strip the old upholstery and preserve the pattern
This is where patience pays off. I remove the chair seat first if it is a slip seat, then I photograph the underside before pulling anything loose. Those photos are useful later, especially when the chair has washers, corner braces, or a dust cover that hides the original layout.
- Turn the chair over and remove the seat or upholstered panel.
- Pull off the dust cover if one is present.
- Remove staples and tacks slowly so the base does not splinter.
- Keep the old fabric pieces intact whenever possible.
- Mark the front edge of each piece so the new fabric goes on in the same orientation.
I do not chase every tiny piece of metal if it is buried flat and harmless, but I do remove anything that could telegraph through the new work or snag the fabric during stapling. If the seat board is soft, cracked, or warped, I replace it rather than trying to upholster around a bad base. That is the carpentry part of the job, and it is what separates a clean recovery from a temporary patch.
Replace damaged padding and fix the seat base
Once the cover is off, I inspect the seat structure the way I would inspect a small piece of carpentry. Plywood, particle board, and thin seat platforms can all work if they are solid, but cracks, rot, or broken edges need attention before new fabric goes on. If I have to replace a seat base, I trace the old one, cut the new piece, and sand the edges smooth so they do not cut into the batting or fabric later.
For cushioning, I usually work in layers. Foam gives the seat its shape, batting softens the edges, and the outer fabric gives the finished line. On a standard dining chair, 1 to 2 inches of foam is usually enough. If the foam is decent but flattened, I may keep it and add fresh batting on top. If it is crumbly or permanently collapsed, I replace it without hesitation.
- Use spray adhesive to hold foam in place on the seat base.
- Press the foam evenly so there are no raised corners.
- Add batting or Dacron over the foam to soften the edges.
- Trim the padding only after it is positioned correctly.
The goal here is not just comfort. A clean, slightly rounded edge makes the final fabric sit better and reduces the hard outline of the board underneath. With the base rebuilt, the next job is cutting fabric accurately enough that the whole chair still looks intentional after the first staple goes in.
Cut, center, and staple the new fabric cleanly
This is the stage where people usually pull too hard, staple too fast, or cut too close. I avoid all three. I lay the fabric face down, center the padded seat on top, and use the old cover as a pattern whenever possible. If I need to start fresh, I leave 3 to 4 inches beyond the seat edge so I have enough material to wrap underneath and staple securely.
If the fabric has a strong pattern, I spend a minute aligning it before cutting. That small pause matters. A chair can be perfectly tight and still look wrong if the motif sits crooked at the front edge.
- Place the seat on the fabric, centered from side to side and front to back.
- Mark the cut line, allowing extra material for wrapping.
- Staple the center of one side first, then the opposite side.
- Repeat for the remaining sides so the tension stays balanced.
- Fold corners into neat pleats or gathers and staple them flat.
- Check the top surface after every few staples.
I keep the fabric taut, but I do not stretch it so hard that the weave distorts or the pattern shifts. On a simple chair seat, the best results usually come from slow, even tension and small corrections rather than brute force. Once the seat looks smooth from the top, I finish the underside and reattach the hardware.
Know when the project is worth the time and cost
Reupholstery is one of those projects where value depends on the chair itself, not just the fabric. A basic dining chair can be a smart DIY project because the labor is simple and the material list is short. A high-end armchair is a different calculation, especially if it needs frame repair, spring work, or complicated sewing. I always compare the chair’s construction, its sentimental value, and the cost of new replacement options before I decide how far to go.
Professional pricing also helps frame the decision. A dining room chair can commonly land in the $150 to $600 range when done professionally, while an armchair can run roughly $300 to $1,000. That does not mean DIY is automatically cheap, but it does show where the labor cost sits. If you already own the staple gun and cutting tools, a seat-only chair usually makes the strongest case for doing the work yourself.
Here is the practical filter I use:
- Choose DIY if the frame is solid, the shape is simple, and the old upholstery comes off cleanly.
- Choose DIY if you only need to replace the fabric on a seat and maybe refresh the foam.
- Choose a professional if the chair has intricate curves, tufting, channeling, or fragile vintage fabric that you want to preserve.
- Replace the chair instead of restoring it if the wood is failing and the piece has no real structural or sentimental value.
Once I know the project makes sense, I put my attention back on the finish work, because that is where a recovered chair starts to look like furniture again instead of a workshop project.
What I check before I call the chair finished
The last ten minutes matter more than most people think. I trim loose threads, press the dust cover neatly across the underside, and make sure the seat is screwed back down without wobble. Then I sit on it, lean side to side, and look at the front edge in natural light. If I can see slack or a wrinkle from a normal sitting position, I reopen that side and correct it before I move on.
- Check that the seat is centered on the frame.
- Confirm that all screws and brackets are back in place.
- Trim excess fabric close to, but not through, the staple line.
- Use a dust cover to hide the underside and protect the padding.
- Store leftover fabric, hardware, and a reference photo together for future repairs.
That last point is worth keeping. I like to leave a small labeled bag with the spare hardware and a scrap of the new fabric tucked somewhere safe, because the next repair is always easier when the materials are already organized. A chair reupholstery job is finished when the seat is tight, the frame is solid, and every edge looks like it was planned from the beginning.