Key things to get right before the first plank clicks in
- Run the planks lengthwise in most hallways so the space looks longer and the cuts stay cleaner.
- Acclimate the flooring for at least 48 hours and follow the brand’s temperature and humidity range.
- Leave a consistent expansion gap, usually around 3/8 inch, and hide it with trim instead of pinning the floor down.
- Use the right underlayment and do not double up padding if the planks already have an attached pad.
- Door frames, closet openings, and transitions need extra care because they are where floating floors fail first.
- Buy extra material, usually about 10%, because hallway offcuts waste more plank than a simple room.
The hallway changes the rules more than most rooms
A hallway is unforgiving because you can see the whole run at once. If the first row drifts off line by even a little, the error multiplies down the length of the floor. That is why I treat hall installs as a layout job first and an installation job second.
There is also more foot traffic, more doorway interruptions, and usually more trimming around casing than in an open room. Floating laminate can handle that well, but only if the subfloor is flat, the expansion gap is protected, and the boards are locked cleanly. Pergo’s installation guide, for example, calls for at least 48 hours of acclimation and a 3/8-inch perimeter gap, which is a good reminder that hallway installs still need room to move.| Hallway condition | What I do | Why it matters |
|---|---|---|
| Long, straight run | Lay the planks lengthwise | It visually stretches the space and keeps cuts simple |
| Several doorways | Dry-fit the first rows before locking anything | Balanced cuts look better and reduce awkward slivers |
| Concrete slab | Use the manufacturer-approved moisture layer or underlayment | Helps protect the floating floor from vapor |
| Narrow hall | Shift the starter row so the last row is not too thin | Thin edge strips can look weak and be harder to lock properly |
Once you understand those constraints, the layout becomes much easier to plan, and that is the next step I would never skip.
Plan the layout before the first plank goes down
My default in a hallway is to run the boards lengthwise. It usually looks better, and it also follows the practical advice from manufacturers to work along the longest, straightest wall. That does not mean you blindly trust the wall itself; walls are rarely perfectly straight, so I use a chalk line or a measured reference line instead.
I also dry-fit enough boards to see where the cuts will land at both ends. The goal is simple: avoid a tiny sliver on either side. If the last row would end up too narrow, I adjust the starter row before I commit. As a rule of thumb, I like to keep the final row wide enough to feel intentional, not like an afterthought. Quick-Step’s guide, for instance, recommends keeping the last plank at least 5 cm wide.
Read Also: Perfect Tile Floor Installation - Avoid Costly Mistakes
What I check during layout
- Which wall gives me the straightest visual reference.
- Whether the hallway opens into one room or several, because that affects transitions.
- How much material I need after adding at least 10% for waste and mistakes.
- Whether the end joints will stagger by at least 12 inches or about 30 cm.
- Whether the last row will still look balanced after I account for the expansion gap.
If the hall is extremely narrow or has an awkward bend, I pause here and rethink the starting point. That is a small delay compared with living with a crooked floor line for years, and it leads straight into the tools I want nearby before I start cutting.
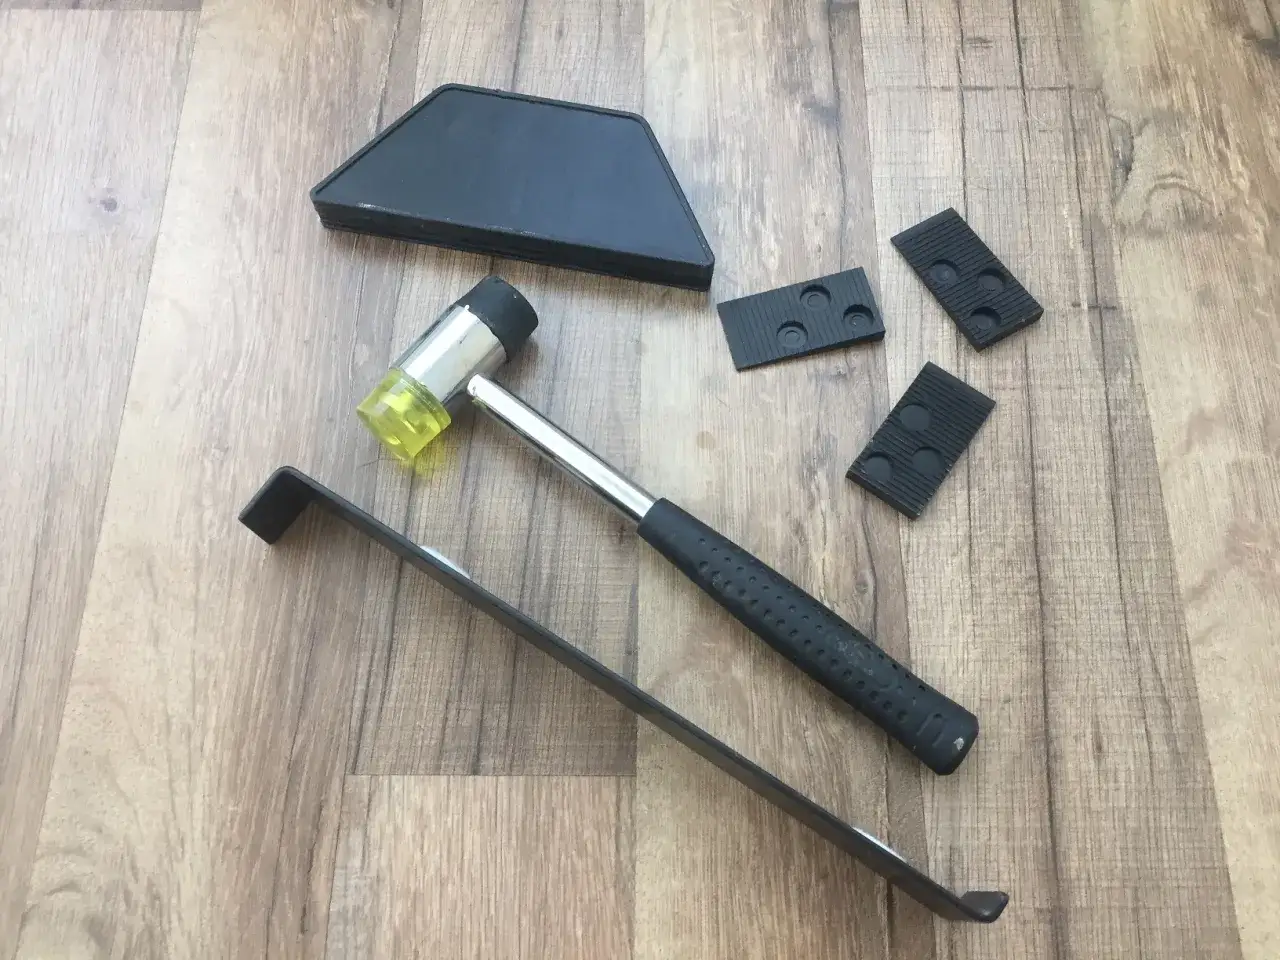
The tools and materials I actually want on hand
Hallway installs move faster when every tool is within reach. I do not want to stop midway through a row to hunt for a pull bar or a fresh blade. I also do not want to improvise with the wrong underlayment, especially if the planks already have an attached pad.
- Laminate planks, plus at least 10% extra
- Manufacturer-approved underlayment or moisture barrier
- Spacers for a consistent expansion gap, usually around 3/8 inch
- Tapping block and pull bar
- Jigsaw or oscillating saw for jambs and odd cuts
- Chalk line, tape measure, pencil, and square
- Utility knife for underlayment and trim adjustments
- Knee pads, eye protection, and a dust mask or respirator when cutting
One detail matters more than beginners expect: if the laminate already has an attached pad, I do not add another underlayment layer unless the manufacturer explicitly says to. Doubling the padding can make the floor feel loose and can interfere with the locking system. Lowe’s says the same thing in simpler terms: follow the product instructions, because the underlayment decision depends on the specific floor you bought.
With the layout settled and the tools ready, the install itself becomes a controlled sequence rather than a guessing game.
The installation sequence that keeps the run straight
This is the part people think they want first, but it only works if the prep and layout are already done. I install hallway laminate in a floating pattern, which means the boards lock together and are not nailed or glued to the subfloor unless the manufacturer says otherwise. Lowe’s puts it plainly: floating laminate expands and contracts, so the floor has to be able to move.
- Acclimate the planks. Keep unopened cartons flat in the room for at least 48 hours. If your brand asks for more time in extreme humidity or dryness, follow that instead.
- Prep the subfloor. Sweep thoroughly, remove old trim, and undercut door casings so the new planks can slide underneath. The floor should be clean, dry, and flat enough for the product’s tolerance.
- Install the underlayment. Roll it out in the direction the floor will run, tape seams as instructed, and keep it smooth. Do not overlap seams unless the product tells you to.
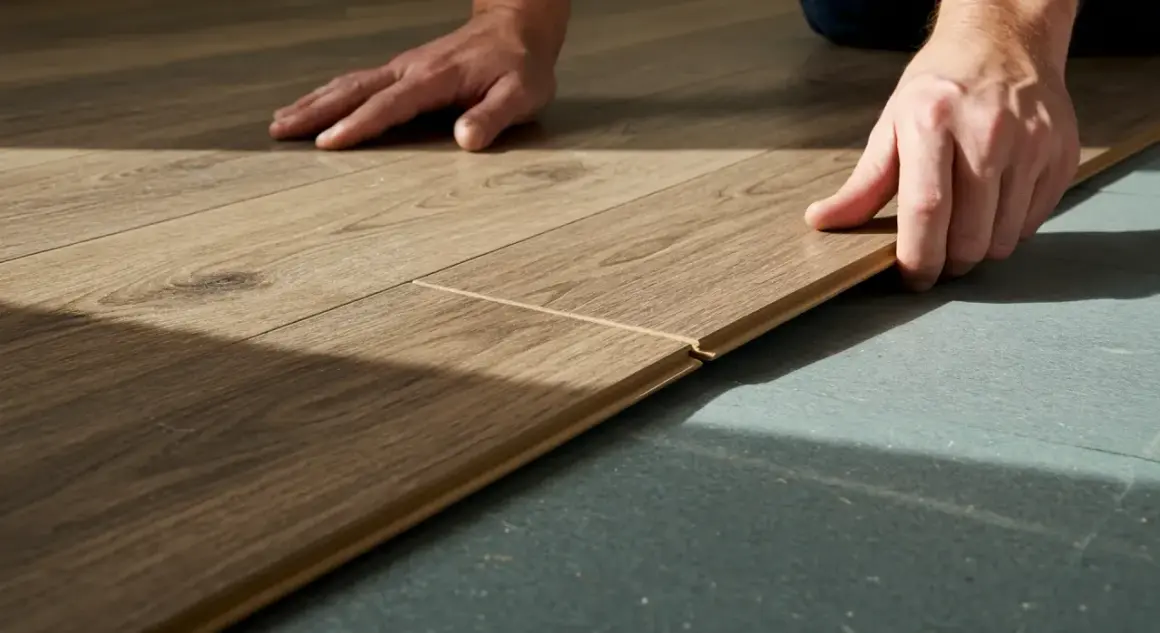
- Set the first row. Place spacers around the perimeter so you keep that consistent expansion space. I prefer to snap a chalk line rather than trusting the wall.
- Lock the next rows. Stagger end joints so they never line up from row to row. I aim for at least 12 inches of offset because it looks better and distributes stress more evenly.
- Use the tapping block carefully. Tap gently and stay at least 8 inches from the plank ends when you are closing the long side. Excess force can chip the locking profile.
- Cut the last row to fit. Measure carefully, subtract the expansion gap, and rip the boards lengthwise so the final strip is wide enough to stay stable.
- Trim around obstacles. For vents, pipe penetrations, and odd corners, a jigsaw gives the cleanest control, but the expansion gap still has to remain open.
I like to keep a full carton or a heavy box across the end of the active row while I work. It stops the boards from creeping backward as I click the next pieces into place. That simple trick saves time, and it matters even more once the hallway starts feeding into doorways and adjoining rooms.
Doorways, trim, and transitions decide whether the floor looks finished
Hallways almost never end cleanly. They meet bedrooms, bathrooms, closets, or a front entry, and each of those junctions can expose a flaw if you rush it. This is where floating floors either look professional or look improvised.
| Situation | What I do | Why |
|---|---|---|
| Door frame | Undercut the casing and slide the plank under it | Hides the expansion gap and creates a cleaner line |
| Hallway to carpet | Use the proper transition strip | Protects the edge and bridges the height change |
| Hallway to another floating floor | Follow the manufacturer’s doorway or T-molding rule | Lets each floor move independently if the run is too long |
| Hallway to tile or rigid surface | Use the profile specified for the height difference | Prevents chipping and gives the edge a cleaner finish |
I am careful not to fasten trim through the floor itself. Baseboards and shoe molding should go to the wall, not through the laminate, or you risk trapping the floating system. Lowe’s shows the doorway detail well: the plank should tuck slightly under the frame, while the expansion gap stays concealed and open beneath the casing.
If the hallway connects to a laundry room, bathroom, or another space with more moisture, I become stricter about the product instructions and the transition profile. That is the point where the install is no longer just about looks; it is about keeping the floor serviceable over time.
The mistakes that show up fastest in a hallway
Hallways are good at exposing shortcuts. A mistake that might disappear in a large room can look obvious here because the eye tracks the line from one end to the other. I see the same problems again and again, and they are all avoidable.
| Mistake | What happens | Better move |
|---|---|---|
| Skipping acclimation | Boards can move after installation and open joints or buckle | Let the cartons rest in the room for at least 48 hours |
| No expansion gap | The floor can pinch, lift, or bind at the edges | Use spacers and hide the gap with trim |
| Starting off line | The hallway looks crooked from one end to the other | Snap a reference line and trust it, not the wall alone |
| Stacked end joints | The floor feels repetitive and weaker at the seams | Stagger joints by at least 12 inches, or 30 cm |
| Last row too narrow | The edge looks awkward and is harder to lock securely | Adjust the starter row before you get too far |
| Forcing joints with too much hammering | The locking profile chips or the board edge bruises | Tap lightly with the right block and pull bar |
There is a practical truth here: hallway floors do not forgive uncertainty. If the first two rows are right, the rest usually goes smoothly. If they are not, the mistakes keep repeating until the end of the run, which is why I treat those early rows as the most important part of the job.
The small checks that make the hallway feel finished
Once the boards are in, I do not call the job done immediately. I remove the spacers, install the trim, and walk the hallway in both directions to check for any hollow-sounding spots, tight joints, or edges that catch my eye. If a transition strip needs silicone, caulk, or a specific fastening method, I follow the product label rather than guessing.
- Vacuum grit before installing trim so debris does not get trapped under the molding.
- Confirm that the baseboards cover the gap without pinching the floor.
- Check door swings so new floor height does not cause rubbing.
- Look down the hallway from both ends to confirm the line reads straight.
- Avoid wet mopping right away if your trim or sealant still needs time to cure.
For a hallway, the finish is not just the visible surface. It is the way the line runs, the way the door casings sit, and the way the floor still has room to move after the room changes temperature and humidity. If I were doing this in a real home, I would spend more time on layout and doorway trimming than on the last row itself, because that is where the hallway either looks deliberate or looks patched together.