
A DIY shower tile installation is less about sticking tile to a wall and more about building a waterproof system that can handle daily steam, soap, and movement. I would treat the tile as the visible finish and the substrate as the real project, because that is where most failures start. The steps below cover the planning, materials, waterproofing, setting, grout, and the mistakes that are worth avoiding before they become expensive repairs.
The safest path is to plan the waterproof system first and the tile second
- Start with the shower structure, not the decorative tile, because the backer and membrane decide whether the job lasts.
- Use a system approved for wet areas and follow one manufacturer’s instructions from start to finish when you can.
- Aim for near-full mortar coverage in the shower, with no hollow corners or unsupported edges.
- Leave movement joints open at inside corners and other changes of plane, then fill them with silicone sealant.
- Do not rush the cure times; a shower that looks dry can still be weak underneath.
- If the pan, curb, or drain needs rebuilding, the project jumps a level in difficulty fast.
Decide whether this is a tile job or a shower rebuild
The first thing I check is scope. If the walls are sound, the framing is plumb, and the waterproofing system is straightforward, a shower tile project is very doable for a careful homeowner. If you are moving the drain, rebuilding the curb, correcting slope, or repairing rot behind the old walls, you are no longer just setting tile; you are rebuilding a wet-area assembly.
| Project scope | Difficulty | What helps | When I would call a pro |
|---|---|---|---|
| Retiling sound shower walls | Moderate | Flat framing, approved backer, simple layout | Hidden moisture damage, mold, or soft framing |
| Replacing tile over a complete waterproof system | Moderate to advanced | Existing membrane or board system still in good shape | Any sign the membrane was compromised |
| Building a new pan and curb | Advanced | Prefabricated shower system, clear instructions, no plumbing relocation | Curbless showers, drain moves, or structural repair |
If you want the odds on your side, keep the first project to walls over a proven base. Once the floor assembly enters the picture, the margin for error gets much smaller, which is why the next decision is the backer and waterproofing system.
Choose the backer and waterproofing method before you buy tile
I prefer to choose the wall system before I choose the tile, because not every tile is hard to set, but every bad substrate is hard to hide. In a shower, the system needs to stay dimensionally stable, resist moisture, and let the membrane do its job without surprises.
| System | Strengths | Tradeoffs | Best fit |
|---|---|---|---|
| Cement board + separate membrane | Proven, widely available, usually lower material cost | More steps, more seams to treat, heavier to handle | DIYers who do not mind extra prep and want a familiar build |
| Foam board shower system | Lightweight, easy to cut, waterproofing is built in or integrated | Higher material cost, requires matching accessories | First-time installers who want a cleaner system-based approach |
| Approved drywall with a full membrane system | Fast and efficient when the system allows it | Only appropriate when the chosen method explicitly permits it | Best left to people who will follow one manufacturer’s method exactly |
My rule is simple: if the product system does not clearly support a wet area, I do not improvise. A shower is not the place to mix and match random boards, membranes, and sealants. Once the system is chosen, the prep work becomes much more predictable.
Materials-wise, I would also budget for 10% extra tile for a straight layout and 15% extra for diagonals, niches, or complex cuts. That small cushion saves a lot of stress when a tile cracks, a cut goes wrong, or you discover the color lot is sold out.
Prepare the shower so the tile has a flat, dry, stable base
This is the part most people want to rush, and it is also the part that decides whether the finished shower feels solid. I want the framing straight, the backer secure, the seams treated, and the waterproofing continuous before a single tile goes up.
- Inspect the studs and make them plumb. If a wall bows, shim or plane it now instead of trying to force tile to hide it later.
- Install the approved backer board or foam panel system according to the manufacturer’s fastener pattern.
- Tape seams with alkali-resistant mesh where the system requires it, then embed the tape in thin-set or the prescribed compound.
- Seal corners, penetrations, niches, and fastener zones with the correct waterproofing method.
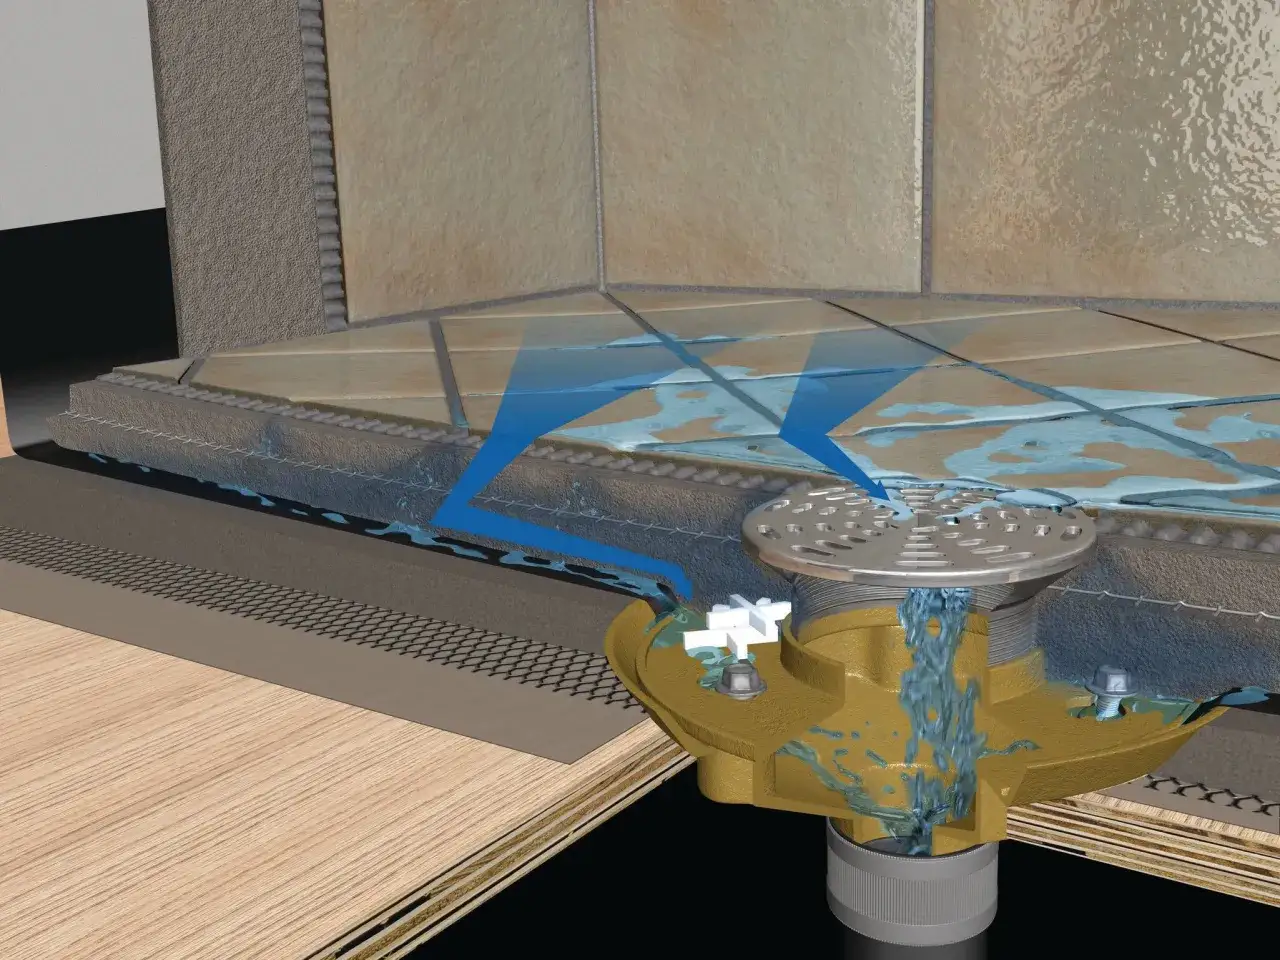
- Carry the waterproofing continuously through the shower area, including the pan or curb if you are building those parts.
- Let the membrane cure fully, then test the shower receptor when the system calls for it before you tile over it.
The two places I watch most closely are the corners and any opening around plumbing fixtures. Those are the points where small defects turn into leaks. If you are building a shower floor, remember that the receptor needs proper slope to the drain, typically 1/4 inch per foot, or water will sit where you do not want it.
Once the base is correct, the tile itself becomes much easier to manage. That is where layout and coverage start to matter more than brute force.
Lay out the tile so the finished shower looks intentional
A good layout makes the shower feel custom even when the tile is simple. I start by picking the most visible wall, usually the one you see first when you step into the room, and then I work backward so the cuts land where they are least distracting.
For wall tile, a dry layout saves headaches. I measure the tile plus grout joint, mark centerlines, and check how the top and bottom cuts will look before I spread any mortar. If the layout leaves tiny slivers at the ceiling or next to a corner, I shift the plan until the cuts look balanced.
For larger wall tile, the substrate flatness matters even more. Once tiles get larger than about 15 inches on a side, the wall has to be very honest. Any hump, dip, or twist becomes visible fast, and lippage shows up where edges do not line up cleanly.- Use a level line, not the shower pan edge, as your first reference if the base is imperfect.
- Use a ledger board when the first course cannot safely rest on the pan or floor.
- Back-butter larger or textured tiles if needed to improve contact.
- Pull a tile every so often to verify that the mortar ridges are collapsing properly.
- Keep the grout joints consistent, but do not force a pattern that makes the cuts awkward.
Set, grout, and caulk with the right materials in the right places
For a shower, I use a cementitious thin-set mortar, not a general-purpose adhesive that was never meant for constant moisture. The mortar should match the tile, the substrate, and the trowel size. If you are working with large-format tile, a bigger notch is often needed, but I always verify coverage instead of trusting a label alone.
When I set tile, I comb the mortar in one direction, press the tile in firmly, and move it slightly across the ridges to collapse them. That helps avoid voids behind the tile. In a shower, I want roughly 95% mortar coverage in the wet area, because a few hidden air pockets can become trouble later.
What I leave open until the end
- Inside corners
- Wall-to-tub or wall-to-floor transitions
- Changes of plane around niches, benches, and curbs
- Joints around plumbing trim and other penetrations
Those joints should not be filled with grout. Grout is rigid, and shower corners move a little over time. I finish those places with a 100% silicone sealant that matches the grout color as closely as practical. It is a small detail, but it makes a big difference in how long the shower stays crack-free.
Grout choice matters too. Cement grout is common and affordable, epoxy grout is tougher and more stain resistant, and some high-performance grouts offer easier cleanup. I pick the product based on joint width, tile type, and how much maintenance the homeowner is willing to accept. If the shower sees hard use, the more durable grout option is usually worth the extra effort.
After grouting, I keep the shower out of service long enough for the system to cure properly. Rushing back into a shower that still has soft grout or uncured sealant is one of the fastest ways to undo careful work.
The mistakes that cause most shower failures
Most failed shower installations do not fail because the tile was ugly. They fail because the assembly underneath was compromised. When I see a shower go bad, it is usually one of the same few problems repeated in different forms.
| Mistake | What it leads to | Better approach |
|---|---|---|
| Stopping waterproofing short of corners or niches | Hidden leaks, swollen walls, mold | Carry the membrane continuously through every wet surface |
| Using grout in changes of plane | Cracked corners and recurring hairline splits | Use flexible silicone sealant at movement joints |
| Setting tile on an uneven substrate | Lippage, bad cuts, uneven grout lines | Flatten and plumb the wall before tile goes up |
| Poor mortar coverage | Hollow sounds, loose edges, trapped moisture | Check coverage often and back-butter when needed |
| Ignoring cure time | Weak grout, stained joints, early failure | Follow the product schedule instead of the clock in your head |
The mistake I see homeowners make most often is assuming that a shower has to be “waterproof enough” rather than fully detailed. It does not. Water finds the seam you skipped, the corner you grouted wrong, or the drain detail you rushed. Once you accept that, the project gets simpler: every layer has one job, and each one has to be done cleanly.
What I would simplify on a first shower project
If I were guiding someone through a first shower project, I would keep the design modest and the system predictable. A straight layout, a pre-engineered waterproofing method, and standard wall tile are far more forgiving than a diagonal pattern, a custom niche maze, or a curbless floor that depends on perfect slope.
I would also keep the scope narrow. Refinish the walls if the base is already sound. Use a shower system with one set of instructions. Keep the tile size moderate unless you are comfortable making the walls very flat. And buy enough extra material that a bad cut does not stop the job.
Most of all, I would treat the shower as a sequence of checks, not a race to the finish. If the base is flat, the waterproofing is continuous, the mortar coverage is strong, and the corners are sealed correctly, the tile part of the project becomes the easy part. That is the point where a DIY shower can look professional and stay that way.