Leveling a floor is rarely about making every inch perfectly horizontal. For tile and other hard flooring, what matters most is a surface that is flat, stiff, and prepared for the finish that will sit on top. In this guide, I walk through how to level a floor the practical way: how to spot humps and dips, which repair method fits each problem, and where the work stops being a floor-finish issue and becomes a structural repair.
The safest approach is to measure first, fix the structure second, and use the lightest repair that solves the problem
- Flatness matters more than perfect levelness for most tile installs, except where drainage is required.
- A long straightedge tells you more than a short bubble level because it reveals both high spots and low spots across distance.
- Minor humps are usually ground down, shallow dips can be patched, and broader waves often call for self-leveling underlayment.
- If the floor flexes, squeaks, or feels spongy, the issue is structural first and cosmetic second.
- Many self-leveling products need primer, accurate mixing, and a narrow working window.
- Large-format tile needs a flatter substrate than smaller tile, so the target depends on the finish you plan to install.
Flatness matters more than a perfect bubble reading
When I evaluate a floor for tile, I separate flat from level right away. A floor can slope a little and still be perfectly usable, but if it has humps and dips, the tile will show it as lippage, hollow spots, or uneven grout joints. That is why a bathroom floor can be slightly out of level and still work, while a shower pan or exterior surface must be intentionally sloped for drainage.
For standard ceramic tile, a common working target is about 1/4 inch over 10 feet. For large-format tile, especially anything with one edge 15 inches or longer, I plan for a tighter surface: roughly 1/8 inch over 10 feet, with even tighter control over shorter spans. The bigger the tile, the less forgiveness you have. That is the part most homeowners miss when they focus only on whether the floor “feels level.”
In practice, flatness protects the install more than perfection protects the eye. Once you understand that difference, the next step is simple: measure the room in a way that shows the real shape of the surface, not just the obvious problem spots.
Measure the floor before you choose a fix
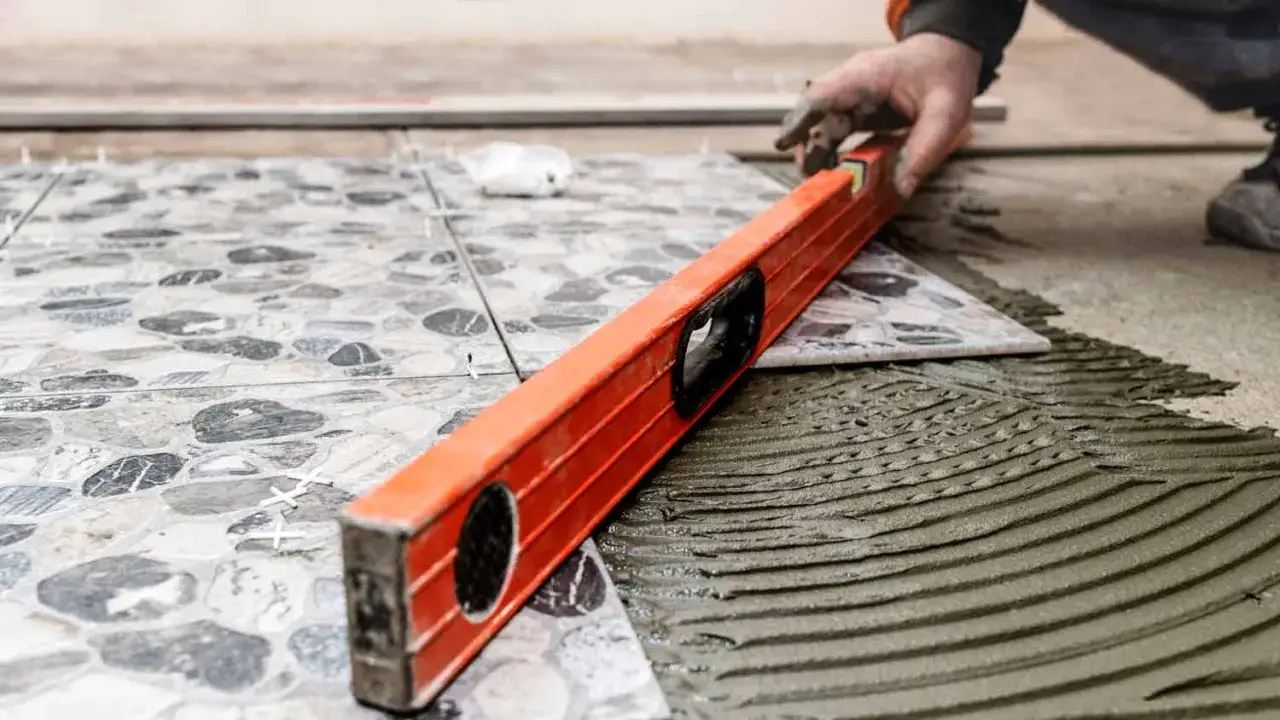
I start with a long straightedge, usually 6 to 10 feet, because it exposes the floor’s actual profile. This Old House uses the same basic approach: lay a straightedge on edge across the floor, then look for places where it rocks or leaves a gap. Rocking means a high spot. A gap means a low spot. Mark both as you go so you do not lose the map once you start grinding or patching.
The tools I reach for are simple:
- a 6 to 10 foot straightedge or very straight board
- a tape measure
- a pencil or chalk line
- a laser level if the room is large or the slope is hard to read
- a notepad or floor sketch so I can mark problem areas
I also check the floor in more than one direction. A room can look acceptable from one angle and still have a diagonal crown or sag that will matter once tile goes down. If I find more than a few isolated gaps under the straightedge, I assume the problem is not just one bad spot. It is usually a pattern, and that pattern tells me whether to grind, patch, pour, or repair the subfloor.
Before I move on, I also look for movement. A floor that flexes underfoot needs a different solution than a floor that is merely uneven, and that distinction saves a lot of wasted material.
Choose the method that matches the defect
There is no single leveling product that solves every floor. The best method depends on whether the surface has a hump, a dip, a broad wave, or a structural issue below it. I prefer to choose the smallest fix that will actually make the floor tile-ready, because overbuilding a repair is expensive and underbuilding it is worse.
| Method | Best for | What it fixes | Main limitation |
|---|---|---|---|
| Grinding | Concrete humps, ridges, thin high spots | Reduces peaks without adding height | Creates dust and does nothing for low areas |
| Patching compound | Small dips, seams, shallow depressions | Fills localized lows | Not efficient for large areas or deep build-ups |
| Self-leveling underlayment | Broad unevenness, multiple low spots, tile prep | Creates a new flat plane over the substrate | Needs correct priming, mixing, and edge containment |
| Structural repair | Bounce, sag, rot, loose panels, weak joists | Restores stiffness and support | More invasive, but often the only durable fix |
Self-leveling underlayment is the method most people think of first, but I do not treat it as a universal answer. Modern cement-based products can cover a wide range of conditions, and some systems can be placed from roughly 1/8 inch to 3 inches in a single lift. Some are walkable in 2 to 3 hours at normal room temperature, and non-moisture-sensitive tile can sometimes be set once the surface is walkable. But the product data sheet controls the job, not the calendar on the wall.
If the issue is a high ridge, I grind. If it is a shallow bowl, I patch or pour. If the floor is moving, I repair the structure first. That order matters, because leveling material will not make a weak floor strong.
Follow a leveling workflow that avoids rework
Once I know the problem, I work in a sequence that keeps me from trapping defects under the finish. The exact product varies, but the workflow is consistent.
- Remove the existing finish and expose a clean substrate.
- Fix loose subfloor panels, squeaks, broken fasteners, and damaged edges before touching the surface shape.
- Find the highest point and use it as the reference for the rest of the room.
- Grind down sharp humps or protrusions first, because it is easier to remove a high spot than to bury it with filler.
- Patch shallow low spots where a full pour would be unnecessary.
- Prime the substrate if the chosen product requires it. That step matters more than people think, especially over porous concrete or difficult existing surfaces.
- Mix the underlayment exactly to spec. Too much water weakens the product and changes the flow.
- Pour or spread the material in a controlled way, then let it seek its plane without overworking it.
- Recheck with a straightedge after cure before tile or underlayment goes on top.
Timing is product-specific. A fast-setting underlayment may give you a short working window, while cooler temperatures, higher humidity, and thicker pours will extend dry time. MAPEI’s current guidance also warns against drafts for at least 72 hours after installation in some systems, which is one more reason not to rush airflow just because the surface looks dry.
What I like about this workflow is that it forces the job to answer a simple question at each step: is the problem in the shape of the floor, or in the strength of the floor? The answer determines everything that follows.
Know when the floor needs structural repair
Some floors are too far gone for surface leveling alone. If the floor feels springy, the subfloor panels move when you walk on them, or the room has repeat failures at the same joints, the issue is likely structural. That is common in older homes, around plumbing leaks, and in remodels where the original framing was never meant to carry a stiff tile assembly.
These are the warning signs I take seriously:
- noticeable bounce or deflection underfoot
- squeaks that return after fastening
- swollen, delaminated, or water-damaged panels
- particleboard, luan, or other unstable underlayment layers
- wide joist spacing or undersized framing for the finish you want
- cracks that reappear after patching
For tile over wood framing, stiffness matters as much as flatness. A common rule of thumb is L/360 for ceramic tile and L/480 for natural stone. In plain English, the floor has to resist bending enough that the tile and grout are not forced to absorb movement. If the structure cannot do that, the right fix may be sistering joists, adding blocking, replacing bad subfloor, or changing the finish plan altogether.
This is where a lot of DIY projects go sideways. People spend time chasing a flat top surface while ignoring movement below it. Once the floor is stable, the leveling work finally has something solid to build on.
The mistakes that cost the most time later
Most leveling failures come from the same handful of mistakes, and they are avoidable if you stay disciplined during prep.
- Leveling to the wrong target. For tile, I want flatness and support, not an absolutely horizontal room at any cost.
- Skipping primer. Self-leveling products often need it to bond properly and spread predictably.
- Ignoring moisture. Concrete that is too wet can ruin the underlayment or the finished floor above it.
- Trying to fix bounce with filler. A flexing floor needs structural repair, not just more material.
- Using the wrong tool. A short level can hide waves that a long straightedge would reveal immediately.
- Overwatering the mix. That makes the product easier to pour but weaker after cure.
- Pouring beyond the product limit. If the material is rated for a certain depth, respect it or use aggregate and a second lift if the system allows it.
- Tilting the room with guesswork. A floor that needs drainage should be designed for drainage, not improvised after the fact.
The most expensive mistake, in my experience, is trying to hide a structural defect under a cosmetic fix. It can look good for a month and fail for years. Once that is clear, the last step is making sure the floor is actually ready for the tile assembly you plan to install.
The checks I make before tile goes down
Before I set a single tile, I run one last control check with a straightedge in several directions. If the floor is still outside the target flatness, I correct it now. After tile is installed, every small defect becomes harder and more expensive to hide.
I also check the transitions, because doorways and room edges tell you whether the leveling work is truly continuous. A floor can look good in the center and still create a lip at the threshold, which is exactly the kind of detail people notice after the furniture is back in place. For large-format tile, I am especially strict here, because long edges exaggerate every rise and dip beneath them.
If the room is going to receive tile, I make one final decision: either the floor is flat enough to support the tile system, or it is not. That is the honest point of the whole process. A good finish starts below the surface, and the best time to solve unevenness is before the first tile ever touches thinset.