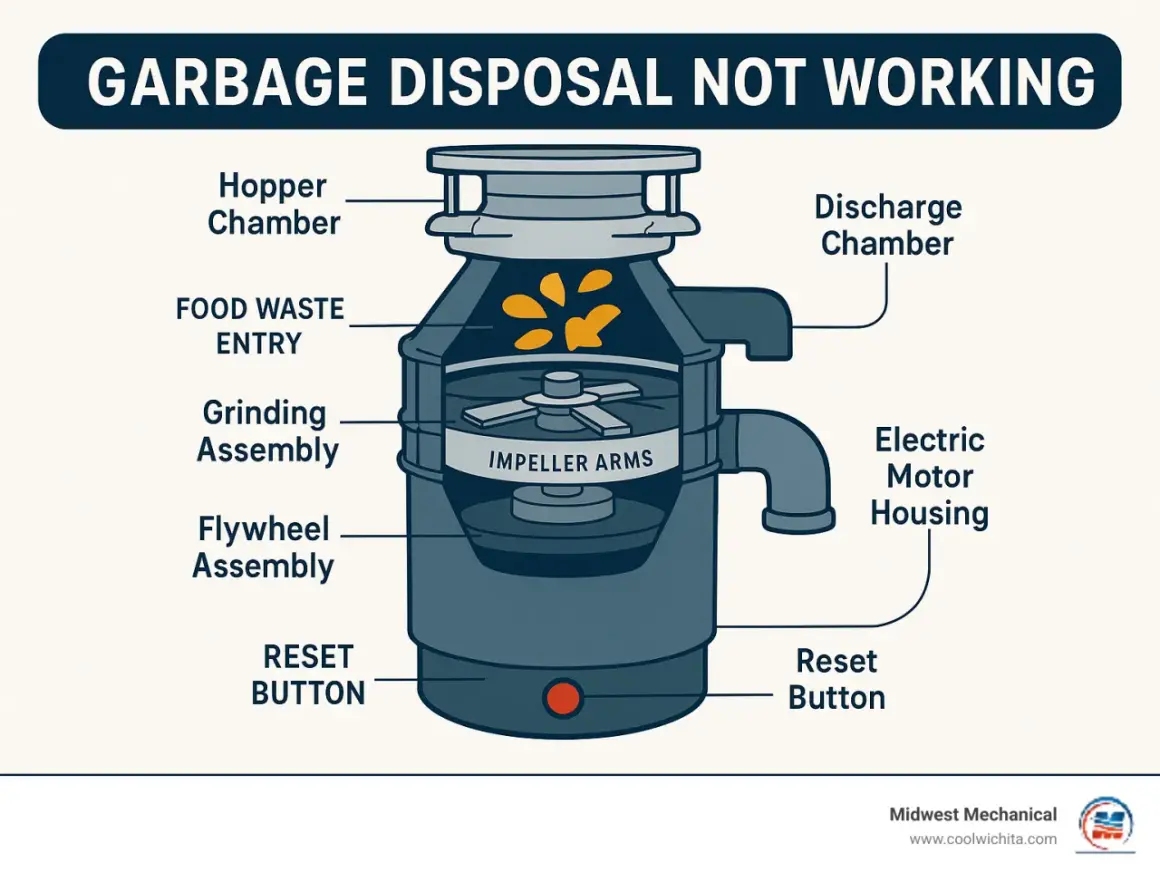
The fastest path is to diagnose the symptom before turning screws
- A humming disposal usually points to a jammed impeller or flywheel, not an instantly dead motor.
- A unit with no sound at all is more likely dealing with power, switch, outlet, or breaker trouble.
- Slow draining often has more to do with the trap or branch line than with the disposal chamber itself.
- Leaks at the top or side are often repairable, but a leak from the bottom usually means the unit is failing internally.
- Always cut power first. If the breaker trips repeatedly or you smell burning, stop the DIY work.
Start by reading the symptom correctly
I always separate a true disposal failure from a plumbing backup before touching anything. The fix changes depending on whether the unit is jammed, unpowered, overheated, clogged downstream, or leaking from a specific joint. That first diagnosis saves time and keeps you from dismantling the wrong part of the sink.
| What you notice | Most likely cause | Best first move |
|---|---|---|
| Humming, but the unit does not spin | Jammed flywheel or impeller, sometimes overload protection | Turn off power, free the chamber, then press reset |
| Complete silence when switched on | No power, tripped breaker, bad switch, loose plug | Check outlet, GFCI, breaker, and reset button |
| Runs, but the sink drains slowly | P-trap or branch drain clog | Clear the trap and inspect the outlet pipe |
| Water under the cabinet | Loose connection, failed gasket, cracked housing | Dry the area and locate the exact leak point |
| Burning smell or smoke | Motor strain, jam, or internal damage | Shut it off and stop using it |
Once I know which bucket the problem falls into, the repair gets much simpler. The next step is the one most homeowners need first: clearing a jam without damaging the motor.
How to clear a jammed disposal without making the problem worse
When a disposal hums but refuses to spin, I treat it like a jam until proven otherwise. That symptom is common, and it is usually fixable with a safe manual release, a reset, and a careful test run.
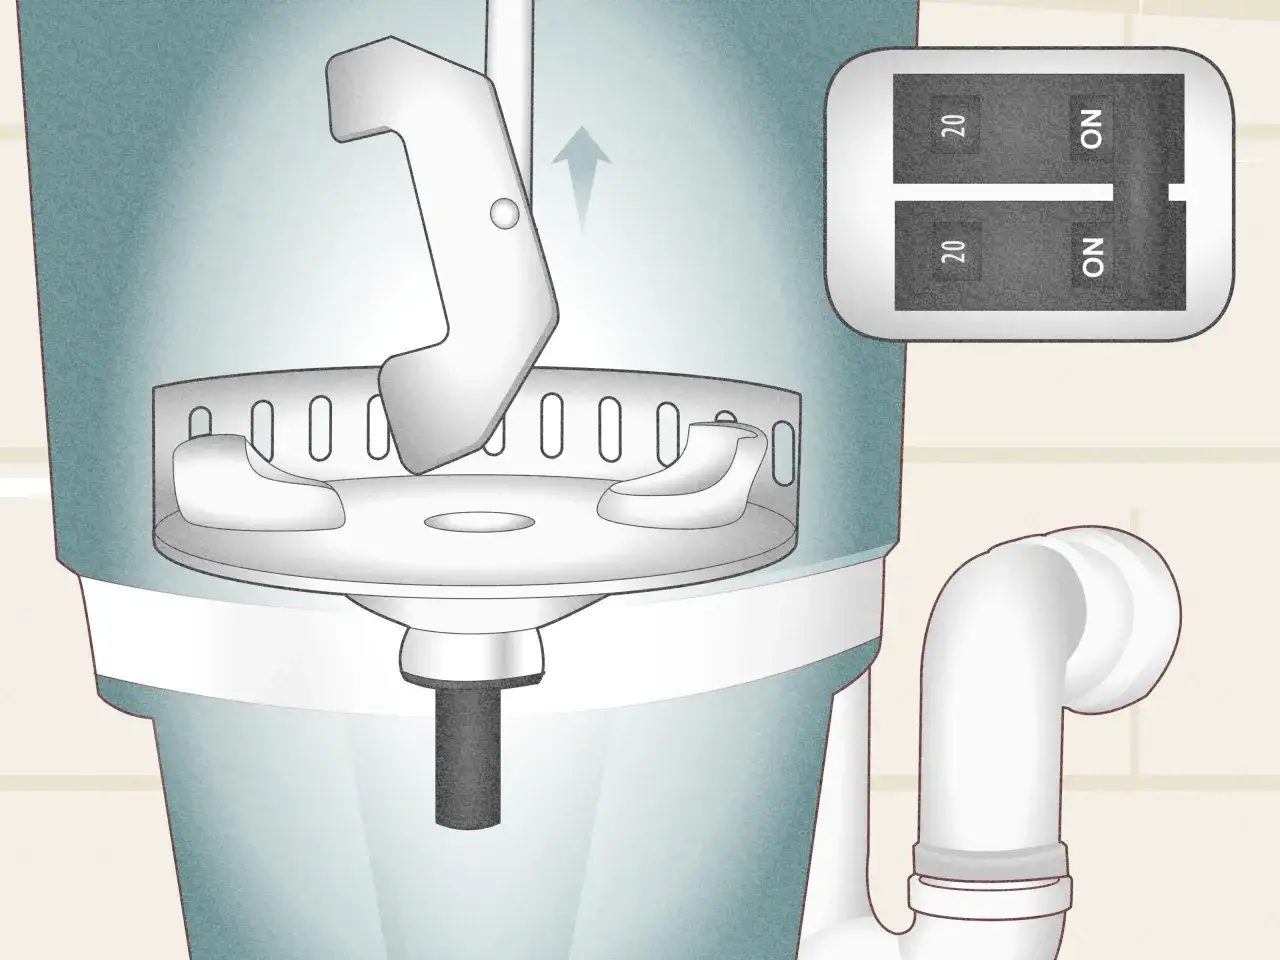
- Turn off power at the breaker or unplug the unit. Do not trust the switch alone.
- Shine a flashlight into the sink opening and remove visible debris with tongs or needle-nose pliers.
- Look for the hex socket on the bottom of the unit and insert a 1/4-inch Allen wrench. Turn it back and forth to free the flywheel.
- If the wrench stops hard, keep working it gently rather than forcing it. A stubborn stop often means a spoon, bone, or other object is lodged inside.
- Once the chamber turns freely, press the reset button on the bottom or side of the unit. If the motor was overheated, let it cool for a few minutes first.
- Restore power, run cold water, and test the disposal in short bursts.
What I do not recommend is putting a hand inside the chamber or trying to “muscle through” a jam by holding the switch down. If the disposal starts, stalls again, and then trips repeatedly, the problem may be deeper than a simple obstruction. At that point, I move on to the electrical path.
Check the electrical path before you assume the motor is dead
A disposal that is totally silent is often dealing with a power problem rather than a mechanical one. In kitchens, that usually means a tripped breaker, a popped reset, a GFCI outlet, a loose plug, or a worn switch.
- Check the wall switch and make sure it is actually sending power to the unit.
- If the disposal plugs into an outlet under the sink, confirm the plug is fully seated.
- Reset any GFCI outlet on the same circuit, since a sink area often shares protection with other kitchen loads.
- Look at the breaker panel for a tripped breaker and reset it once.
- Press the disposal’s reset button only after you have cleared any jam and given the motor time to cool.
- If the breaker trips again immediately, stop. That points to a short, a failing motor, or a wiring problem that is not a casual DIY fix.
A good rule here is simple: if the unit powers up after a reset and then fails again under light load, I start thinking about motor wear. If it never powers up at all, I look at the circuit first. That distinction matters, because the next failure mode is usually plumbing, not electricity.
Clear the drain line when the sink is backing up
Sometimes the disposal is working, but the sink still holds water or backs up into the other basin. In that case, the problem is usually in the P-trap, discharge elbow, or branch drain instead of the grinding chamber itself.
- Place a bucket and towels under the trap before loosening anything.
- Disconnect the P-trap and let the water drain into the bucket.
- Remove sludge, grease, and food buildup from the trap and the disposal outlet.
- Inspect the discharge elbow and the dishwasher inlet if your dishwasher ties into the unit.
- Reassemble the parts snugly, but do not overtighten plastic fittings.
- Run cold water and test the sink for fast drainage.
I avoid chemical drain cleaners here. They can sit in the trap, damage seals, and create a second problem without solving the first. If the trap is clear but the line still drains slowly, the clog is farther down the branch line and a hand auger or plumber’s snake is the better next step. Once the drain path is clear, leaks become the last major issue to check.
Find the source of a leak before the cabinet gets damaged
When I see water under a sink, I dry everything completely before testing. That makes the leak source much easier to spot, especially around the flange, the side connections, and the bottom of the unit. A good leak test is simple: wrap paper towels around each suspect point, run water, and look for the first wet spot.| Leak location | What it usually means | Best fix |
|---|---|---|
| Top, where the disposal meets the sink | Loose mounting hardware, worn putty, or a bad sink flange seal | Retighten the assembly and reseal the flange if needed |
| Side, at the discharge pipe or dishwasher inlet | Loose slip nut, worn washer, cracked hose, or poor connection | Tighten or replace the connection parts |
| Bottom of the unit body | Internal seal failure or cracked housing | Replace the disposal |
Top and side leaks are often fixable with hardware, a gasket, or fresh plumber’s putty. Bottom leaks are different. If water is coming from the body of the unit, I treat that as a replacement problem rather than a repair problem, because the internal seals are usually done. That brings up the question most homeowners eventually face: repair or replace.
Know when repair is the wrong answer
I am comfortable repairing a disposal when the failure is external and specific. I am much less interested in rescuing a unit that keeps failing after a clean jam, smells burnt, or leaks from the body. Most disposals last roughly 8 to 15 years with normal use, but age alone is not the only factor. Repeated overloads and neglected clogs wear them out faster.
- Repair makes sense when the issue is a jam, a loose connection, a reset, or a clogged trap.
- Replacement makes more sense when the bottom leaks, the housing is cracked, or the motor overheats after light use.
- Replacement is usually the better call when you are getting repeated resets, loud grinding after clearing debris, or a persistent burnt smell.
- DIY prevention matters: run cold water while grinding and for 15 to 20 seconds after, feed scraps gradually, and skip grease, fibrous peels, and hard non-food objects.
- Small habits help a lot: flush the unit regularly, keep the splash guard clean, and do not overload it with a full sink of scraps at once.
That is the dividing line I use in real kitchens: fix the reversible problems, replace the appliance when the seals, wiring, or motor are telling you they are done. If you keep the diagnosis simple and work from the symptom outward, most disposal failures are manageable without turning the job into a full plumbing project.