Learning how to solder copper pipe is less about brute heat and more about preparation. Clean metal, the right flux, and a steady heating pattern are what make the solder flow into the joint instead of sitting on top of it. This guide covers the tools, the sequence, the safety details that matter in U.S. plumbing, and the mistakes that usually cause leaks.
The essentials that decide whether a copper joint holds
- Use lead-free solder and flux for potable-water lines in U.S. homes.
- Clean both the pipe and fitting to bright copper before you apply flux.
- Heat the fitting, not the pipe, and let the solder move by capillary action.
- Stop feeding solder once you see a thin, continuous silver ring at the joint.
- Wipe off flux residue while the joint is still warm so corrosion does not start later.
Tools and materials that make the job predictable
I treat the torch as the least important tool in the kit; the real work happens before the flame goes on. If the pipe is cut square, cleaned properly, and assembled without play, soldering becomes much more forgiving.
| Item | Why it matters | Practical note |
|---|---|---|
| Tube cutter | Gives a square cut and leaves less cleanup work | A hacksaw can work, but it usually leaves more burrs and uneven edges |
| Deburring tool or reamer | Removes the internal ridge that blocks flow | Deburr both inside and outside the pipe end |
| Emery cloth or abrasive pad | Cleans the metal to a bright surface | Shiny copper solders more reliably than dull, oxidized copper |
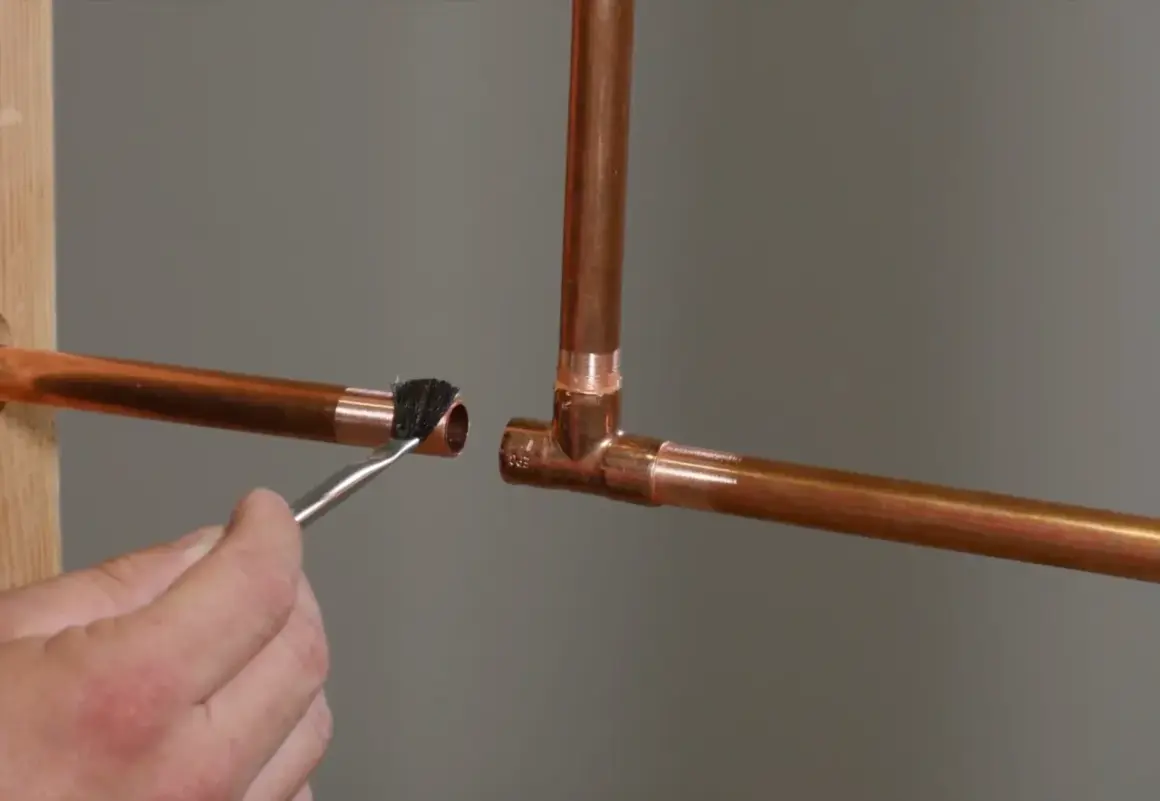
| Fitting brush | Cleans the inside of the coupling or elbow | Match the brush to the fitting size so you actually reach the cup |
| Lead-free flux | Helps the solder wet the metal and flow into the joint | Use a thin coat, not a heavy paste layer |
| Lead-free solder | Forms the actual watertight bond | Choose solder approved for drinking-water plumbing when the line serves potable water |
| Propane or MAP-Pro torch | Supplies controlled heat | Smaller tips suit smaller tubing; larger joints need more heat |
| Heat shield and dry rag | Protects nearby surfaces and helps clean the joint | Keep both within reach before lighting the torch |
| Fire extinguisher and spray bottle | Backup for stray heat or smoldering material | Do not start a solder job unless you can reach them fast |
For most household work, the common tubing sizes are 1/2-inch and 3/4-inch, and the same basic technique applies to both. Larger diameters simply demand more patience, more even heat, and a cleaner setup. Once the kit is ready, the next step is the part that really decides whether the joint seals.
Prepare the joint so solder can pull itself in
Capillary action is the whole trick here. The solder does not get forced into the joint by pressure; it is drawn into the narrow gap between the pipe and the fitting when both surfaces are clean, properly fluxed, and hot enough.
- Cut the pipe square so the fitting seats evenly.
- Deburr the inside and outside edge until the pipe end is smooth.
- Dry-fit the pieces and mark insertion depth if the joint is in a tight spot.
- Clean the pipe and fitting to bright metal; do not stop when they only look “less dirty.”
- Brush on a thin, even coat of flux on both mating surfaces.
- Assemble the joint with a slight twist, then leave it alone.
That last point matters more than beginners expect. Once the surfaces are cleaned and fluxed, fingerprints, dust, and movement work against you. I like to imagine that the joint has already become a system at that point, and every extra touch just makes it less predictable. With the joint prepared correctly, the flame has a much easier job.
Heat the fitting, not the pipe
This is the part people usually try to muscle through, and it is where most bad solder joints start. The flame should warm the fitting cup evenly, not blast one spot on the pipe until the flux burns off.
- Hold the torch at about a 45-degree angle and aim at the fitting side of the joint.
- Move the flame around the circumference so the whole cup comes up to temperature.
- Keep the heat slightly ahead of where you are applying solder.
- Touch the solder to the joint edge, not directly into the flame.
- When the solder melts, let the joint draw it in on its own.
- Stop feeding as soon as a thin silver ring appears around the fitting.
- Remove the heat, then wipe the joint with a dry rag once it is safe to do so.
If the solder balls up instead of flowing, the joint is usually not hot enough or not clean enough. If the flux starts to smoke heavily, turn black, or disappear too early, the joint is too hot and you are close to burning the chemistry that makes the bond work. A good joint looks neat and controlled, not piled up with extra solder. That brings us to the mistakes that create leaks even when the pipe seems “pretty close.”
The mistakes I see most often
Most solder failures are not mysterious. They come from one of a handful of repeatable problems, and once you know them, you can usually spot the weak joint before water ever touches it.
| Mistake | What it causes | Better move |
|---|---|---|
| Dirty or oxidized copper | Solder beads up, refuses to flow, or leaves gaps | Clean until the metal is bright again |
| Too much flux | Messy residue and a higher chance of corrosion later | Use a very thin coat on both surfaces |
| Heating the pipe instead of the fitting | Solder sticks to the wrong place and never fully enters the cup | Focus the flame on the fitting side and move it evenly |
| Overheating the joint | Burned flux, blackened surfaces, and failed flow | Back off, let it cool, and re-clean if needed |
| Moving the joint too soon | Cracked solder ring or a hairline leak | Hold the assembly still until it cools enough to inspect |
| Trapped water in the line | The joint never gets hot enough to solder properly | Drain and dry the pipe completely before heating |
I do not trust a repair that only looked good while it was hot. The real test is whether the joint stayed clean, round, and evenly filled after cooling. The next layer is the one many DIY repairs miss entirely: safety and code.
Safety and code details in U.S. plumbing
For drinking-water work in the U.S., the material choice matters as much as the technique. The EPA lead-free rule limits solder and flux to no more than 0.2% lead and sets a separate limit for the wetted surfaces of pipes, fittings, and fixtures, so lead-free products are the correct default for potable-water lines.
I also keep the work area as controlled as the joint itself. That means ventilation, a fire shield when framing or cabinets are close, and a final check for smoldering material after the flame goes out. If the repair is in a concealed wall, near insulation, or under a permit, I stop and verify local requirements before I start heating anything.
- Use lead-free solder and flux on potable-water systems.
- Keep combustible materials away from the torch path.
- Inspect both sides of the wall if the joint is near finished surfaces.
- Have a fire extinguisher close enough to reach without leaving the job.
- Do not assume a dry-looking area is safe if there is insulation or dust hidden behind it.
Once safety is handled, the next question is not “Can I solder it?” but “Should I solder it, or is another connection better for this spot?”
When soldering is the right choice and when another fitting is smarter
Soldered joints are a strong choice when you want a compact, durable connection on accessible copper tubing. They are less ideal when the line is wet, hidden, cramped, or impossible to inspect after the repair. In those cases, I weigh the method before I touch the torch.
| Method | Best use | Why I choose it | Tradeoff |
|---|---|---|---|
| Soldered joint | Permanent copper-to-copper connections in accessible runs | Compact, inexpensive, and proven when the prep is right | Needs a dry line and open flame |
| Press fitting | Fast repairs or no-flame work | Very clean and quick in tight spaces | Tool and fitting cost are higher |
| Compression fitting | Visible service connections | No heat required | Bulkier and not my first pick for hidden walls |
| Push-fit fitting | Emergency fixes or awkward access | Fastest option when time matters most | Not the method I would choose for every concealed repair |
If the joint is in a finished wall and you cannot inspect it later, the connection method matters as much as the workmanship. That is why I always look at the whole job, not just the fitting in my hand. The final habit is small, but it saves more repairs than any torch trick.
Why I always practice on scrap before touching the line
The fastest way to get comfortable with soldering is to ruin two short offcuts on purpose. A practice joint tells you how long the fitting needs heat, how quickly the flux reacts, and how much solder is enough for a clean ring without flooding the cup.
- Use the same pipe size as the real job, not a random scrap piece.
- Watch for the moment the flux goes from wet to active and then to ready.
- Practice feeding solder from the edge of the joint instead of melting it in midair.
- Inspect the finished ring for gaps, dull patches, or blackened flux.
The best copper repair is usually the one built on patience, not flame. If I can make a clean practice joint, then repeat that same result on the live line, I know the repair is ready to hold water instead of only looking finished.