
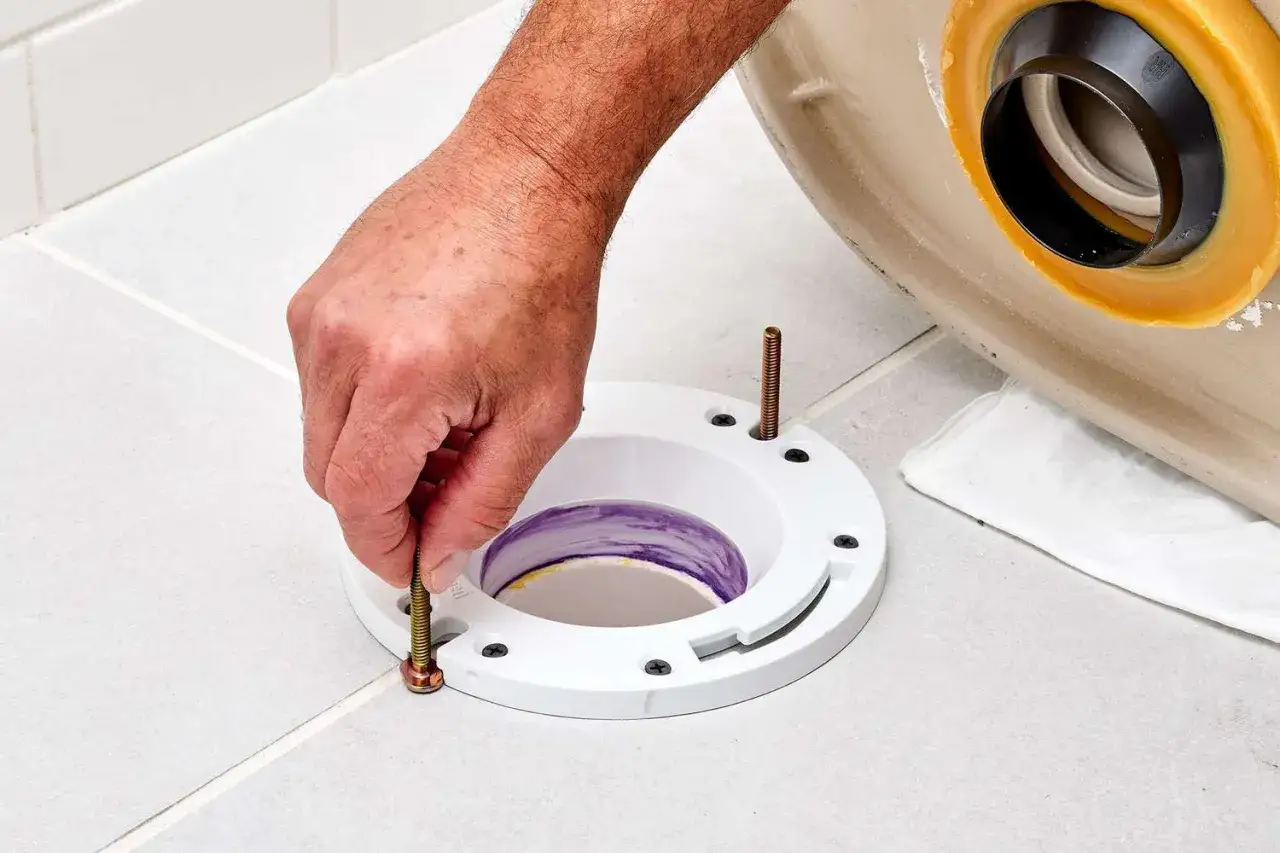
A toilet flange on tile works best when the flange ends up on the finished surface, or very slightly above it, so the wax ring can compress evenly and the toilet stays stable. In real remodels, the tile thickness, mortar bed, and subfloor height often decide whether you need a spacer, a new seal, or a full reset. I’ll walk through the height target, the practical fixes, and the mistakes that cause leaks or a rocking toilet.
What matters most before you set the toilet on tile
- The flange should sit on top of, or at least level with, the finished floor surface.
- If it ends up below the tile, a spacer or extension kit is usually the cleanest fix.
- If the flange is cracked, rusted, or missing bolt slots, repair or replace it instead of building around the damage.
- Measure from the finished tile, not the subfloor or backer board, because that is the real reference point.
- A toilet that rocks is usually warning you about height, support, or both.
What the flange should do on a tiled floor
The closet flange is the ring that connects the toilet to the drain and gives the bowl a solid place to bolt down. On a tile floor, I want that sealing surface to meet the finished floor, not the subfloor hidden underneath it. That matters because the wax ring is not meant to bridge a big height gap; it is meant to compress evenly between the toilet horn and the flange.
When the flange sits on top of the tile or just barely proud of it, the toilet can compress the seal without putting stress into the bowl. If the flange sits too low, the wax ring has to work harder than it should, and the leak path starts to open up around the horn. If it sits too high, the toilet can rock, which is almost as bad because movement eventually breaks the seal.
My practical rule is simple: finished tile is the reference plane. Once that plane is right, the rest of the job becomes a matter of measuring the gap accurately and choosing the least invasive fix that still leaves a durable seal. That measurement step is what I check next.
How to measure the finished height correctly
I do not trust visual guesses here. Tile, thinset, mortar, and underlayment can change the finished height by enough to make a toilet leak if you guess wrong. The cleanest way to check is with a straightedge across the tile and a tape measure from the straightedge down to the top of the flange.
| Flange position | What it usually means | What I would do |
|---|---|---|
| On top of the tile or slightly above it | Usually the ideal setup | Use a standard wax ring or the seal the toilet manufacturer recommends |
| Flush with the tile | Can work, but leaves less margin for error | Check the toilet base fit carefully and make sure the seal compresses evenly |
| About 1/8 to 1/2 inch below the tile | Common after new flooring goes in | Use a flange extender, spacer kit, or a thicker seal depending on the gap |
| More than 1/2 inch below the tile, or visibly damaged | Usually too much correction to ignore | Reset, replace, or repair the flange instead of trying to bury the problem in wax |
There is one detail people miss all the time: measure to the actual tile surface, not to the backer board, not to the mortar bed, and not to the grout joints if they sit lower than the tile face. I also check the whole flange, not just one side, because tile floors are not always perfectly flat. If the flange is uneven, the toilet can sit deceptively level while the seal is still compromised. That is where the repair choice becomes more important than the measurement itself.
Best ways to correct a flange that sits below the tile
When the finished floor is already in place and the flange ended up too low, I choose the fix based on how far off it is. A small gap can often be handled cleanly; a bigger one needs a proper flange extension or a reset. I try not to overcomplicate it, because the cheapest-looking shortcut is often the one that causes a callback later.
| Fix | Best use case | Main advantage | Typical parts cost | Main limitation |
|---|---|---|---|---|
| Standard wax ring | Flange is at or very near finished floor height | Simple and inexpensive | $5 to $10 | Not forgiving when the flange is clearly low |
| Extra-thick wax ring | Small height deficit | Fast fix for a minor mismatch | $8 to $15 | Still not the best answer for a large gap or unstable floor |
| Flange extender or spacer kit | Flange sits below the tile after a remodel | Brings the sealing surface back to the right height | $15 to $40 | Must be installed squarely and sealed correctly |
| Repair ring or full flange replacement | Flange is cracked, rusted, broken, or badly out of position | Most durable long-term repair | $20 to $100+ in parts | More labor, and sometimes floor access is needed |
I treat the spacer kit as the cleanest answer when new tile leaves the flange below grade. Manufacturers build these kits for exactly that situation, and they are more reliable than trying to make wax do structural work it was never meant to do. If the flange itself is damaged, I stop thinking about extenders and start thinking about repair or replacement instead. One more distinction matters here: an offset flange solves alignment problems, not height problems, so it is not the right tool if the only issue is the tile stack-up.
How to install the flange or extension without creating a leak path
Once the height issue is solved, the installation details decide whether the repair lasts. I start by shutting off the water, removing the toilet, and scraping every bit of old wax off the bowl outlet and the flange. Then I inspect the flange, the subfloor, and the surrounding tile for movement, cracks, or rot. If the floor is soft, no spacer kit in the world will make the installation reliable.
- Dry-fit the flange, extender, or repair ring and make sure the bolt slots line up with the toilet base.
- Use the correct screws or anchors for the floor type: wood screws into wood, concrete anchors into slab.
- Do not rely on tile alone for fastening. Tile is the finish layer, not the structure.
- If the kit calls for a gasket or sealant between layers, install it exactly where the system is designed to seal.
- Set the wax ring or approved seal, then lower the toilet straight down without sliding it around.
- Snug the bolts evenly until the bowl is stable, then stop. Over-tightening can crack the toilet or distort the seal.
- Test with several flushes and check around the base and below the floor for any seepage.
Two habits make a bigger difference than people expect. First, I keep the toilet level while setting it down so the wax compresses evenly. Second, I do not chase stability by tightening the bolts harder and harder. If the bowl rocks, the real problem is usually the floor, the flange height, or both. Tightening alone only hides that for a little while.
The mistakes I see most often in tiled bathrooms
Most flange failures on tile do not come from one dramatic error. They come from a chain of small compromises. A floor gets tiled before the flange is addressed, the installer assumes the wax ring will make up the difference, and the toilet gets forced into place. That is how leaks start.
- Setting the flange before the tile is finished and never correcting the height afterward.
- Using the wrong repair method for the size of the gap.
- Trying to compensate for a low flange with too much wax instead of a proper extender.
- Ignoring a cracked flange, rusted ring, or missing bolt slot.
- Fastening the flange in a way that does not anchor it to the structural floor.
- Sliding the toilet around after the seal is already seated.
- Over-tightening the bowl bolts until the porcelain starts to complain.
The biggest mistake, in my view, is treating the finished floor as an afterthought. Tile changes the geometry of the bathroom, and plumbing has to respect that change. Once you start thinking in finished-floor height instead of subfloor height, the whole job gets easier to judge. That is also the point where a simple repair ends and a deeper problem becomes obvious.
What I check before I call the job done
Before I leave a toilet-flange job on tile, I want three things: the bowl sits flat, the seal is sound, and the flange is actually supported. If any one of those is off, the bathroom may look finished but the repair is not really finished.
- The toilet does not rock when I press on opposite corners of the bowl.
- The bolts are snug, but the porcelain is not stressed.
- The flange sits at the proper relationship to the finished tile, not the subfloor.
- There is no seepage around the base after several flushes.
- The floor around the flange is solid, not soft or springy.
- If the flange was repaired or extended, all transition points are sealed and fastened properly.
If the toilet still rocks after a correct flange repair, I do not assume more caulk or more bolt tension will save it. At that point I recheck the floor flatness, the flange stack, and the toilet base itself. That last pass is usually what separates a repair that merely looks done from one that actually stays dry.
For this kind of bathroom work, the rule I trust most is also the simplest: build to the finished tile, not to the rough floor underneath it. If the flange height is right, the seal is clean, and the toilet sits solidly, you are usually in good shape for the long run. If the height is wrong or the flange is damaged, fix that first and let the seal do its job the way it was designed to.