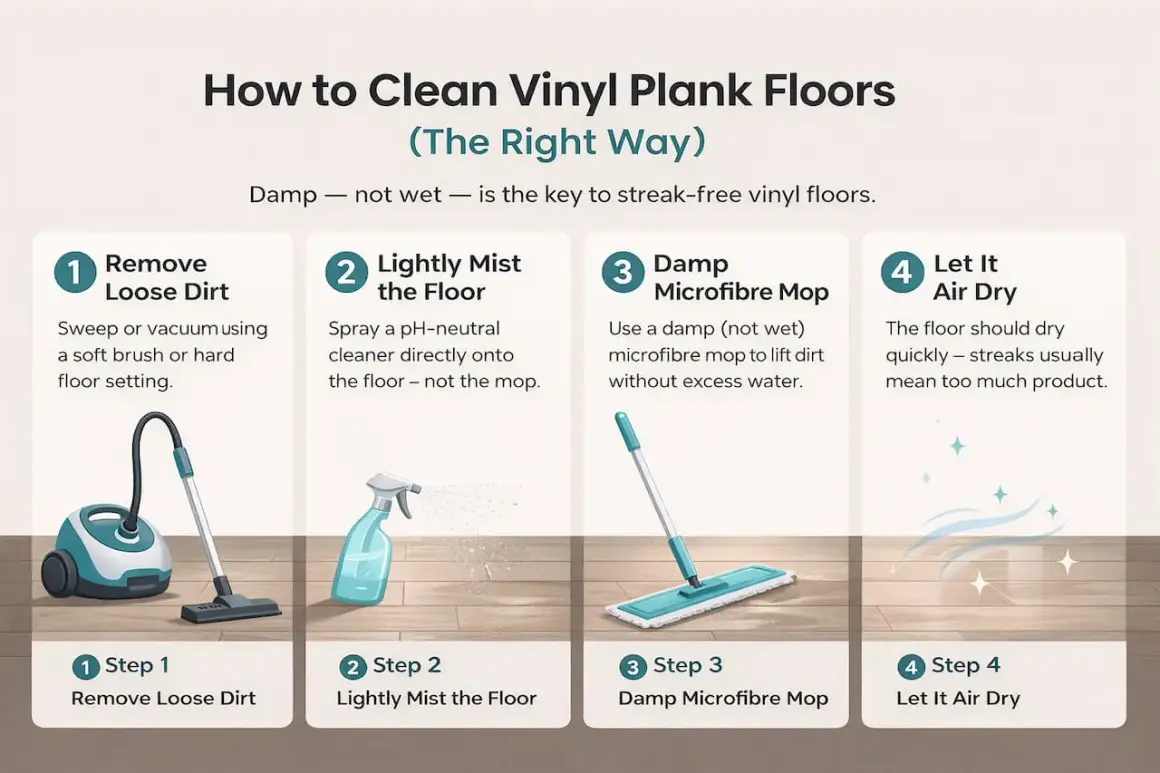
The safest method keeps the floor dry enough to protect the finish
- Dry cleaning comes first. Sweep, dust mop, or vacuum before any wet cleaning so grit does not act like sandpaper.
- Use a pH-neutral cleaner. That is the safest choice for routine cleaning on most vinyl plank floors.
- Keep the mop barely damp. Vinyl can handle moisture, but standing water and soaked pads create problems.
- Blot spills immediately. Fresh spills are easy; dried residue is what usually leaves marks.
- Avoid steam, wax, vinegar, and harsh chemicals. Those are common reasons floors turn cloudy or sticky.
- Dry the surface at the end. A quick pass with a clean microfiber cloth prevents streaking and slipping.
Start with dirt control, because grit does the real damage
Before I touch a mop, I get rid of loose dirt. Fine grit from shoes, pet paws, and entryways is what scratches the wear layer over time, especially in kitchens, hallways, and mudrooms. If you clean only the visible spots and leave the dust behind, the floor can still look hazy because you are pushing soil around instead of removing it.
For day-to-day maintenance, I prefer a broom with soft bristles, a dry microfiber dust mop, or a vacuum set to hard floors. The key detail is the vacuum head: use a hard-floor attachment and turn off any rotating brush or beater bar. In busy areas, I would do a quick dry clean every day or two; in lower-traffic rooms, every few days is usually enough. Once the loose debris is gone, the next step is choosing the right cleaner for the surface itself.
Use a cleaner that matches the floor, not just the mess
The cleaning product matters as much as the tool. The safest general choice is a pH-neutral hard-surface cleaner made for vinyl or LVP, because it removes soil without leaving a sticky residue or attacking the finish. I also like microfiber because it picks up fine residue better than cotton and works well on textured planks.
| Method | Best for | What I use | Main caution |
|---|---|---|---|
| Dry sweep or vacuum | Dust, pet hair, sand, crumbs | Broom, dust mop, hard-floor vacuum attachment | Do not use a beater bar or brush roll |
| Damp mop | Everyday soil and light footprints | Microfiber mop and a pH-neutral cleaner | Wring the mop well; do not flood the floor |
| Spot cleaning | Spills, scuffs, sticky marks | White cloth, small amount of cleaner, or rubbing alcohol for stubborn spots | Avoid abrasive pads and anything that can haze the finish |
The manufacturer guidance I checked is consistent on the basics: dry removal first, then a lightly damp mop, and no steam unless the product guide specifically allows it. That is the pattern I trust because it cleans the floor without loading the seams or leaving detergent behind. Once you have the right cleaner and pad, the actual washing process is straightforward.
A deep-clean method that keeps the finish clear
When a floor looks slightly dull, the problem is often residue, not damage. That is why I keep deep cleaning boring and controlled. A stronger cleaner is not the answer; a better sequence is.
- Remove loose dust and grit with a broom, dust mop, or vacuum.
- Prepare the cleaner exactly as the label instructs if it is a concentrate.
- Work in small sections so the floor never stays wet for long.
- Wipe with a microfiber mop that is damp, not dripping.
- Change the pad or rinse the cloth when it starts to look dirty.
- Dry any damp areas with a clean towel if the floor still feels wet after mopping.
For a normal home, I would do this kind of deeper clean every 1 to 2 weeks in kitchens, entryways, and homes with pets, and every 3 to 4 weeks in low-traffic rooms. If the floor still feels tacky afterward, too much cleaner was probably left behind. In that case, I would go back over it with a fresh, lightly damp microfiber pad and remove the film instead of adding more product.
How to handle spills, scuffs, and sticky residue
Fresh spills
Fresh spills are easy if you act fast. I blot liquid with a paper towel or white cloth instead of rubbing, then wipe the area with a slightly damp cloth if needed. The goal is to lift the spill, not spread it across a wider patch of flooring.
Dried spots
For dried food, juice, or muddy marks, I start with warm water and a microfiber cloth. If that is not enough, a small amount of pH-neutral cleaner usually finishes the job. Let the cloth do the work; aggressive scrubbing is where many people create dull patches they did not have before.
Read Also: Walking on New Tile Too Soon? What Happens & How Long to Wait
Scuffs and sticky residue
Scuff marks are often transfer from shoes or furniture, not actual damage. I try a dry microfiber cloth first, then a damp one with a little cleaner. For sticky residue, a plastic scraper can help lift the top layer before wiping the spot clean. If a mark still will not move, a touch of isopropyl alcohol on a white cloth is usually safer than reaching for a stronger household cleaner. That said, I never jump straight to alcohol unless the milder steps fail.
What to keep off vinyl plank flooring
A lot of floor problems come from using the wrong cleaning habit rather than from normal wear. If I had to name the biggest offenders, they would be steam, oversaturation, and products that leave a film behind.- Steam mops, unless the exact flooring guide says they are approved.
- Vinegar, citrus cleaners, and acidic mixes that can dull the surface over time.
- Bleach, ammonia, and other harsh chemicals.
- Wax, polish, oil soap, and “mop and shine” products.
- Abrasive pads, steel wool, and scrubbing powders.
- Vacuum beater bars and stiff rotating brushes.
- Soaked mops, standing water, and sloppy bucket mopping.
Those products and tools are tempting because they sound powerful, but vinyl plank floors usually need control, not force. If you avoid the list above, you remove most of the risk of clouding the finish or making the floor feel sticky after cleaning. The last step is keeping new dirt from building up in the first place.
The habits that keep vinyl planks looking clean longer
I think prevention matters more than people expect. A few small habits cut cleaning time in half and keep the floor looking more even between mops. Entry mats at outside doors help, but I check the backing material because some rubber or latex-backed mats can discolor certain vinyl products. Felt pads under chairs and stools make a difference too, especially in dining areas and kitchens.
In a home with pets or sandy shoes, I would also vacuum more often than feels necessary. That is not overkill; it is protection. If you maintain the floor with quick dry pickups, a gentle damp clean, and immediate spot treatment, vinyl planks stay attractive for years without special treatment. My rule is simple: clean lightly, clean consistently, and never let moisture or residue do the work for you.