Replacing a failed sprinkler head is one of those irrigation repairs that looks trickier than it is. With the water shut off, the right replacement part, and a clean test run afterward, you can restore coverage without rebuilding the whole zone. In this guide, I’ll show how to replace a sprinkler head the right way, how to choose the correct type, what the job usually costs in the United States, and when the problem is really below the surface.
The quickest path is matching the part before you dig
- Turn off the irrigation zone first and let pressure bleed off before unscrewing anything.
- Replace like for like: spray head for spray head, rotor for rotor, and the same pop-up height if possible.
- Clean the threads, use PTFE tape on male threads, and hand-tighten the new head rather than forcing it.
- Run the zone for 2 to 5 minutes to flush grit, then fine-tune arc, radius, and alignment.
- If the fitting is cracked, the stem will not pop up, or pressure stays low, the repair is bigger than a simple head swap.
What to gather before you start
I keep this repair simple by assembling everything before I touch the valve. That usually means a replacement head, a small hand trowel, PTFE tape, a rag, and either a flat-head screwdriver or the tool that fits your nozzle adjustment screw. If the old head is buried deep or surrounded by roots, a narrow shovel and a little patience matter more than brute force.
Two checks save the most time: the head type and the body height. A 4-inch pop-up body is not the same thing as a 2-inch one, and a rotor should not be dropped into a spray zone unless you are redesigning the whole section. I also like to take a photo before removal so I can match the original arc, direction, and height after the new part is in. Once those basics are clear, choosing the replacement gets much easier.
That preparation also reduces the chance of turning a small repair into a muddy mess, which matters more than most people expect. From there, the next decision is the part itself.
Choosing the replacement head that matches the zone
The most common mistake I see is buying a “close enough” part. It may thread in, but if the arc, throw, or precipitation rate is wrong, the lawn will show it fast. Spray heads are common for small turf areas and beds, while rotors are better for wider spaces because they throw water farther and apply it more slowly.
| Type | Best use | Typical pressure | Typical U.S. price | Why it matters |
|---|---|---|---|---|
| Pop-up spray head | Small lawns, edges, beds | About 30-40 PSI | About $3-$10 | Easy one-for-one replacement in existing spray zones |
| Rotor / gear-drive rotor | Medium to large lawns | About 50 PSI | About $10-$20+ | Longer throw and slower application rate |
| Rotary nozzle on spray body | Water-saving retrofit for spray zones | About 30-40 PSI | About $8-$20 | Useful when you want better efficiency without rebuilding the zone |
If you are not redesigning the zone, keep the replacement in the same family and use the same arc and radius. That matters because spray heads, rotors, and rotary nozzles do not apply water at the same rate, so head-to-head coverage can drift if you mix them blindly.
I also pay attention to the pop-up body height. If the body sits too low, grass can block the spray. If it sits too tall, the head is easier to hit with a mower or foot traffic. Match the old installation as closely as possible, and the rest of the job becomes much more predictable.
With the right part in hand, the physical swap is mostly about avoiding dirt and over-tightening.
How I swap the head without damaging the riser
The actual replacement is short if you work carefully. The goal is not just to remove the old head, but to leave the threads and fitting intact for the new one.
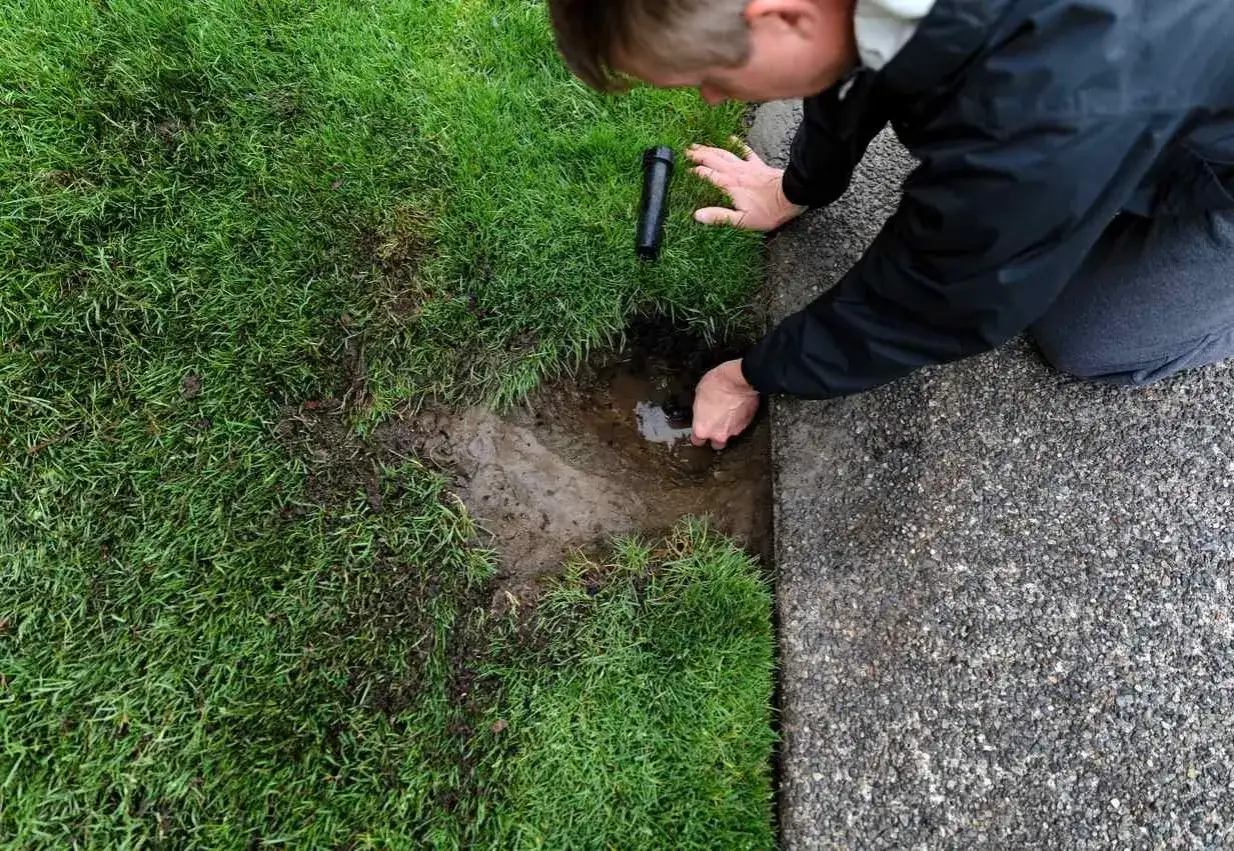
- Shut off the irrigation zone and, if needed, the main irrigation supply. Open the affected zone briefly to release trapped pressure.
- Dig a small ring around the head until the full body and threaded connection are exposed. Keep soil out of the open pipe.
- Unscrew the old head by hand. If the fitting turns with it, stop and expose a little more of the riser so you do not twist the line.
- Inspect the riser and threads. If you see a crack, stripped threads, or a broken swing joint, replace more than the head.
- Wrap the male threads with two to three turns of PTFE tape, turning the tape clockwise so it tightens as the head goes on.
- Screw on the new head by hand until it seats snugly. I only use tools if the body has to be oriented in a final position, and even then I keep the force light.
- Backfill lightly around the body, but do not bury the cap or nozzle adjustment point.
The key detail is hand-tight first, not wrench-tight first. Over-tightening is one of the fastest ways to crack a fitting or tilt a head just enough to create a bad spray pattern later.
Once the part is seated, the zone still needs a flush and a pattern check. That last stage is where a repair becomes a real fix instead of just a new piece of plastic in the ground.
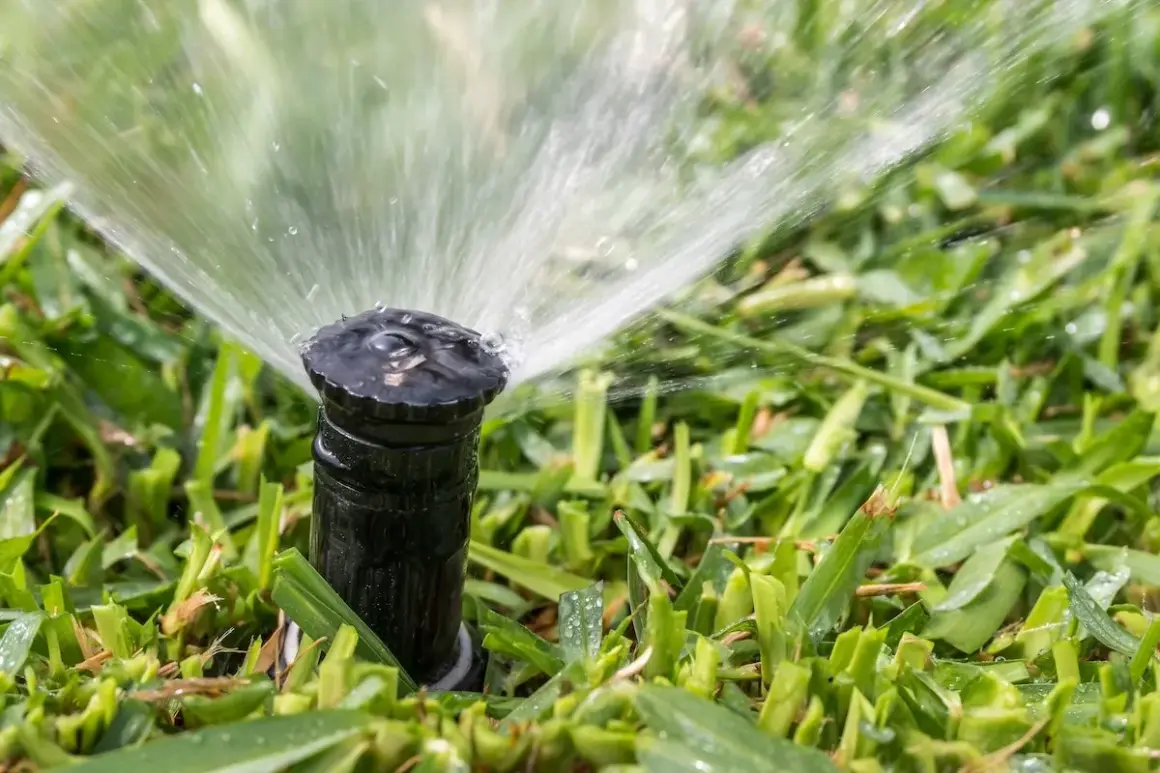
Flush, test, and adjust the zone
I always flush the line for a few minutes after a head swap. A 2- to 5-minute run is usually enough to push out dirt, sand, and bits of tape that would otherwise clog the nozzle. While the zone is running, I check for three things: a clean pop-up, a steady spray pattern, and no seepage around the base.
Then I fine-tune the arc and throw. Arc is the spray angle, throw is the distance the water travels, and both matter if the head sits near a driveway, path, or fence. If the pattern mists into the air, the pressure may be too high. If it falls short or looks uneven, the nozzle may be blocked or the wrong head may be installed for that zone.
I also watch for head-to-head coverage, which is the simple idea that each sprinkler should help reach the next one. If the new head leaves dry strips or overshoots hardscape, the issue is not just cosmetic. It affects water use, turf health, and how often you will have to revisit the repair.
This is the moment to be honest with the system. If the new head still cannot match the coverage of the others in the zone, the issue may not be the part you just installed. That brings the cost question into focus.
What the repair usually costs in the United States
For a DIY repair, the part itself is usually the cheapest piece of the job. Basic pop-up spray heads can start around $3, while many residential rotors land closer to the $10 to $20 range depending on brand and features. If you need PTFE tape, a nozzle, or a matching pop-up body, your out-of-pocket total is still often modest.
| Item | Typical cost | Notes |
|---|---|---|
| Basic spray head | $3-$10 | Best for simple like-for-like replacements |
| Rotor / gear-drive head | $10-$20+ | More coverage and usually more expensive than spray heads |
| PTFE tape and small supplies | $2-$10 | Usually a one-time buy if you already have basic tools |
| Professional replacement | $60-$150 per head, often more if digging or pipe repair is needed | Useful when the fitting is broken or the issue is not isolated to the head |
The real cost jump happens when the job is no longer a head swap. Broken pipe, stuck valves, and damaged swing joints push the visit into a different category because they require more digging and more time. If you are trying to decide whether to do it yourself, the key question is simple: is the problem visible at the head, or is it hidden in the line?
That distinction saves money, but it also prevents a lot of unnecessary frustration. If the symptom keeps returning, I stop assuming the head is the whole story.
When the problem is bigger than the head
I stop treating it as a simple replacement when the symptoms keep coming back after the new part is installed. That usually means the line, fitting, or valve is involved. The most common red flags are:
- The new head leaks from the base even after tightening and re-seating it.
- The stem will not pop up fully or sticks half-open.
- Water pressure drops across the whole zone, not just at one head.
- The head sits crooked because the riser or swing joint is cracked.
- Multiple heads in the same zone spray unevenly, which points to a pressure or layout issue.
In those cases, I look past the head and inspect the riser, lateral line, and valve box. A clogged filter can mimic a bad head. So can a broken pipe that leaks underground and steals pressure from the whole zone. If you replace the head twice and the symptom stays the same, stop spending money on parts and inspect the system itself.
That kind of reality check is what keeps a one-hour fix from turning into a weekend of repeated digging. It also explains why a few small mistakes are responsible for most failed DIY repairs.
Mistakes that lead to a second repair
These are the errors I see most often, and none of them are dramatic. They are just small enough to be tempting and expensive enough to matter.
| Mistake | What it causes | Better move |
|---|---|---|
| Mixing spray and rotor heads in one zone | Uneven watering and dry patches | Match the original head type unless you are redesigning the zone |
| Over-tightening the new head | Cracked threads or a skewed body | Hand-tighten first and use only light tool pressure if needed |
| Skipping the flush | Nozzle clogs and weak spray | Run the zone for a few minutes before final adjustment |
| Ignoring pop-up height | Grass blocks the spray or the head sinks too deep | Match the body height to the existing installation |
| Leaving dirt around the open fitting | Debris gets into the line and causes another clog | Keep the hole clean while the old head is out |
The pattern behind those mistakes is simple: the repair is not really finished until the zone proves it can water evenly and retract cleanly. Once that is true, the fix usually holds through the season instead of failing after the next mowing pass.
A repair that holds up through the next season
When I do this repair properly, I am not just swapping a broken plastic part. I am restoring coverage, protecting the pipe threads, and making the next maintenance visit easier. That is especially useful in landscaping areas where a bad pattern can waste water on sidewalks, invite fungus in one patch, or leave another strip of turf dry and stressed.
If you want the job to last, keep one spare head that matches each zone, note the model number on your phone, and check the system again after the first full watering cycle. That small follow-up catches leaks and misalignment before they turn into another dig. A careful replacement is usually quick; the difference is in the matching and the testing.