When I plan a spa in a backyard, I start with the boring parts: load, access, power, and drainage. Those are the things that decide whether the tub feels like part of the landscape or becomes an expensive maintenance headache. This guide walks through the real setup process, the choices that affect cost and performance, and the details that matter most once the tub is in place.
The choices that make a spa setup safe, smooth, and worth the money
- Start with the spa type. A 120V plug-and-play model is easier to place, while a 240V tub usually gives better heating and stronger performance.
- Use a proper base. A level, engineered surface matters more than almost anything else for long-term stability.
- Plan the electrical work early. Most full-size tubs need a dedicated circuit, GFCI protection, and a licensed electrician.
- Measure the delivery route. Gates, turns, steps, and overhead clearance can make or break the install.
- Balance the water before heavy use. The CDC recommends pH between 7.0 and 7.8, with at least 3 ppm chlorine or 4-8 ppm bromine for hot tubs.
- Protect the landscape. Leave service access, manage runoff, and add privacy without boxing the spa in.
Choose the spa type that fits your site and usage
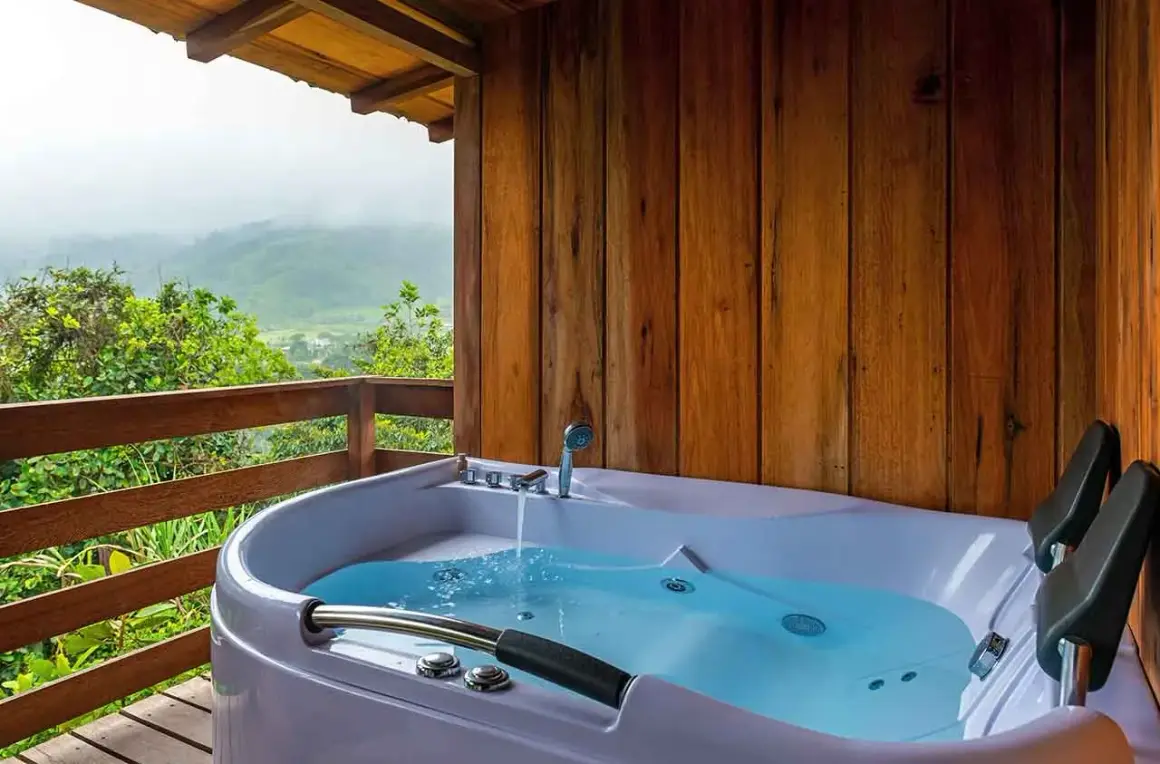
The first decision is not where the tub goes. It is what kind of tub the yard can realistically support. A small 120V plug-and-play spa is easier to place and usually cheaper to wire, but a full-size 240V model is a better fit when you want faster heating, more jet power, and more consistent cold-weather performance.
| Option | Best for | What changes in the install | Main trade-off |
|---|---|---|---|
| 120V plug-and-play | Compact backyards, lighter use, lower upfront cost | Usually uses an existing outdoor outlet and a simpler setup path | Slower heating and less power for heavier use |
| 240V hardwired | Regular soaking, larger tubs, colder climates | Needs a dedicated circuit, GFCI protection, and an electrician | Higher installation cost and more planning |
| Built-in or in-ground | Design-forward outdoor living spaces | Often involves excavation, structural work, and more coordination | Highest cost and longest schedule |
If I were buying for daily use in the U.S., especially in a region with real winters, I would lean toward the 240V path unless the spa is very small and the expectations are modest. The cheaper electrical option can look attractive on paper, but if the heater struggles or the jet layout is limited, you feel that compromise every week. Once the spa type is set, the next decision is whether the ground beneath it is actually up to the job.
Build a base that stays level through weather and weight
The base is not just a place to set the tub. It is the part of the project that has to carry thousands of pounds without shifting, cracking, or trapping water underneath. A filled spa can add a massive load very quickly, and even a small one can become a four-ton problem once the water and bathers are included.
For most permanent outdoor setups, a level, reinforced concrete slab is the cleanest answer. Jacuzzi's 2026 planning guidance puts a reinforced slab at roughly $600 to $2,000 or more, depending on the site, while prefabricated spa pads and gravel-based options can reduce the upfront cost if the ground is prepared correctly. The key is not the material alone. It is whether the surface is compacted, level, and stable enough to stay that way after rain, frost, and years of use.
| Foundation | Why people choose it | What I watch for | Practical note |
|---|---|---|---|
| Concrete slab | Most stable and lowest drama over time | Thickness, reinforcement, and level finish | A common benchmark is 4 inches reinforced and properly prepared |
| Compacted gravel with spa pad | Lower cost and decent drainage | Compaction and level tolerance | Works best when the pad is designed for the model, not improvised |
| Reinforced deck | Integrates the tub into an outdoor living area | Structural capacity for the filled load | Do not assume a standard deck can handle a spa without engineering |
| Existing patio | Fast if the slab is already sound | Cracks, slope, settling, and drainage | A patio can work well only if it is truly level and structurally sound |
I would not set a spa on bare soil, grass, or a surface that you already know moves with the seasons. Drainage matters too. The area around the base should shed rain and splash-out away from the pad, not let water collect under the shell. That is where people save a little money up front and then pay for it later in settling, service problems, or ugly repairs. Once the base is right, the project moves from site work into electrical and code territory.
Handle permits and electrical work before delivery
This is the part of the job that most homeowners underestimate. A hot tub can be mechanically simple and still fail if the electrical side is rushed. Most full-size units in the U.S. need a dedicated 240V circuit, GFCI protection, and professional wiring. In other words, this is not the moment to guess, splice, or borrow capacity from another appliance.
What the electrician should confirm
- Whether the main panel has enough capacity for the spa load.
- Whether the tub needs a dedicated 240V line or can run on 120V.
- Where the GFCI disconnect will sit relative to the spa.
- Whether trenching, conduit, or a subpanel is required.
- Whether the model needs special bonding or grounding details from the manual.
Read Also: Ponding Meaning - Fix Yard Drainage & Standing Water
Why permits are worth the delay
Permits add time, but they also reduce the chance that the work gets redone after an inspection fails. They matter for safety, insurance, and resale, and they keep the install from becoming a hidden liability. In many jurisdictions, the disconnect is expected to be visible from the spa and placed at a safe distance from the water, so the exact location should be decided before anyone runs wire or pours the final slab.
If the electrical path is long, the cost rises quickly. That is normal. What is not normal is trying to save a few hundred dollars by skipping proper protection or guessing at wire sizing. Once the electrical plan is locked in, the focus shifts to the one day that can still create surprises: delivery.
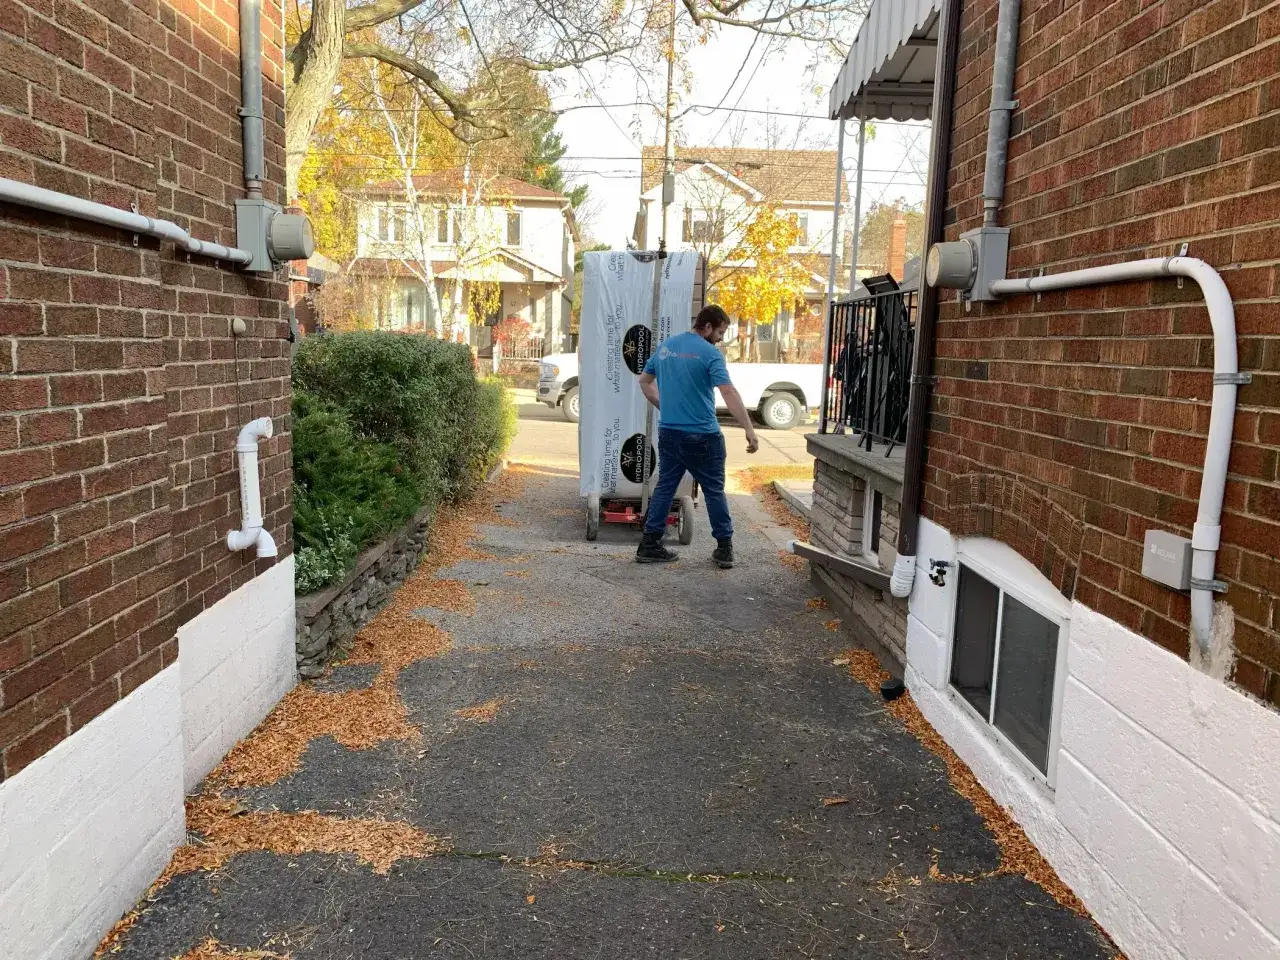
Map the delivery route before the truck arrives
Most people picture the tub sitting in the yard. I picture the route first. Delivery problems are usually simple but annoying: a gate that is too narrow, a low branch, a tight 90-degree turn, a fence section that should have been removed the day before, or an overhead line no one noticed until the truck showed up.
- Measure every gate, side yard, and pinch point from the truck to the final pad.
- Check overhead clearance for trees, awnings, gutters, and utility lines.
- Clear out furniture, planters, hoses, and loose hardscape items.
- Confirm whether a fence section, gate hardware, or temporary rail removal is needed.
- Keep kids and pets away from the route until the tub is set.
A good rule is to leave more room than you think you need. Cal Spas notes that many tubs need at least 36 inches of passage width, and that is before you account for awkward turns or soft ground. If the access is tight, a crane or a specialized carry route may be the only sensible option. I also like to have the pad finished before delivery day and the electrician scheduled close behind it, so the tub does not sit half-installed while everyone waits on the next step. After the shell is in place, the job is not done yet. It still needs a clean fill and a proper startup.
Fill, heat, and balance the water the right way
The first fill tells you a lot about the install. It shows whether the shell is level, whether the plumbing is tight, and whether the pump has been primed correctly. Follow the owner manual for the fill point and startup sequence, because some details vary by model, but the basic pattern is the same: fill, check for leaks, start the system, and only then begin water balancing.
The chemistry should not be treated casually. The CDC recommends a hot tub pH between 7.0 and 7.8, with at least 3 ppm chlorine or 4-8 ppm bromine, and water temperature should stay at or below 104 F. Those ranges are not there to be fussy. They protect skin, equipment, and water quality at the same time.
- Fill with a clean hose and let the system prime before heating hard.
- Check for drips, airlocks, and unusual pump noise during the first run.
- Test the water after the fill and again after the first heating cycle.
- Run the cover when the spa is not in use so heat is not wasted.
- Keep the first few sessions short until the water is fully balanced.
One mistake I see often is assuming that water care can wait until after the spa has already become a habit. It cannot. A few minutes of testing early on saves a lot of cloudy-water troubleshooting later. Once the spa is running cleanly, the last big question is what the full project really costs.
Budget for the full project, not just the shell
In 2026, the biggest budgeting mistake is focusing on the spa price and ignoring everything around it. A tub is only one line item. The real spend usually includes site prep, electrical work, delivery, permits, and any finishing touches that make the area usable after dark or in bad weather.
| Cost item | Typical range | What pushes it higher |
|---|---|---|
| Spa unit | $3,000 to $15,000+ | Size, insulation, jet count, shell quality, and brand tier |
| Base or pad | $200 to $2,500+ | Prefab pad, gravel, poured slab, or deck reinforcement |
| Electrical work | $800 to $4,200+ | Panel upgrades, long wire runs, trenching, and GFCI hardware |
| Delivery and placement | $200 to $500+ | Stairs, cranes, tight access, and extra labor |
| Permits and inspection | $100 to $250+ | Local fees and any re-inspection work |
That budget range changes fast if the project needs a panel upgrade, a reinforced deck, or a crane lift over landscaping. The cheapest install is usually not the one with the lowest invoice; it is the one that does not create repair bills later. If you want the space to feel finished rather than temporary, the final layer is landscaping and layout.
Make the spa part of the landscape, not an afterthought
This is where a hot tub starts to feel like an outdoor room instead of an appliance sitting in the yard. I like to think about privacy, lighting, paths, and service access at the same time. Tall planters, hedges, or a pergola can make the area feel intentional, but they should never block the equipment panel or crowd the service side of the spa.
Lighting matters more than people expect. Good path lighting keeps the route safe after dark, while softer accent lighting makes the area feel calm instead of exposed. I prefer layered light over one bright fixture aimed straight at the tub. It is better visually, and it does not turn the spa into a spotlight. For planting, choose species that will not shed debris constantly into the water, and avoid anything with invasive roots near the slab.
- Leave enough room around the tub for covers, steps, and service access.
- Use privacy screens or plants that do not crowd the maintenance side.
- Keep walkways slip-resistant and wide enough for comfortable night use.
- Drain runoff away from the pad, not toward it.
- Choose landscaping that looks good year-round without creating constant cleanup.
When I see a spa area that works well, it is usually because the owner respected the boring parts as much as the beautiful ones. The layout feels relaxed, but nothing about it was accidental. That is the difference between a tub that gets used often and one that always seems slightly inconvenient.
The last checks I would make before calling it finished
Before I call a spa project complete, I want four things locked in: the base is level and stable, the electrical work is inspected and correct, the delivery path is no longer a problem, and the water is balanced before the first long soak. If any one of those is weak, I treat the project as unfinished.
That approach keeps the install practical instead of cosmetic. A well-planned spa should feel easy from day one, not like a beautiful object that needs constant work to stay usable. If you get the surface, power, access, and water right, the rest of the backyard can be designed around it with confidence.