Plexiglass rewards a careful setup more than a fast hand. In this guide, I walk through the practical choices that make a clean cut possible: which method fits which sheet, how to keep the line accurate, how to avoid melting or chipping, and how to finish the edge for cabinet, shelf, and storage work. Knowing how to cut plexiglass cleanly saves time later, especially when the piece has to fit a cabinet opening, shelf track, or dust cover.
What you need to get a clean cut the first time
- Match the tool to the shape: score-and-snap for thin straight cuts, saws for thicker sheet, and a jigsaw for curves.
- Keep the sheet fully supported and clamped so vibration does not chip the edge.
- Use acrylic-friendly blades: a plastic scoring tool, a 10 TPI jigsaw blade, or a carbide triple-chip saw blade.
- Let the blade do the work. Heat, chatter, and slow feeding are what usually ruin the finish.
- For visible or joinery edges, sand or machine-finish after cutting instead of treating the saw line as the final surface.
Pick the method that matches the sheet and the cut
I start with shape and thickness, because the wrong method is what usually creates chips, haze, or a line that drifts out of square. A thin strip for a storage insert is a different job from a curved notch around a hinge, and each one asks for a different tool.
| Method | Best for | Typical thickness | What it gives you | Where it falls short |
|---|---|---|---|---|
| Score-and-snap | Straight cuts, trim strips, simple panels | Up to 1/8 in., and straight scribe cuts at about 2.5 mm or less | Fast, clean, minimal dust | Not for curves or thick sheet |
| Jigsaw | Curves, corner reliefs, cutouts | Thin to medium sheet | Flexible and easy to steer | More vibration and a greater risk of chatter |
| Table saw | Long straight rips and repeatable strips | Medium to thicker sheet | Most accurate for straight shop cuts | Needs the right blade and good support |
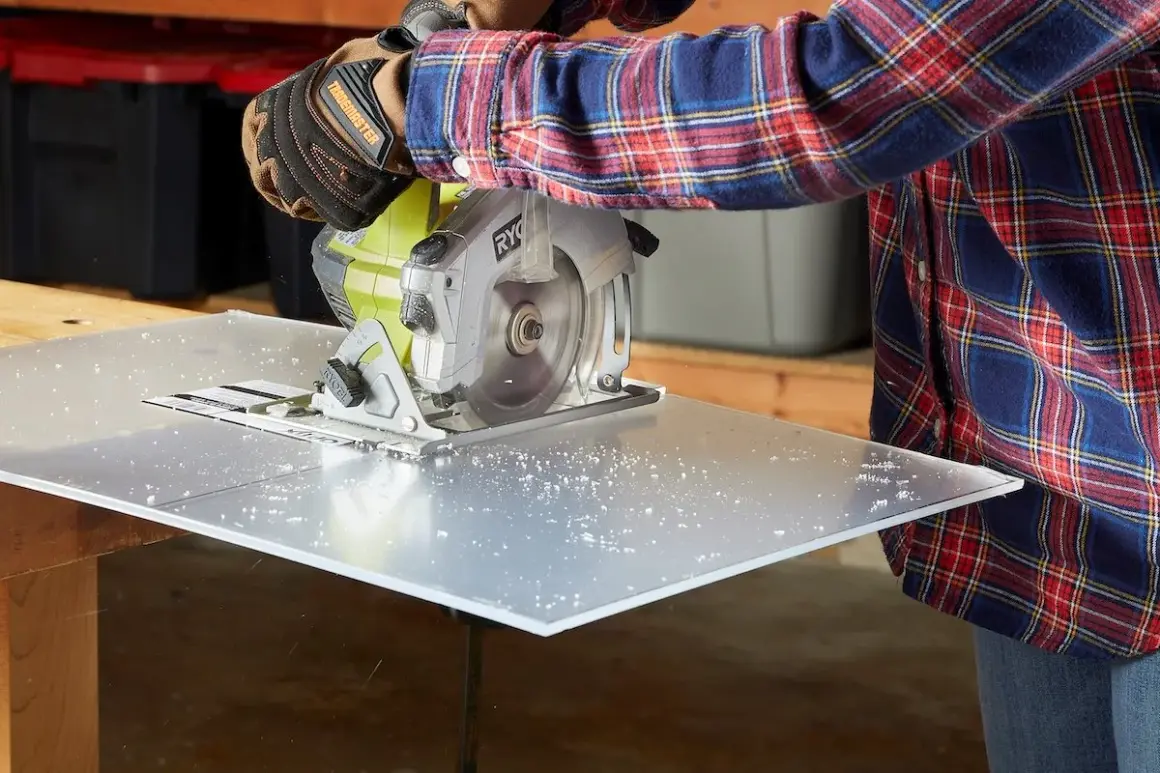
| Circular saw | Large panels and long straight cuts away from the bench | Medium to thicker sheet | Good when the sheet is too big for a table saw | Edge quality depends heavily on setup |
In practice, I choose the method by shape first and thickness second. A straight shelf insert is usually best handled one way, while a cutout for a cabinet latch or vent opening is better handled another. Triple-chip blades are worth the trouble here because the tooth geometry breaks the chip in stages instead of tearing the edge, and that is what keeps the cut looking deliberate instead of abused. Once the method is chosen, the next job is making the layout accurate enough that the tool can follow it.
Set up the sheet so the line stays true
Good acrylic cuts start before the blade moves. I leave the protective film on if it is still intact, measure the opening in more than one spot, and mark the cut line on the film so the glossy face stays clean. For cabinetry and storage pieces, that extra measurement matters because openings are often slightly out of square even when they look perfect to the eye.
- Measure top, middle, and bottom if the piece has to fit a frame or track.
- Keep the sheet fully supported on both sides of the line.
- Clamp a straightedge for long cuts instead of trying to freehand the mark.
- Account for kerf, which is the width of the cut removed by the blade.
- Use a scrap offcut or backer board where the blade exits the material.
I also try not to chase a final dimension on the first pass. A small amount of margin makes the part easier to sneak into a cabinet opening or shelf channel, and it gives me room to clean the edge without overshooting the fit. With the sheet supported and marked, the actual cut becomes much easier to control.
Make straight cuts without burning the edge
For straight work, the tool choice is usually obvious once the sheet is in front of me. Thin material can be scribed and snapped, while thicker stock is usually better on a saw. What matters more than speed is keeping the sheet flat, the blade sharp, and the feed steady.
Score and snap for thin sheet
This is my first choice for simple straight cuts in thinner acrylic. Use a real acrylic scriber or a sturdy straight blade, guide it with a straightedge, and make several firm passes until roughly one-third of the thickness is scribed. Then place the line at the edge of a table, keep the sheet supported, and apply a quick, steady break from the free end. It is a clean method when the sheet is thin and the line is straight, but it stops being a good option once the material gets too thick or the shape turns.
Use a table saw for long, accurate rips
For repeated strip cuts, I prefer a table saw with a carbide-tipped triple-chip blade. A 10-inch blade with 60 to 80 teeth is a solid all-purpose choice, and acrylic fabrication guidance commonly puts the blade height just above the sheet, with a steady feed rather than a hesitant one. I keep one blade dedicated to plastics when I can, because a blade that has already been used on lumber usually leaves a hotter, rougher edge.
On longer cuts, the offcut should stay supported until the blade is completely through the sheet. If it drops or twists, the cut edge can chip right where the blade exits, and that is the part of the cut people notice first.
Read Also: DIY Cutting Board - Build One That Lasts & Looks Great
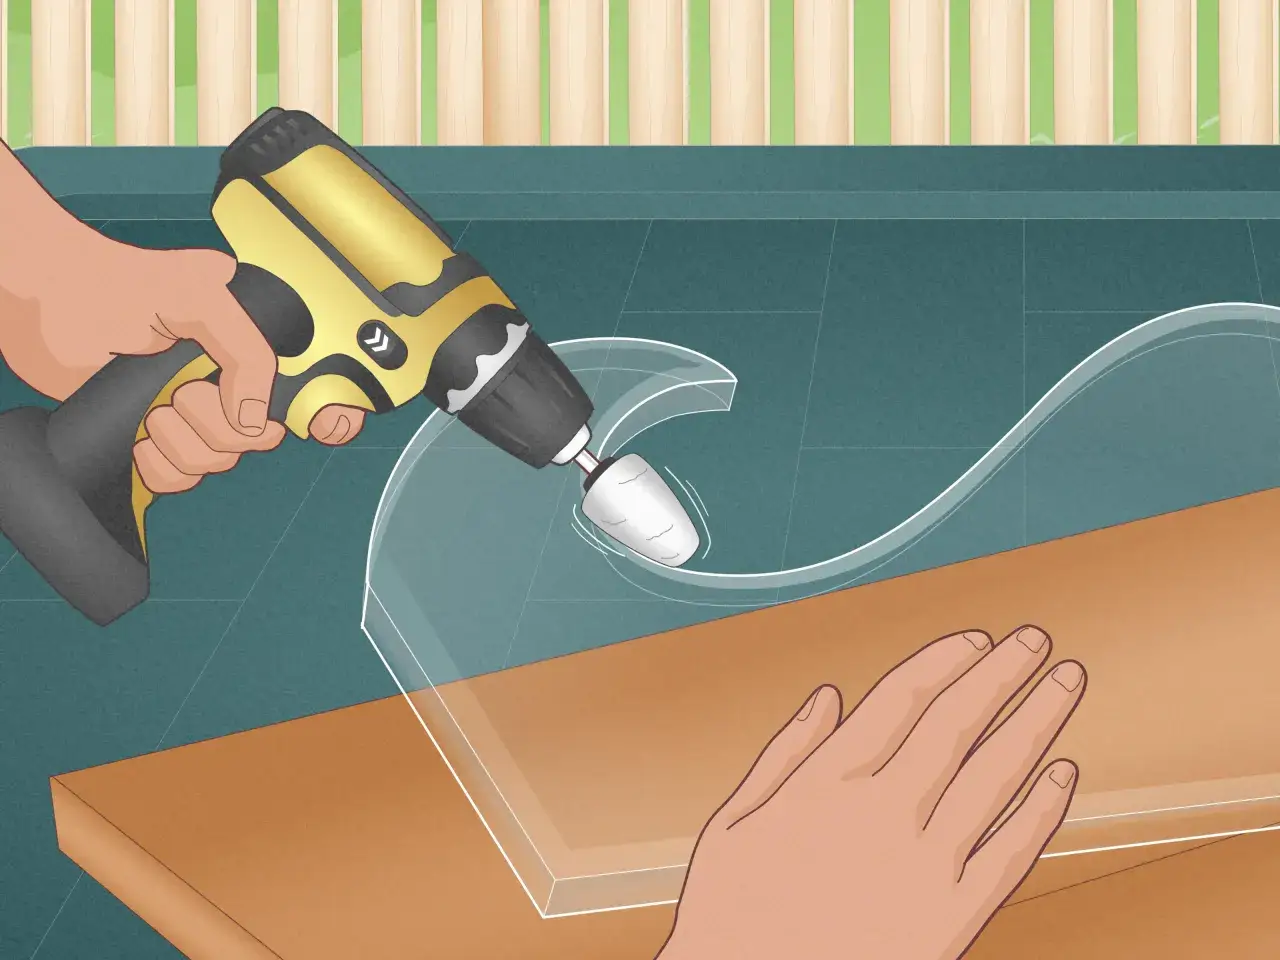
Reach for a jigsaw when the shape turns or notches
A jigsaw is the right tool when the line bends around a notch, cutout, or rounded corner. I use a blade around 10 teeth per inch that is made for plastic, support the sheet on foam or another sacrificial backer, and keep the saw close enough to the support surface to reduce vibration. The moment the sheet starts to chatter, the edge quality drops.
Curves are less about forcing the saw and more about steering it gently. If I need a tight corner, I cut just shy of the final line first, then make a second pass to true it up. That keeps the material from heating and dragging against the blade as much. Even a perfect cut can fail if you ignore heat and vibration.
Control heat, chatter, and cracking
Most bad acrylic cuts come from the same three problems: too much heat, too much vibration, or too much pressure. Plexiglass is forgiving in some ways, but it will show abuse immediately as melted edges, white stress marks, or tiny cracks that spread later. I treat those signs as setup problems, not material flaws.
- If the blade is dull, replace it instead of pushing harder.
- If the sheet is flexing, add support before the cut continues.
- If the edge looks cloudy or gummy, the feed is too slow for the blade and the material.
- If the saw starts to labor, stop and correct the setup rather than forcing the pass.
For me, the most reliable fix is usually boring: a sharp blade, a stable work surface, and a feed rate that stays consistent from start to finish. I do not try to salvage a poor cut by going slower and slower, because that often builds more heat, not less. Once the cut is clean, the edge still needs to be judged for the job it will do, which is where finishing comes in.
Finish the edge for storage and carpentry work
Not every project needs a polished edge. A hidden shelf support or drawer divider can stay with a clean saw-cut finish as long as the edge is square and free of burrs. A visible cabinet insert, display panel, or dust shield is different, because the edge becomes part of the look of the piece.
| Project need | Best edge approach | Why it works |
|---|---|---|
| Hidden or structural fit | Clean saw cut with light deburring | Fast and accurate without adding unnecessary work |
| Visible panel | Wet sanding, then buffing if needed | Removes saw marks and softens the final appearance |
| Parts that will be bonded | Keep the edge clean and square, and follow the adhesive maker’s guidance | Round or stressed edges can weaken the joint |
For visible work, I prefer a light wet-sanding pass because it removes saw marks without putting too much stress into the edge. If the piece will be solvent-bonded later, I keep the edge as clean and square as possible and avoid overworking it into a rounded profile. That last choice matters more than people think, because a pretty edge is not always the best edge for assembly. The last fit check is what turns a clean cut into a usable part.
Fit the piece like a cabinet part, not a glass pane
When I cut plexiglass for shelf sides, drawer dividers, or cabinet inserts, I treat the fit as the real finish line. I test the piece in the opening, look for tight corners before I look at the edge finish, and trim only when I know which side is the problem. That habit saves more time than trying to make the first cut perfect.
For carpentry and storage projects, the best result usually comes from a simple pattern: measure carefully, support the sheet, choose the right blade, and keep the cut cool. If I do those four things, plexiglass behaves well and the part fits where it should. If I skip one of them, I usually spend the rest of the job fixing a problem that was avoidable from the start.