House framing is the structural skeleton of a home, and it controls how weight moves from the roof down to the foundation, how well the building resists wind and settling, and how much flexibility you have for finishes and storage later. In practice, the frame decides whether a house feels solid, straight, and easy to finish, or finicky and expensive to fix. This article breaks down the parts of the frame, the main framing systems used in the United States, the build sequence, the mistakes that cause trouble, and the storage decisions that need to be made before drywall hides everything.
The frame is where strength, speed, and future flexibility meet
- The frame carries roof, floor, wall, wind, and seismic loads through a continuous load path to the foundation.
- Platform framing is still the standard in most U.S. homes, while balloon framing is mostly a legacy system found in older houses.
- Common stud spacing is 16 inches on center, but 24 inches on center is also used when the design and code allow it.
- As of 2026, straightforward full-house framing often lands around $7 to $16 per square foot, with more complex jobs running higher.
- Storage plans matter early, especially for attics, garages, and heavy wall-mounted cabinets or shelves.
What the frame actually includes
I think of framing as a connected system, not a pile of lumber. Each piece has a job, and the whole structure only works when those jobs line up cleanly from the roof to the foundation.
- Sill plates and rim joists anchor the wood frame to the foundation and help tie the edges of the floor system together.
- Floor joists span between supports and carry the live load from people, furniture, and finishes.
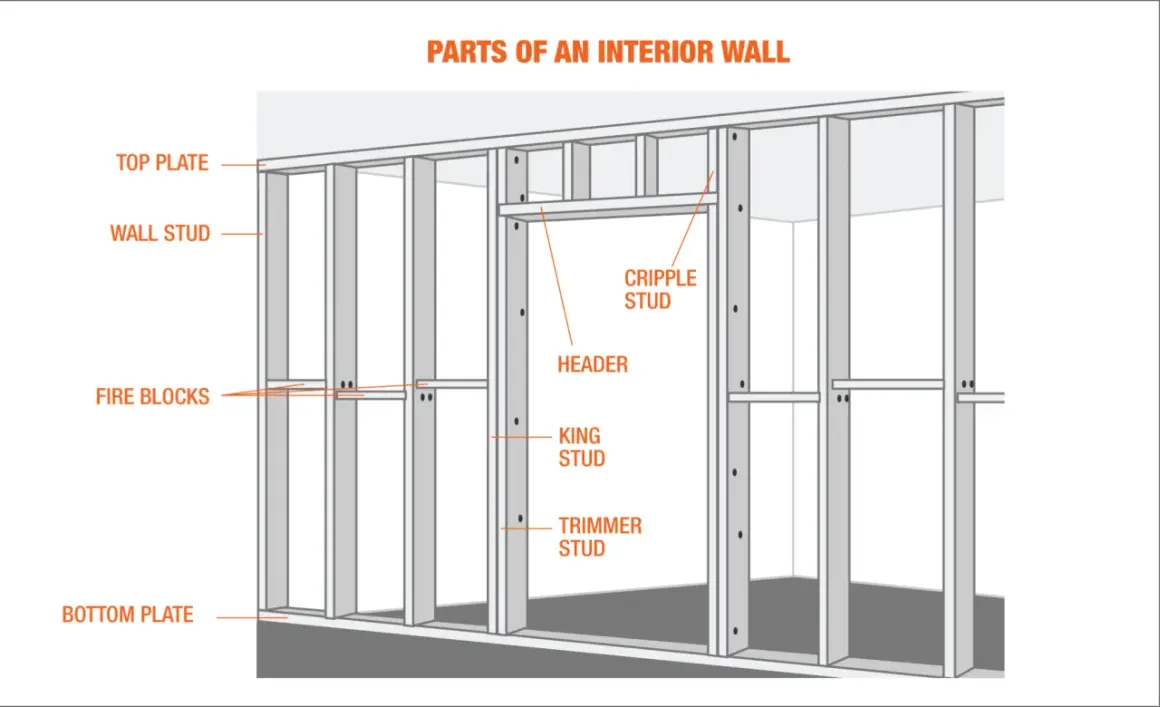
- Studs form the vertical wall structure. They are the members that usually take wall loads down to the lower framing.
- Top and bottom plates tie the studs together and give the wall a continuous bearing line.
- Headers bridge over doors and windows so openings do not interrupt the load path.
- Rafters or roof trusses shape the roof and transfer roof loads to the walls.
- Sheathing, blocking, and connectors add stiffness, help resist racking, and keep the structure tied together under wind and movement.
The term that matters most here is load path, which is the continuous route that moves forces from the roof and upper floors all the way to the foundation. Once that idea clicks, the rest of framing becomes easier to read, because every member is either carrying load, tying load together, or preventing the structure from moving in ways it should not.
That same logic is what separates older framing methods from the systems most builders use today.
The main framing systems used in U.S. homes
In the U.S., most residential construction still uses light-frame wood, but the layout can vary a lot. The differences are not just historical. They affect speed, cost, fire behavior, energy performance, and how easy it is to remodel later.
| System | How it works | Why builders use it | Tradeoffs |
|---|---|---|---|
| Platform framing | Each floor is built as its own platform, then the next level is framed on top of it. | Faster to build, uses shorter members, easier to square and inspect, and works well with modern code requirements. | Requires careful detailing at floor lines and openings, especially when the plan is complex. |
| Balloon framing | Wall studs run continuously past the floor line in older homes. | Common in historic houses and some remodels; it can be structurally sound when properly maintained. | Harder to build, can create open vertical cavities, and older versions often lack modern fire blocking. |
| Advanced framing | Uses layout discipline, efficient member spacing, and fewer pieces where code and engineering allow it. | Can reduce lumber use, thermal bridging, and waste while keeping the structure strong. | Needs tighter planning and a plan that actually supports the layout; it is not a casual swap-in. |
Platform framing is the default in most new homes because it is practical on a jobsite. The crew can frame one level, sheath it, and use that flat surface as a working deck for the next level. Advanced framing can be worth it, but only when the design, spans, sheathing, and code requirements are all working together. If those details are weak, the promised savings disappear fast.
Once you know the main systems, the next question is how a frame actually goes up in sequence.
How a frame goes up on site
The fastest framing crews are not just quick with a nail gun. They are disciplined about layout, checking, and sequencing. A good frame starts with dimensions that are correct before the first wall is stood.
- Layout begins on the plan. The crew snaps lines for walls, openings, and load-bearing points so the structure starts square and readable.
- The base gets set first. Sill plates, floor framing, and any beams or rim members are installed and checked before walls go up.
- Wall panels are built and stood. Studs, plates, and rough openings are assembled, then raised and braced until the wall is plumb.
- Headers and openings are confirmed. Doors and windows need correct rough openings, or the finish work later becomes a fight.
- The upper structure is added. Ceiling joists, rafters, or trusses tie the frame together and define roof shape and spans.
- Sheathing and bracing lock the frame. This is where the structure starts to resist racking, which is sideways movement from wind or uneven loading.
- Fire blocking and connectors are finished before inspection. Hidden cavities need the right blocking, and load-critical joints need the specified fasteners or metal connectors.
In real work, the order can shift a little depending on weather, crew size, and whether the project uses trusses, engineered lumber, or prefabricated wall panels. The important part is not the exact rhythm but the discipline: every level has to sit correctly on the one below it. That is where a frame stays straight instead of drifting out of alignment over time.
And when the frame drifts, the problems usually show up later as small annoyances that are expensive to fix.
Where frames fail before anyone notices
The most costly framing mistakes are often invisible on day one. They show up after drywall, trim, and cabinets, which is exactly why I treat this part of the job as a quality-control issue, not just a carpentry issue.
| Common mistake | Why it matters | Better move |
|---|---|---|
| Weak load-path alignment | Loads end up landing on members that were not meant to carry them. | Stack studs, posts, beams, and bearing walls whenever the design allows. |
| Overnotching or overdrilling structural members | It can reduce capacity and create hidden weak spots. | Follow code limits and engineering details instead of guessing in the field. |
| Skipping fire blocking | Concealed cavities can let fire spread vertically much faster. | Install fire blocking where required, especially in walls and chases. |
| Relying on attic joists for storage without checking | Ceiling framing may not be designed for storage loads. | Verify joist size, span, spacing, and intended live load before flooring the attic. |
| Poor moisture detailing | Wet framing shrinks, moves, and eventually rots. | Use proper flashing, sheathing, drying space, and ventilation details. |
| Too little fastening or bracing | The frame can rack, squeak, or feel soft under load. | Use the specified nailing pattern, bracing, and connectors rather than a lighter shortcut. |
A frame can be code-compliant and still be a poor frame if it is sloppy at the corners, openings, or bearing points. I usually watch for the little signs first: walls that do not feel flat, openings that are slightly off, and missing blocking that will become a problem the minute someone tries to hang a cabinet or run utilities through the cavity.
Those mistakes are easier to avoid when you know what framing is likely to cost and how much time the job really needs.
What framing costs and how long it usually takes
As of 2026, straightforward wood framing for a full house in the United States often lands around $7 to $16 per square foot. More complex plans, expensive labor markets, engineered details, and taller or more open designs can push that number into the $11 to $30 per square foot range. For a 2,000-square-foot home, that can translate to roughly $14,000 to $32,000 on the lower end and materially more on the higher end if the house is custom or structurally demanding.
| Cost driver | Why it changes the price |
|---|---|
| Square footage | More area means more studs, joists, sheathing, labor, and fastening. |
| Number of stories | Two-story and taller homes need more lifting, more setup, and more bracing. |
| Roof complexity | Valleys, hips, dormers, and steep pitches add labor and waste. |
| Large openings | Big windows and wide doors often require engineered headers and extra support. |
| Local labor and lumber prices | Regional pricing changes quickly and can move a bid more than homeowners expect. |
| Wind or seismic requirements | Extra connectors, hold-downs, and shear details add material and labor. |
Schedule matters too. A simple house may move from slab or platform to dried-in framing in a few weeks, while a larger or more complicated home can take 30 to 60-plus days. Weather, inspection timing, and material availability all stretch the calendar, which is why framing is one of the first places a project feels slow when the plan is not clean.
The next place framing decisions matter is storage, because storage is where a lot of people unknowingly overload structure or create expensive rework later.
Framing with storage in mind
This is the part many homeowners only think about after the drywall is already up. If you want built-ins, heavy shelves, garage racks, or attic storage, the frame needs to be prepared for those loads before the wall is closed.
Block for the fixtures you know are coming
Wall blocking is one of the cheapest upgrades you can make during framing. A few extra pieces of lumber behind drywall can support kitchen cabinets, grab bars, TV mounts, towel bars, mudroom hooks, and garage storage systems without depending only on drywall anchors. I always prefer blocking when the load is real and the location is already known, because it avoids the ugly compromise of chasing studs after the finish work is complete.
Read Also: Cut Glass Like a Pro - Your DIY Guide to Perfect Cuts
Do not treat the attic like free square footage
Attic storage looks simple until you check the framing. In many U.S. code setups, common living areas are designed around 40 psf live load, sleeping rooms around 30 psf, and storage attics around 20 psf when they are intended for that use. That is enough to support light, distributed storage in a properly designed space, but it is not a blank check for stacked bins, appliances, or heavy boxes concentrated in one bay. If the joists were not sized for storage, flooring the attic can overload the ceiling framing.
Garages deserve the same caution. Overhead storage racks and loft platforms load a few points very hard, which is very different from a light, spread-out load. If the plan includes storage above the garage, I want that detail solved while the framing is still open, not after someone has already hung drywall and insulation.
Once storage is part of the design, the last step is making sure the hidden work is right before the walls disappear.
The checks I would insist on before drywall closes the walls
Before the drywall crew arrives, I want the frame verified as if it will never be visible again, because after finish work starts, every correction gets more expensive. A few minutes of inspection at this stage can save a lot of patching, callbacks, and blame later.
- Walls are plumb, level, and square enough that trim will not fight them.
- Load-bearing lines stack correctly from roof to foundation.
- Headers, trusses, beams, and connectors match the plan, not an improvisation on site.
- Fire blocking is installed in concealed cavities and chases.
- Window and door rough openings match the actual unit sizes, not just the drawing.
- Any planned storage loads have been accounted for before insulation and drywall seal everything in.
For me, the best house framing is the kind you barely notice later because it was laid out cleanly, inspected carefully, and built with the next 20 years in mind.