Replacing a worn toilet flange is one of those plumbing repairs that looks minor until it starts causing real trouble. This guide explains how to replace a toilet flange, choose the right replacement part, set the height correctly, and test the seal so the toilet stops rocking and leaking at the base. I focus on the details that matter in a normal U.S. bathroom: standard pipe sizes, finished-floor height, and the mistakes that turn a small repair into a bigger one.
The repair succeeds when the flange is solid, level, and anchored
- The flange holds the closet bolts and gives the seal a flat surface; if it is cracked, loose, or low, leaks are likely.
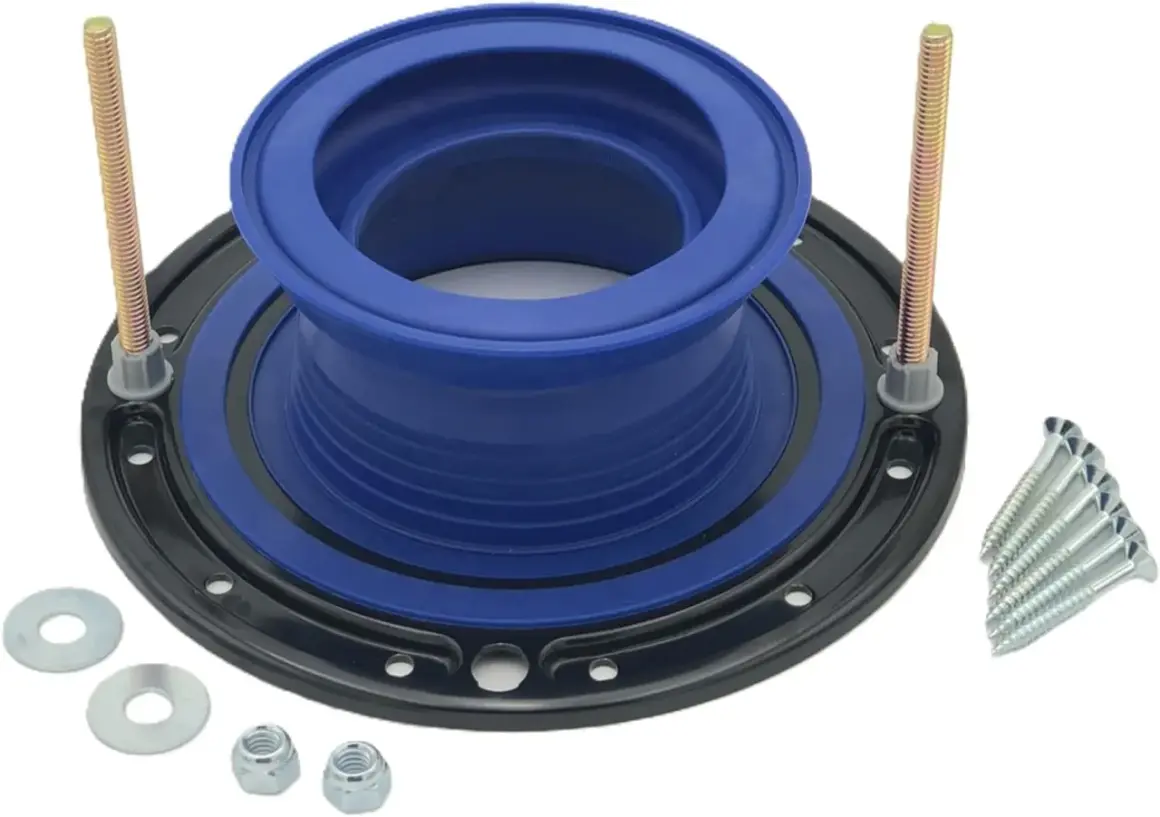
- Most repairs need a new flange or extender, a fresh wax ring, new closet bolts, and corrosion-resistant screws.
- A common target is about 1/4 inch above the finished floor; use an extender instead of stacking wax to solve major height problems.
- Repair rings work for broken ears, extenders work for low flanges, and full replacement works best when the old part is failing.
- If the subfloor is soft, the drain is cast iron and badly corroded, or the pipe is damaged below the floor, the job gets bigger fast.
What the flange does and why it fails
The closet flange is the connection point between the toilet and the drain line. It anchors the closet bolts, keeps the bowl aligned, and gives the wax or foam seal a flat landing surface. In my experience, most people do not notice a problem until the toilet starts to rock, the bolt ears crack, or a faint sewer smell shows up near the base.
Common failure signs are pretty consistent: rusted or spinning screws, a flange that sits below the finished floor, a toilet that wobbles even after the nuts are tightened, or staining and moisture around the base. A flange can also fail after new flooring goes in, because tile or vinyl raises the floor and leaves the old part too low. When that happens, the seal is working against the wrong height, and the wax ring ends up doing too much of the job.
I treat flange problems as a floor-and-seal problem first, not just a toilet problem. That is why the next step is choosing the right fix before buying parts or pulling the toilet apart.
Choose the right repair for the floor and drain you have
Not every bad flange needs a full replacement. Some only need a repair ring or an extender. Others need the old part removed completely because the damage is too far gone. I decide based on three things: whether the flange body is intact, whether the height is correct, and whether the subfloor is still solid.
| Repair option | Best for | Typical parts cost | What to watch |
|---|---|---|---|
| Repair ring | Broken screw ears or a cracked top ring, but the main body is still usable | $6-$25 | Does not solve a low flange or a rotten floor |
| Flange extender | Flange sits below the finished floor after new tile, vinyl, or flooring | $15-$25 | Needs a stable flange underneath and enough bolt engagement |
| Full flange replacement | The flange is broken, loose, rusted, or no longer anchors to the floor properly | $10-$40 | More labor, and cast iron or slab work can slow the job down |
If the flange is only slightly low, an extender is often the cleanest fix. Some kits stack in small increments, which helps when flooring changes have left the seal just a little short of the right height. If the flange is cracked or the screws will not hold, I do not try to patch around it. A weak base usually means the repair will fail again later.
Once you know which path fits the job, the part list gets simpler and the installation goes faster.
What to buy before you start
Before I touch the old toilet, I make sure the replacement parts actually match the drain and the floor. In the U.S., most residential toilet drains are 3-inch or 4-inch, and the flange needs to match the pipe size and material. A PVC flange is not the same job as a cast-iron repair ring, and buying the wrong one wastes time fast.
Parts
- New flange or repair ring sized for the drain pipe and material.
- Fresh wax ring or foam seal, depending on the toilet and flange height.
- New closet bolts, washers, and nuts.
- Corrosion-resistant screws, ideally stainless or brass, long enough to bite into solid subfloor.
- Flange extender kit if the finished floor is higher than the flange.
- Shims for leveling the toilet if the floor is not perfectly flat.
Read Also: Garbage Disposal Installation - Avoid Leaks & DIY Mistakes
Tools
- Adjustable wrench
- Putty knife or scraper
- Oscillating multi-tool or hacksaw for stubborn parts
- Drill/driver
- Tape measure and level
- Rags or a shop vac
- Gloves and eye protection
I also like to have a small block of wood or a rag ready to plug the drain once the toilet is removed. That keeps odors down and prevents hardware from disappearing into the pipe. With the parts ready, the actual removal is straightforward if you work slowly and keep the porcelain out of stress.
Remove the toilet and old flange without damaging the floor
Start by shutting off the water at the valve, flushing the toilet, and sponging out the remaining water in the tank and bowl. Disconnect the supply line, remove the caps over the closet bolts, and loosen the nuts. Lift the toilet straight up and set it aside on a protected surface. Do not twist or drag it across the floor; that is how porcelain chips happen.
- Scrape away the old wax ring from the toilet horn and the top of the flange.
- Plug the drain opening with a rag or towel so debris and smell stay out of the room.
- Remove the screws or fasteners holding the old flange to the floor.
- If the flange is glued, rusted, or broken, cut it free carefully with the right tool.
- Inspect the subfloor for soft spots, rot, or water damage before you install anything new.
This is the point where hidden damage often shows up. If the plywood is soft, the flange cannot hold securely no matter how good the new part is. I stop and fix the floor first if I can push a screwdriver into the subfloor or feel movement around the opening. On older cast-iron drains, I also slow down here because corrosion changes the repair method and the wrong cut can make the problem worse.
Install the new flange at the correct height
The best flange installation is the one that stays flat, tight, and at the right height after the toilet goes back on. A common target is for the top of the flange to sit about 1/4 inch above the finished floor. That gives the seal enough compression without forcing the toilet to sit on an oversized wax ring.
- Dry-fit the new flange and make sure the bolt slots are aligned with the toilet.
- Check the height against the finished floor, not the subfloor.
- If the flange is low, add an extender instead of trying to solve the gap with extra wax.
- Fasten the flange with corrosion-resistant screws into solid framing or subfloor.
- Make sure the flange does not rock before you move on.
For PVC or ABS, follow the fitting style the part is designed for. For cast iron, use a repair flange or replacement style made for that material and fasten it the way the manufacturer specifies. If you are on a concrete slab, use the anchoring method made for masonry and do not depend on caulk, wax, or the toilet bolts to hold the flange in place. The flange itself needs to be the stable part.
If the floor was recently tiled, this is where a low flange usually reveals itself. In those cases, extenders are worth using because they restore the seal height instead of making the wax ring do a job it was never meant to do.
Reset the toilet and test the seal
Once the flange is secure, install new closet bolts in the slots and set the new wax ring in place. I prefer to keep the toilet centered and lower it straight down in one controlled motion. Sliding it around after the wax touches the toilet horn can break the seal or distort the ring.
- Place the toilet carefully over the bolts and lower it straight onto the wax ring.
- Press down evenly until the bowl meets the floor.
- Tighten the nuts a little at a time on each side so the bowl stays level.
- Stop as soon as the toilet is stable; overtightening can crack the porcelain.
- Use shims if the toilet rocks, then trim the shims after everything is tight.
After the toilet is secured, reconnect the supply line, turn the water back on, and flush several times. I always check the base with a dry tissue or paper towel after the first flush and again after a few minutes. Any moisture there means the seal or the flange height still needs attention. If you caulk the base, leave a small gap at the back so a future leak is visible instead of trapped under the toilet.
Common mistakes that cause repeat leaks
The repair usually fails for one of the same few reasons, and most of them are preventable. I see the same mistakes over and over: people reuse the old wax ring, ignore a low flange, or tighten the toilet until the bowl flexes against the floor.
- Reusing the old wax ring after the toilet has been lifted.
- Using the wax ring to bridge a major height problem instead of fixing the flange.
- Overtightening the closet bolts until the porcelain or the flange starts to distort.
- Skipping subfloor repairs when the wood underneath is already damaged.
- Installing the flange crooked or with too few screws to hold it down.
- Failing to test after reassembly before cleaning up and sealing the room.
A toilet that leaks again a day or two later is usually telling you the floor support, flange height, or seal compression was wrong. That is why I check those three points every time before I call the job done. The final question is whether the repair is still a DIY job or whether the damage has crossed into plumber territory.
When the job is bigger than a flange swap
I stop treating this as a simple toilet repair when the subfloor is soft, the drain pipe is damaged below the floor, or the flange is attached to badly corroded cast iron. Those cases often need more than a replacement ring and a wax seal. If the toilet sits on a concrete slab, access can also get complicated because you may need masonry fasteners, cutting, or a different flange style altogether.
Recent U.S. cost guides put professional flange replacement around $145-$165 on average, with many jobs staying under $200 before extra repairs. DIY parts can be much cheaper, often landing in the $10-$50 range depending on whether you need just a ring, an extender, or a full replacement flange. The part cost is not what changes the budget most; labor and hidden floor damage do.
If you are already seeing water damage around the opening, or if the flange has failed because the floor has rotted away, I would not rush the repair. At that point, the right fix may include subfloor replacement before the new flange ever goes in. That is slower, but it is the difference between a repair that lasts and a toilet that starts moving again.
What makes this repair last
The most durable flange repair is the one that respects the floor, the height, and the seal all at once. That is the core of how to replace a toilet flange properly: pick the right part, anchor it to solid material, keep the top at the right level, and reinstall the toilet without forcing the bowl to compensate for a bad base. I treat the flange as the foundation, not an accessory.
Before I leave a bathroom after this kind of repair, I want three things: no rocking, no seepage, and no hidden wobble under the bowl. If those are true after several flushes, the job is done the right way. If not, I go back to the flange, because that is usually where the leak was born.
That is the practical way to handle the repair, and it is the difference between a quick patch and a toilet that stays sealed for years.