A well-built bike rack clears floor space, keeps handlebars from tangling, and stops bikes from leaning into siding, planters, or garden tools. I like a design that is simple enough to build in an afternoon but strong enough to handle daily use, whether it sits in a garage, shed, porch, or covered side yard. This guide walks through a practical DIY bike rack build, the measurements that matter, and the outdoor details that keep it from wobbling, rusting, or rotting out too soon.
The main choices that shape the build
- A basic wall-mounted rack is the fastest and cheapest option, but it only works if the wall structure is solid.
- For most bikes, 24 inches of spacing between hooks or storage points is a safe, comfortable default.
- If the rack lives outdoors, treated wood or coated metal and corrosion-resistant fasteners matter more than fancy joinery.
- A simple build usually falls around $25 to $60 if you already own the tools; an outdoor-ready version often lands closer to $60 to $150.
- Leave about 4 feet of access space in front of wall storage so pedals and handlebars can move without collisions.
- Test the heaviest bike first and recheck the hardware after the first week of use.
Choose the rack style that fits your space
I always start with placement, because the room around the bikes decides the design. A rack that works beautifully in a garage can be clumsy on a porch, and a rack that looks neat in a shed may fail fast if it sits in open weather.
| Style | Best for | What I like about it | What to watch out for |
|---|---|---|---|
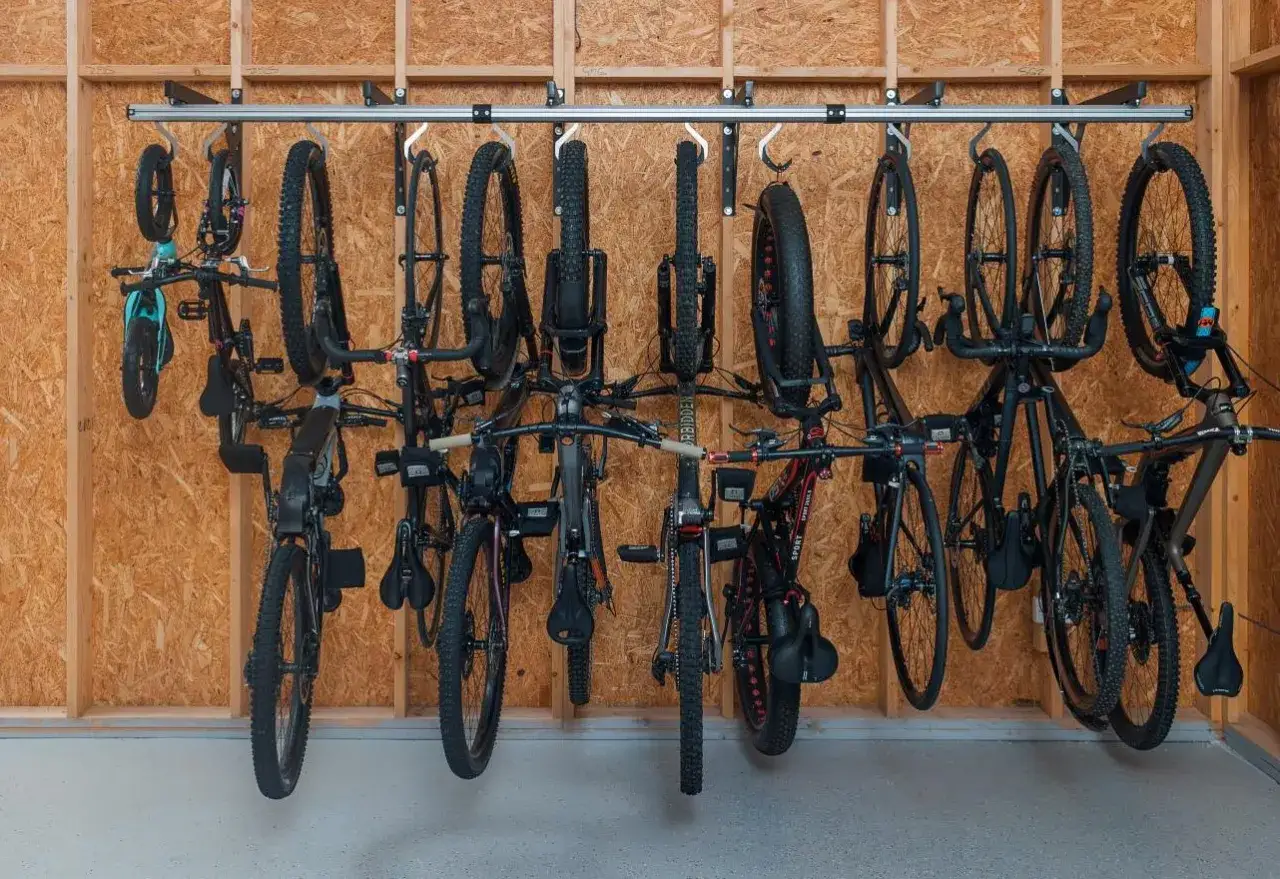
| Wall-mounted vertical rack | Garage walls, sheds, covered porches | Small footprint, low cost, simple lumber and hooks | Needs studs or masonry, plus enough handlebar clearance |
| Freestanding floor rack | Patios, side yards, rental spaces | No wall mounting, easy to move, useful where studs are unavailable | Takes more floor space and usually needs bracing or added weight |
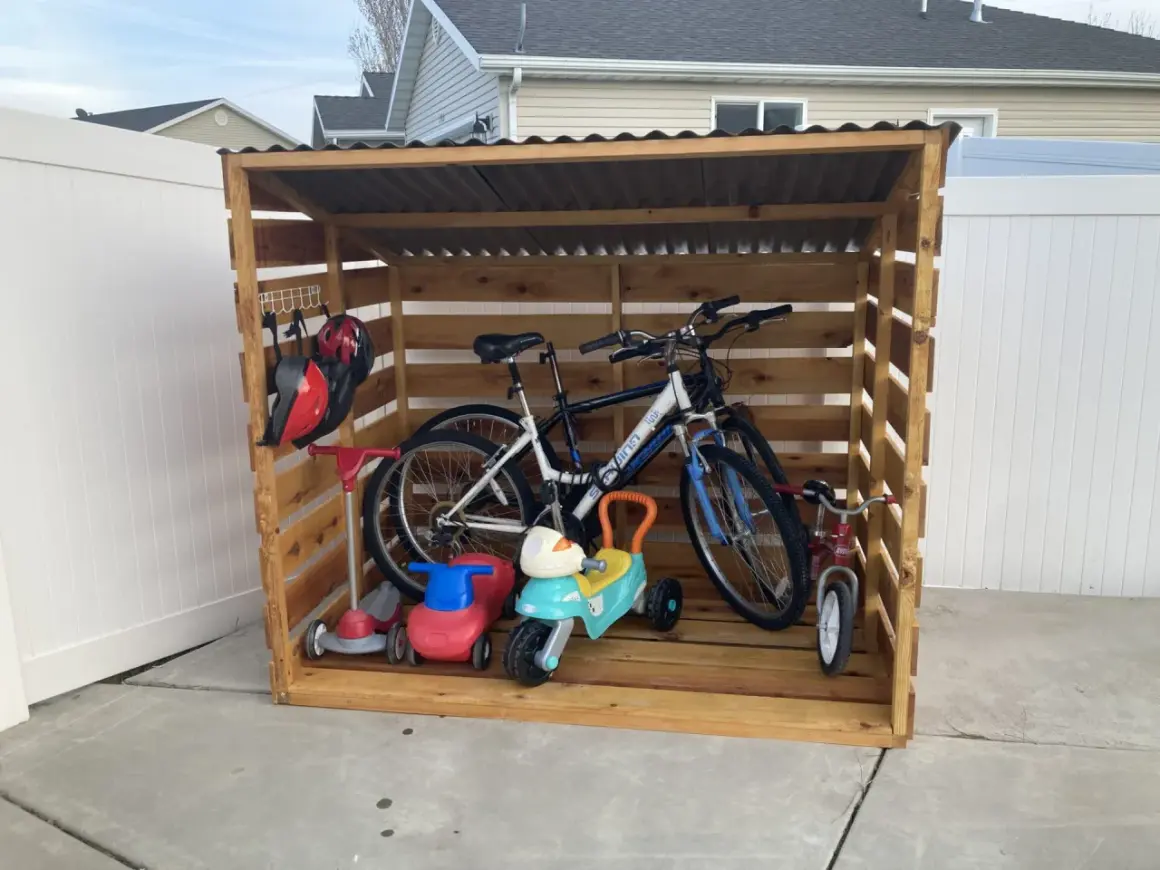
| Covered outdoor rack | Under eaves, inside a bike shelter, next to a shed | Longer service life and better protection from rain and sun | Costs more if you add treated materials, finish work, or a roof |
For most homes, the wall-mounted option is the easiest starting point. If the rack will sit near landscaping or a walkway, I lean toward a covered location and a narrow paver or gravel strip underneath, because it keeps the area cleaner and makes the bike zone look intentional rather than temporary. Once the style is chosen, the numbers decide whether the rack feels tidy or cramped.
Plan the dimensions before you cut lumber
Good dimensions prevent most of the frustration. I measure the longest bike first, then I check handlebar width, wheel size, and the space a rider needs to lift the bike into place without scraping the wall or another frame.
- Hook spacing: 24 inches center to center is a safe starting point for most bikes.
- Tight spacing: 16 inches can work in compact layouts, but it is less forgiving with wide bars and larger bikes.
- Access lane: Leave about 4 feet in front of a vertical wall rack so bikes can come out cleanly.
- Wall footprint: Two bikes in a vertical wall setup can fit into a surprisingly small area, but the clearance in front matters more than the footprint on the wall.
- Rail height: A lower rail around 65 inches from the floor and an upper rail about 14 inches above it is a practical starting point for staggered storage.
If the rack will hold mixed bikes, I put the longer adult bikes on the ends and the smaller bike in the middle. That one decision usually prevents the handlebars from fighting each other every time someone parks or pulls a bike out. With the layout settled, the build itself stays simple and predictable.
Build a simple wall-mounted rack step by step
The cleanest beginner build is a wall-mounted vertical rack made from 2x4s and screw-in bike hooks. It is fast, cheap, and strong enough for everyday use when it is fastened into real framing. If you later decide to move the rack outside under cover, the same layout still works as long as the materials are weather-resistant.
Cut and prep the rails
Cut two horizontal rails to length, then sand the edges so the lumber does not splinter when the bikes are lifted on and off. If I am working with rough or reclaimed boards, I take a few extra minutes here, because that makes the rack feel finished instead of improvised.
Find the framing and mark the layout
Use a stud finder and mark the mounting points before drilling anything. I want the rails to land on solid structure, not just drywall, and I check the marks with a level so the hooks end up straight.
Mount the rails securely
Fasten the lower rail first, then mount the upper rail about 14 inches above it if you are building a staggered setup. Construction screws in the 3-inch to 3.5-inch range are a sensible choice for most 2x4 builds, and I usually put two fasteners into each stud for peace of mind.
Set the hook spacing
Install the hooks about 24 inches apart, or a little wider if the bikes have thick bars or large frames. If the hooks are staggered between the two rows, the bikes sit more naturally and the handlebars are less likely to tangle. I always pre-drill for the hooks, because that reduces splitting and keeps the hardware straight.
Read Also: Build a Brick Walkway That Lasts - Expert Guide to Durability
Test the fit before you call it done
Hang the heaviest bike first and see how the frame swings, where the pedals sit, and whether the front wheel clears the wall. If anything feels tight, I adjust the spacing before adding the rest of the bikes. That test saves time, patches, and frustration later. If you cannot anchor into a wall, the same spacing rules still apply to a freestanding frame, but that version needs a wider base and stronger bracing.
Make it safe and stable
Stability is where a homemade rack either feels solid or feels like a bad idea. I do not trust drywall anchors for loaded bikes unless the system is specifically designed for that load, and I do not skip the level check just because the rack is small.
- Hit studs or masonry: Use structural framing whenever possible, and use the right anchors if the wall is concrete or block.
- Match the hardware to the load: Use screws and hooks that are meant for real weight, not lightweight decorative fasteners.
- Check the clearances: Make sure pedals, saddles, and handlebars do not scrape the next bike or the wall.
- Test one bike first: If the first bike sits awkwardly, the rest of the rack will only magnify the problem.
- Retighten after the first week: Wood settles a little, and that first adjustment is normal.
If I am building for a family, I think about the heaviest bike, not the lightest one. The rack should feel boringly solid from the first lift, because that is the kind of storage system people actually keep using. Once the structure is sound, the next question is how long it will survive outdoors.
Make it outdoor-ready
Outdoor placement changes the material list. Sun, moisture, and temperature swings will punish soft lumber and cheap hardware faster than most people expect, so I prefer materials that can handle wet feet, spray, and seasonal weather without turning soft or rusty.
- Use weather-tolerant wood: Pressure-treated lumber, cedar, or another exterior-grade option is a better starting point than bare construction scraps.
- Choose corrosion-resistant fasteners: Hot-dip galvanized or stainless hardware lasts longer outdoors than plain interior screws.
- Seal the cut ends: End grain drinks moisture fast, so paint or seal the cuts before installation.
- Keep wood off the ground: Rubber feet, pavers, or a small concrete pad reduce wicking and keep the rack cleaner.
- Stay out of the sprinkler line: Constant overspray shortens the life of the rack and keeps the bikes damp.
- Add overhead protection if you can: A roof edge, overhang, or simple shelter makes a bigger difference than most finish products.
For a side-yard setup, I like a gravel strip or paver base under the rack because it improves drainage and keeps mud from splashing onto the drivetrain. That is a landscaping detail, but it also becomes a bike-care detail the first time it rains. Once the weather resistance is handled, the remaining mistakes are mostly avoidable.
Avoid the mistakes that turn a good rack into a nuisance
Most bad racks are not bad because the idea was wrong; they are bad because the spacing, mounting, or finish was rushed. I see the same problems again and again, and they are usually easy to avoid if you slow down before the first screw goes in.
| Mistake | Why it causes trouble | Better choice |
|---|---|---|
| Hook spacing is too tight | Bars and pedals collide, and the rack becomes annoying to use | Start around 24 inches and widen it if the bikes are bulky |
| Mounting into drywall only | The rack loosens, pulls out, or flexes under load | Fasten into studs or masonry |
| Using untreated wood outdoors | Moisture and sun shorten the life of the rack quickly | Use exterior-grade materials and seal the cut edges |
| Skipping a test fit | You may end up with holes in the wrong places | Hang one bike first and confirm the clearances |
| Placing the rack in a walkway | It becomes an obstacle instead of an organizer | Keep a clear path and leave room for doors, mowers, and hoses |
I also avoid overbuilding the wrong parts. A decorative fascia or extra trim will not fix weak mounting, and a thicker board will not rescue bad spacing. The fastest way to improve the rack is to make the structure solid, then refine the edges and storage details afterward.
The last details I would add before calling it finished
The small finishing touches are what make a homemade rack feel permanent. If I had a little extra time, I would add a shallow shelf for helmets or pumps, a rubber strip where the frame touches the hook, and a label or painted mark for each family member’s parking spot.
- A narrow shelf or peg strip keeps helmets, lights, and pumps off the floor.
- Rubber sleeves or tape on the hook contact points protect painted frames and rims.
- Numbered spots help families keep the rack organized without arguing about bike placement.
- A stain or paint color matched to the siding, shed, or fence helps the rack blend into the yard.
- A drip tray, gravel strip, or paver pad below the rack keeps the area cleaner in wet weather.
If I were building this for my own yard, I would keep the frame simple, overbuild the mounting, and spend the extra time on finish and drainage. Those are the details that separate a rack that only looks good on day one from one that still feels solid after a wet spring, a hot summer, and a lot of daily use.