What matters most before the membrane goes down
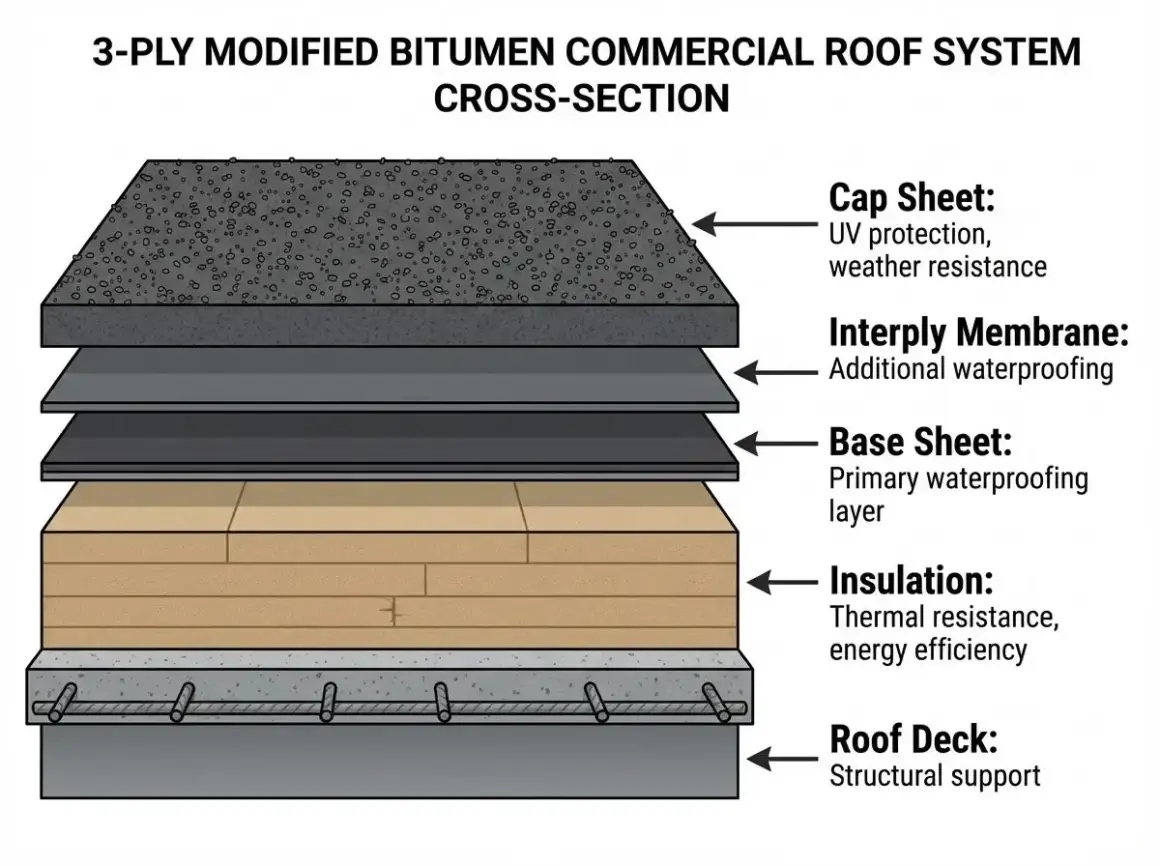
- Modified bitumen is a layered low-slope roofing system, usually built around a base sheet, one or more plies, and a cap sheet.
- Positive drainage is not optional; a practical minimum target is about 1/4 inch per foot so water does not sit on the roof.
- Torch-applied, cold-applied, self-adhered, and mechanically attached systems each trade off speed, safety, weather limits, and labor demands.
- Most leaks start at seams, flashings, penetrations, and edge details, not in the open field of the roof.
- Twice-yearly inspections, clean drains and gutters, and quick patching of small defects help the roof reach its expected life.
What this roof system is and where it fits best
Modified bitumen is a reinforced asphalt membrane designed for flat and low-slope roofs. I think of it as a system, not a single product: the deck gets prepared, insulation and underlayment are added as needed, and then the membrane layers are installed to form the weatherproof skin.
That layered approach is why this roof makes sense on commercial buildings, garages, porches, and any structure where water must move deliberately to drains or gutters instead of shedding by gravity alone. It also explains the limits. If the deck is soft, the slope is weak, or water already ponds in the wrong places, the membrane is only part of the fix.
In practice, I also separate the membrane families. SBS systems are valued for flexibility and movement tolerance, while APP systems are firmer and handle heat well. Neither one forgives sloppy preparation, and neither one should be treated like a cosmetic topcoat. Once the membrane type is chosen, the next question is how the job is staged on the roof.
How I would lay out the installation sequence
The cleanest way to think about the work is in sequence. I want the roof to be dry, the details to be planned, and the crew to know where every termination goes before the first roll is opened.
- Inspect the deck first. Any soft wood, rusted metal, trapped moisture, or loose substrate has to be corrected before membrane work starts.
- Confirm drainage and slope. If the roof does not move water to drains, scuppers, or gutters, the finished system will age too fast no matter how good the membrane is.
- Install the base layers. Depending on the assembly, that may mean vapor retarder, insulation, base sheet, or an interply sheet. Compatibility matters here.
- Set the membrane with the right attachment method. That may be torch heat, cold adhesive, self-adhering backing, or mechanical fastening, but the product instructions have to drive the process.
- Watch the laps closely. Many systems call for 3-inch side laps, 6-inch end laps, and staggered end laps so seams do not stack in the same line.
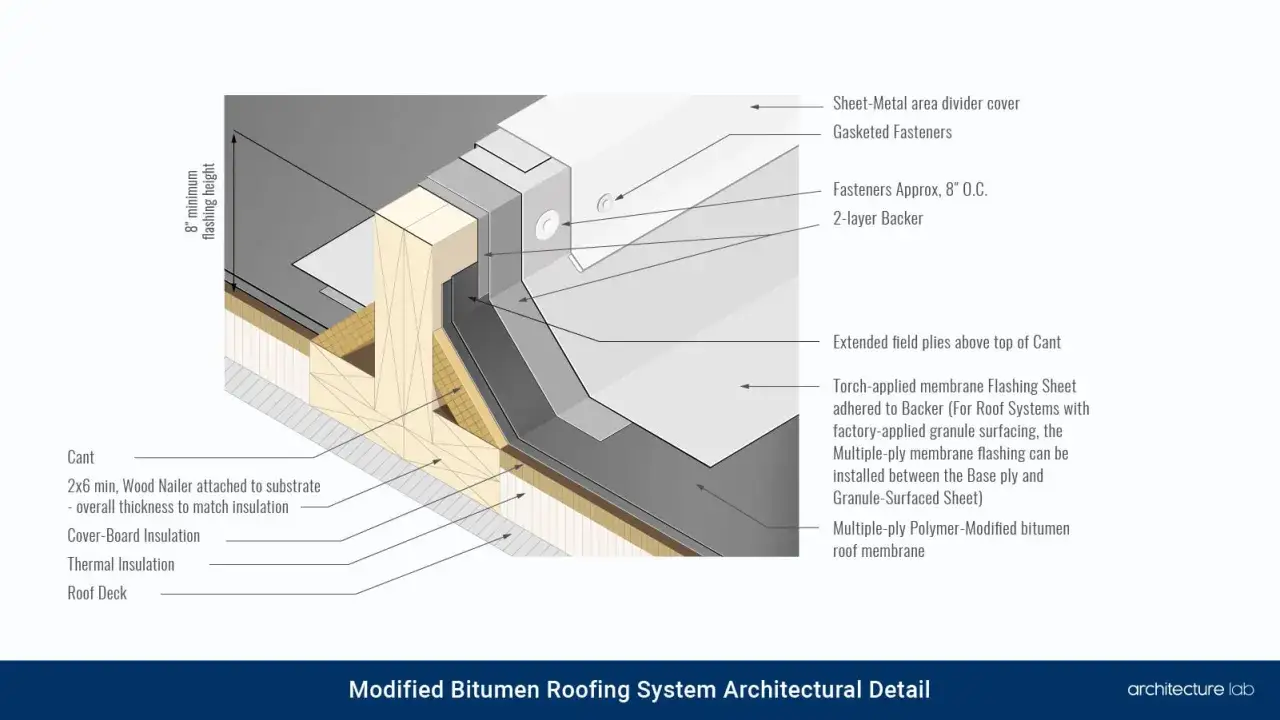
- Flash every transition. Curbs, walls, pipes, drains, and edge metal are where water usually finds the first weakness.
- Inspect the finished seams. I want full and uniform adhesion, no fishmouths, no wrinkles, and no loose edges that can be caught by wind or foot traffic.
Weather changes the rhythm. In cooler conditions, rolls should be relaxed before installation so they lie flatter and are less likely to wrinkle later, and some systems need tighter cold-weather controls than others. That sequence changes again depending on the attachment method, which is where the real tradeoffs show up.
Choosing between torch-applied, cold-applied, self-adhered and mechanically attached
The method matters as much as the membrane. I choose it based on building occupancy, fire restrictions, crew skill, weather window, and how much site disruption the owner can tolerate.
| Method | What it does well | Main tradeoff | Best fit |
|---|---|---|---|
| Torch-applied | Creates strong heat-welded seams and performs well on many low-slope projects. | It demands fire planning, trained installers, and careful work around combustible materials. | Projects with experienced crews and a clear hot-work plan. |
| Cold-applied | Avoids open flame and can reduce fire exposure on occupied sites. | Adhesive rate, cure time, and dry substrates matter a lot; bad weather can slow the job. | Sites where torch work is restricted or not practical. |
| Self-adhered | Fast, clean, and free from open flames and hot asphalt. | Prep has to be excellent, and temperature can affect how aggressively the sheet bonds. | Occupied buildings, smaller roofs, or projects that need less hot-work risk. |
| Mechanically attached | Useful when fasteners are part of the design and the system allows it. | Fastener pattern, wind design, and substrate condition must be right. | Certain assemblies where attachment speed and structural design align. |
For torch-applied work, I want crews trained through NRCA’s CERTA program or an equivalent safety path. That is not a box to check casually; torch roofing can be safe when the design, detailing, and fire precautions are disciplined, but it is the method I treat with the most respect. Self-adhered systems are usually the easiest to live with on occupied buildings, while cold-applied products reward patience and dry weather. The method choice only works if water can actually leave the roof, which brings drainage and gutter details to the front of the conversation.
Drainage, flashing and gutter details that decide the outcome
I start with drainage because a membrane cannot compensate for standing water forever. The practical target on low-slope work is about 1/4 inch per foot, and that slope needs to move water to drains, scuppers, or gutters without creating dead pockets. On roofs with interior drains, the drains should sit low enough to pull water off the surface instead of leaving a puddle around the bowl.
That same logic applies to gutters. If the building uses gutters, they need to be integrated with the roof edge, not treated like an afterthought. I want a clear path from membrane to edge metal to gutter or downspout, with no place for water to creep behind the termination. Condensate from HVAC equipment should not be dumping directly onto the membrane either; it shortens the life of the roof in a way that looks minor until the stains and splits start appearing.
- Keep drains and gutters clear. Debris buildup is one of the fastest ways to create standing water.
- Recess interior drains correctly. If the drain assembly sits too high, the roof never fully empties.
- Use crickets or saddles where needed. These small slope builders move water away from curbs, chimneys, and wide penetrations.
- Detail edge metal carefully. Most edge leaks come from poor termination, not from the field membrane.
- Plan for movement. Expansion joints, parapets, and metal transitions need detailing that can handle expansion and contraction.
When the drainage plan is sound, the roof works with the weather instead of fighting it. Even then, a few common workmanship errors can undo the system faster than most owners expect.
Common mistakes that shorten the roof's life
The mistakes I see most often are not dramatic. They are small, repeatable, and expensive. The frustrating part is that most of them are preventable with better sequencing and a little more discipline in the field.
- Installing over damp material. Trapped moisture can turn into blisters, seam problems, and hidden deck damage.
- Ignoring lap quality. A seam that is not fully bonded is a future leak, even if it looks fine from the ground.
- Stacking end laps in the same line. Staggering matters because it keeps weak points from clustering together.
- Using the wrong adhesive or primer. Products are not interchangeable, and compatibility has to be checked before work starts.
- Rushing cold-weather installation. Rolls that are not relaxed or products that are pushed outside their preferred temperature range tend to wrinkle or bond poorly.
- Underestimating flashing complexity. Pipes, skylights, curbs, and parapet walls need more than a quick wrap.
- Treating a recover like a shortcut. If the old roof is wet, uneven, or damaged, covering it up usually hides the problem instead of solving it.
When I review a failed roof, the failure is often traceable to one of those shortcuts. If those mistakes are avoided, the remaining questions are how long the roof should perform and what kind of upkeep keeps it there.
What I would expect from service life and upkeep
Service life depends on the assembly, exposure, traffic, and drainage, but a sensible planning range is still useful. GAF’s current guidance puts SBS systems roughly in the 10 to 30 year range and APP systems around 10 to 20 years, with the actual result shaped by the full roof assembly, not just the membrane label. In other words, a good product on a poor roof will still disappoint.
Maintenance is simpler than most people expect, but it has to be consistent. I tell owners to inspect the roof at least twice a year and after major storms, clear drains and gutters, check seams and flashings, and repair punctures or lifted edges before they spread. That is also the moment to look for blocked scuppers, ponding near drains, and damage from service workers or HVAC traffic.
The roof that lasts is rarely the roof with the fanciest membrane. It is the roof where the owner can still see the water path, the installer respected the details, and the maintenance plan did not begin after a leak appeared. That leads to the last thing I would lock in before anyone starts rolling membrane.
What I would lock in before the crew starts
Before the first torch lights or the first self-adhered sheet is laid, I want the job defined in writing. If these items are clear, the installation tends to go smoothly. If they are vague, the crew ends up improvising at the exact moment when precision matters most.
- Roof slope and drainage path. I want to know where water is going and how fast it leaves the roof.
- Attachment method. The assembly has to match the building, the weather, and the fire-safety constraints.
- Flashing schedule. Every penetration, wall, curb, and edge should have a planned detail before work begins.
- Weather window. Cold, wind, rain, and temperature swings can change the quality of the bond.
- Deck condition. A roof over a questionable substrate is a problem waiting for the first heavy storm.
- Access for maintenance. Owners still need a way to reach drains, gutters, and service points without damaging the membrane.
That checklist is the difference between a roof that looks finished and one that actually performs. When the deck is sound, the drainage is real, the laps are disciplined, and the flashings are planned, the system has a fair chance to do its job for a long time.