Low-slope roofs fail for ordinary reasons: trapped moisture, weak seams, rushed flashing, and poor drainage. A good modified bitumen roof installation avoids those problems by treating the deck, membrane, and edge details as one system. In this guide I walk through what the material does well, how to tell whether a roof is a real candidate, how the work is sequenced, and which mistakes shorten service life fastest.
The main decisions are slope, adhesion method, and flashing quality
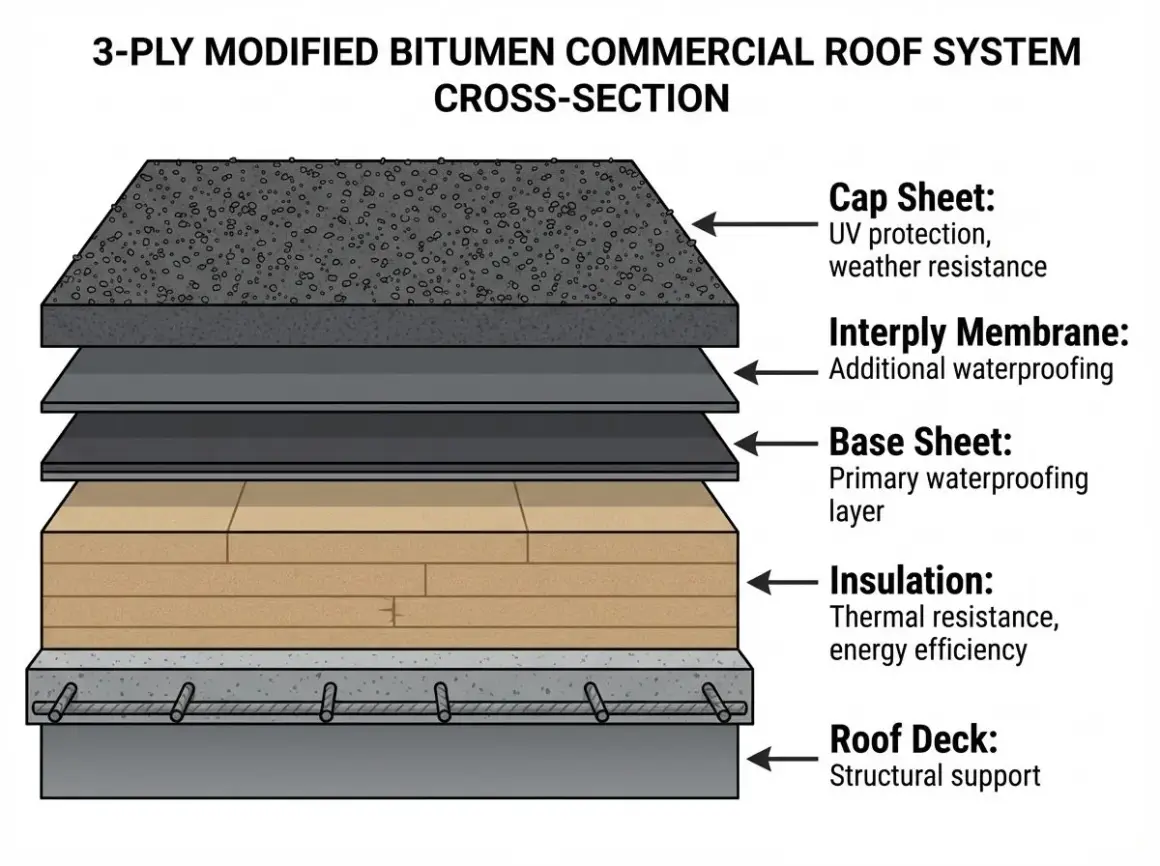
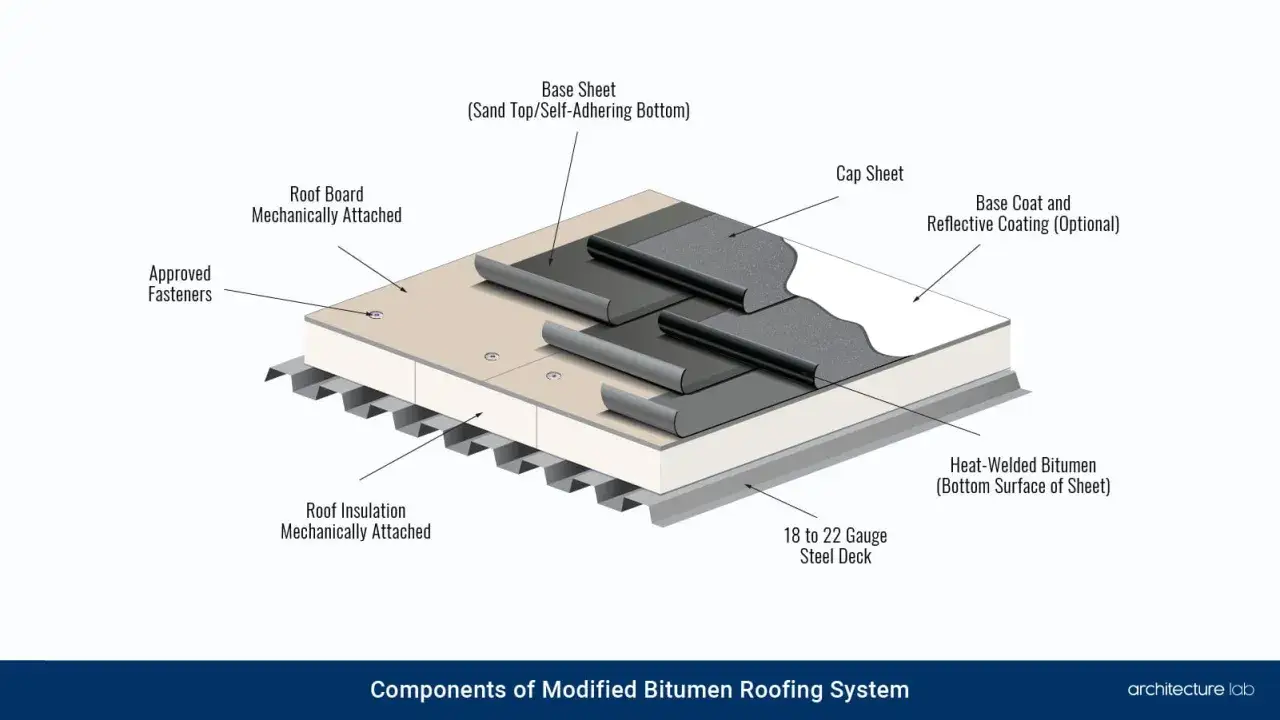
- Most systems are built as a 2-ply assembly with a base sheet and a cap sheet.
- The deck must be dry, smooth, and structurally sound before any membrane work starts.
- Many low-slope systems are intended for pitches around 1/4:12 to 3:12, but the product details matter more than guesswork.
- Torch-down gives very strong seams, while self-adhered systems reduce open-flame risk and cleanup.
- Edge metal, drains, and wall flashings decide whether the roof stays tight after the first storm.
- Good maintenance is simple: keep water moving, inspect twice a year, and repair punctures early.
What modified bitumen roofing is built to do
Modified bitumen sits between old-school built-up roofing and modern single-ply membranes. The sheets are asphalt-based, but they are reinforced and polymer-modified so they stay tougher and more flexible than basic rolled roofing. That combination is useful on low-slope roofs that see temperature swings, foot traffic, and repeated expansion and contraction.
In practice, I think of it as a system for roofs that need strong seams and dependable flashing more than flashy marketing claims. It works well on garages, porches, commercial canopies, additions, and other low-slope areas where ordinary shingles are the wrong tool. It is not a cure for a deck that is rotten, sagging, or holding water in the same spot after every storm. Once you understand what the system is for, the next question is whether the roof itself is ready for it.
How to know whether the roof is ready for it
Before I even think about membranes, I check the roof like a builder, not a salesman. If the substrate is wrong, the roof will eventually tell on itself through blisters, splits, open laps, or edge failures. The table below is the practical version of that pre-installation check.
| Condition | What I want to see | Why it matters |
|---|---|---|
| Slope | Common low-slope applications are around 1/4:12 to 3:12, depending on the product | Too flat and water lingers; too steep and the membrane details can become harder to manage |
| Deck | Clean, dry, smooth, and structurally sound plywood, OSB, or another approved substrate | Movement or moisture telegraph straight into the membrane |
| Drainage | Positive drainage to drains, scuppers, or gutters | Ponding water shortens service life and makes leaks harder to trace |
| Weather window | Dry surfaces and temperatures within the product limits | Adhesion fails when installers force the job in bad conditions |
| Roof size and layout | Enough space and access for rolls, tools, and safe movement | Some self-adhered systems are limited to smaller roof areas, and tight layouts slow the crew down |
For many self-adhered products, installers want ambient temperatures roughly in the 40F-and-rising range, and some systems perform best between 45F and 95F. That is not a small detail. I have seen perfectly good membrane jobs fail early because the crew tried to work over a damp deck, or because they treated a cool morning like a normal workday. If the roof is dry, sound, and properly sloped, the installation can proceed cleanly. If not, the right move is usually repair first, membrane second. From there, the process itself becomes much easier to follow.
The installation sequence that actually matters
The exact steps vary by manufacturer, but the rhythm of the work is the same: prep the deck, lock down the field membrane, then finish every transition and edge with more care than the average homeowner expects. A roof that looks flat from the ground still has dozens of places where water can enter if the sequence is rushed.
- Remove the old roofing and inspect the deck. I want every rotten section, loose fastener, soft spot, and hidden void addressed before the new system goes down.
- Repair and re-fasten the substrate. Replace damaged plywood or OSB, tighten movement, and make sure the deck is continuous and well supported.
- Prime where the system calls for it. Primers are especially important at metal, walls, and certain reroof conditions. This is where adhesion usually lives or dies.
- Plan the layout from the low point upward. The goal is to keep laps oriented so water does not work against the seams. On a simple roof, that means starting low and staying disciplined with alignment lines.
- Install the base sheet or first ply. On many systems, that layer is the structural and waterproofing foundation. It needs to lie flat without wrinkles or fishmouths.
- Build out the flashings. Parapets, curbs, skylights, vents, and wall ties need their own treatment. A cant strip, a beveled piece that eases the membrane up a vertical change, helps prevent a sharp bend from becoming a crack later.
- Install the cap sheet or finish membrane. This is where the roof gets its weathering surface and its final UV resistance. Seams should be fully bonded and rolled.
- Roll and inspect the completed surface. Some current self-adhered guides call for a heavy roller after placement, and that step is not cosmetic. It helps drive out trapped air and improve bond quality.
- Finish edge metal and terminations. Drip edges, copings, and termination bars are not decoration. They are the last line between the membrane and wind-driven water.
The part people underestimate is not the field membrane itself. It is the details at the perimeter and the penetrations. That is where the next decision comes in: which installation method actually fits the roof and the jobsite.
Torch-down, self-adhered, or cold-applied
There are three common ways to install modified bitumen systems, and each one makes sense in a different setting. I do not treat them as interchangeable. The right choice depends on fire risk, access, weather, crew experience, and how much cleanup the owner can tolerate.
| Method | Best for | Main advantage | Main trade-off |
|---|---|---|---|
| Torch-down | Crews trained for open-flame work on suitable substrates | Very strong, heat-fused seams | Higher fire risk and tighter safety controls |
| Self-adhered | Projects where open flame is undesirable or not allowed | No torch, no hot asphalt, less cleanup | More sensitive to temperature and deck preparation |
| Cold-applied | Sites with flame restrictions or crews that prefer adhesive application | Useful where open flame is a problem | Weather window and cure time can slow the job |
Torch-applied systems can be excellent when the crew is trained, the details are designed correctly, and fire precautions are taken seriously. Self-adhered systems are cleaner and often safer because they remove open flame from the equation, but they still demand dry substrates and the right temperature window. Cold-applied systems are often the quiet middle ground, especially where flame work is restricted, but they are not a shortcut around planning. In real projects, I usually favor the method that fits the site restrictions first, then the crew's experience second. Once the method is chosen, the next risk is not the membrane itself. It is the mistake list.
The mistakes that usually create leaks
Most failed roofs do not fail in the middle of a smooth field sheet. They fail where the roof changes direction, changes height, or meets another material. Those are the places that reward patience and punish shortcuts.
- Installing over moisture. A roof deck that is damp, frosty, or wet can trap problems under the membrane and turn them into blisters or adhesion loss later.
- Skipping deck repairs. Covering rot is not repair. It is delay.
- Ignoring ponding. If water already sits on the roof, the membrane is being asked to compensate for a drainage problem it cannot solve by itself.
- Rushing the seams. Poor lap alignment, weak pressure, or sloppy rolling leaves a path for water and wind.
- Underbuilding the flashings. Walls, curbs, vents, skylights, and drains need system-specific treatment, not improvised sealant.
- Using incompatible products. A random caulk or primer can undermine an otherwise solid membrane assembly.
- Overheating torch work. Too much heat damages the sheet; too little leaves an incomplete bond.
If I had to pick one lesson that saves the most money, it would be this: the flashing details matter more than the brochure photo. A roof can look clean from the driveway and still leak at the first wall tie-in or gutter edge. That is why maintenance and drainage have to be part of the conversation from day one.
What maintenance buys you after the roof is done
Modified bitumen roofs can last a long time when they are installed correctly and kept clean. Service life varies by system, exposure, and maintenance, but a well-cared-for roof often reaches into the 10 to 30 year range. Neglect the basics, and you can cut that dramatically without ever seeing a dramatic failure until the leak is already inside the building.
My maintenance list is short and practical:
- Inspect the roof at least twice a year, usually in spring and fall.
- Check again after hail, wind, or long periods of heavy rain.
- Keep gutters, scuppers, and drains free of leaves, gravel, branches, and packaging debris.
- Look for open seams, lifted edges, punctures, and split sealant at flashings.
- Repair small damage early instead of waiting for the next rain to expose it.
- Limit unnecessary foot traffic and use walkway pads where people regularly access the roof.
Drainage deserves special attention on roofs that discharge into gutters or scuppers. If those outlets back up, the membrane sits in water longer than it should, and every seam starts working harder. That is why I treat the roof and the drainage path as one system, not two separate jobs. When the installation is complete, there is still one more question worth asking: what should you verify before you sign off on the work?
The last checks that save you from a return visit
Before I call a modified bitumen roof finished, I want to see a few things in writing and in the field. If the crew says the roof is done but the details are vague, that is usually where future problems begin.
- The seams are fully bonded, rolled, and visually consistent.
- Flashings at parapets, walls, skylights, vents, and curbs are continuous and terminated cleanly.
- Edge metal, drip edges, and coping details are secure and sealed as required.
- Drainage points move water away from the roof without ponding.
- No exposed fasteners, loose debris, or incompatible sealants were left behind.
- The warranty paperwork matches the actual system that was installed.
If those items check out, the roof has a real chance to perform the way it should. That is the difference between a membrane that just covers the deck and one that actually protects the building. A careful modified bitumen roof installation is less about one dramatic step than about a series of disciplined decisions, and the roofs that age well are the ones where the crew respected the deck, the weather window, and the water path from the start.