For asphalt roof shingles, the answer is usually simple: most field shingles are fastened with four nails, while six nails is common when wind ratings, local code, or the manufacturer’s instructions call for it. The part that matters more than the count itself is getting the nails into the right zone, at the right depth, with the right fastener. That is the difference between a roof that stays tight and one that starts failing at the edges after the first serious storm.
The short rule for shingle fastening
- Most standard asphalt strip shingles use four nails per shingle.
- Six nails is common for high-wind applications or product-specific enhanced fastening patterns.
- The manufacturer’s instructions control the job, and the IRC sets a minimum floor in U.S. code.
- Use corrosion-resistant roofing nails with a 12-gauge shank and a 3/8-inch head.
- Nails should sit in the approved nail zone, not be overdriven, underdriven, or exposed.
- Starter strips, ridge caps, and other accessories often have their own fastening pattern.
Four nails is the standard, but it is not the whole answer
In most U.S. asphalt-shingle work, I start with four nails per full-size strip shingle. That matches the general guidance from ARMA and the baseline in the International Residential Code for normal strip-shingle installation. It is the usual answer for ordinary field shingles on ordinary roofs.But roofing is rarely that clean. Some shingle lines are engineered for enhanced wind performance with four nails, some local codes still call for six, and some roof shapes force a different pattern entirely. Once the roof is steep, exposed, or built from a product with a special warranty structure, the package instructions matter more than any rule of thumb.
The safe habit is simple: treat four as the default, then verify whether the product, slope, or jurisdiction upgrades that to six. That leads directly to the situations where the count changes.
When the count changes from four to six
Most homeowners want a one-line answer, but the real answer depends on the roof system. I use the table below as a practical shortcut before I ever start nailing.
| Situation | Typical fastening | Why it changes | What I check first |
|---|---|---|---|
| Standard strip shingles | 4 nails per shingle | Normal residential installation | Manufacturer sheet and local code |
| High-wind areas | 6 nails per shingle | Extra uplift resistance and some code requirements | Wind speed requirement and warranty terms |
| Steep slopes or mansard sections | Special pattern, sometimes hand-sealed | Gravity and sliding forces increase | Slope limit in the product instructions |
| Special laminated or engineered shingles | Product-specific, often 4 but not always | Different nailing zones and warranty rules | Printed nail zone on the shingle wrapper |
I have seen enough roofs to know that the “six-nail” rule is often misunderstood. It is not a universal upgrade; it is a response to wind, slope, or a specific product requirement. If the shingle line is designed for a particular wind warranty with four nails, adding extra nails may not help and can even land outside the approved zone.
That is why I always read the product sheet before assuming the pattern. It saves time later, and it keeps the roof aligned with the warranty instead of just the job-site habit.
Where the nails should land on the shingle
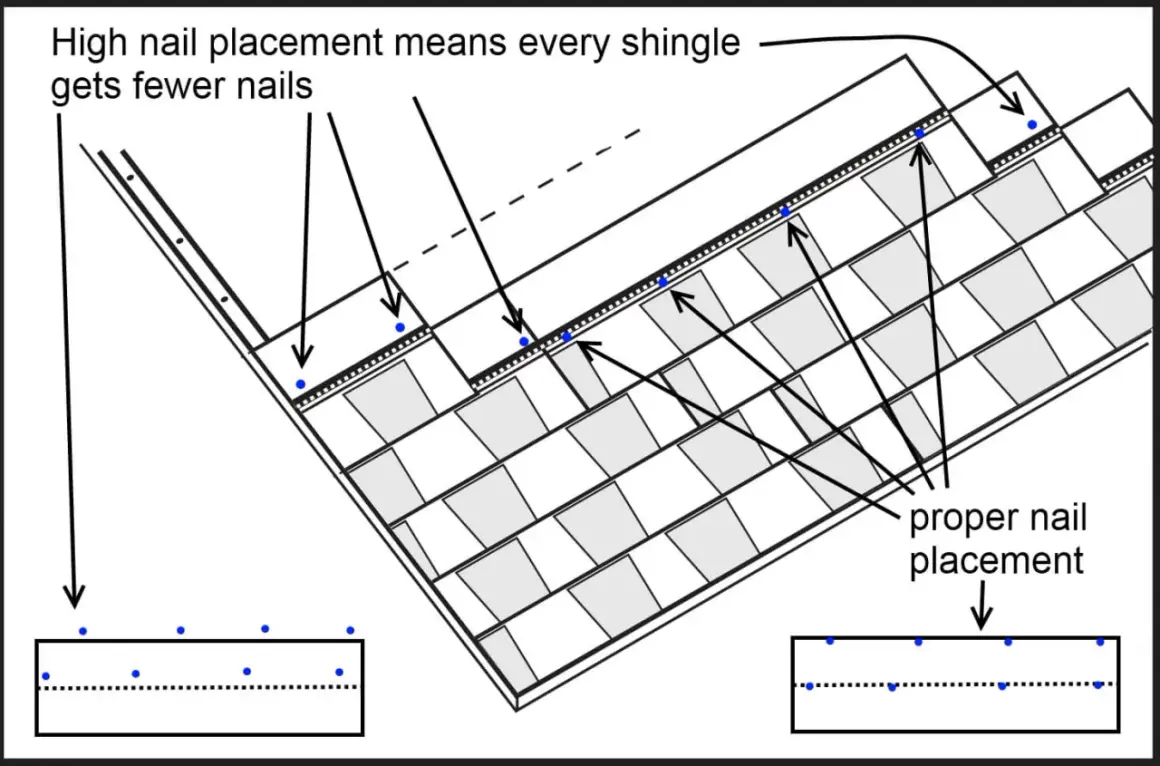
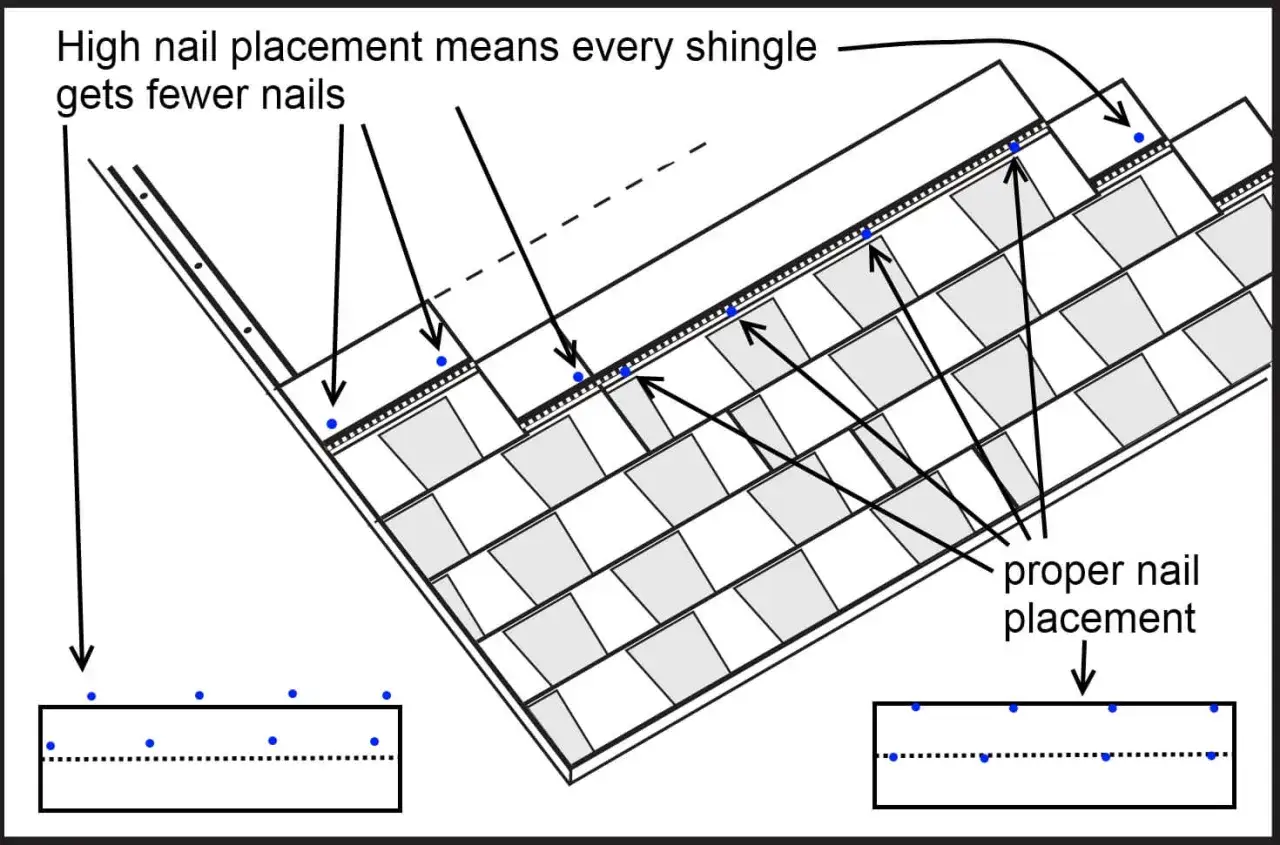
Once the count is right, placement becomes the bigger issue. Nails belong in the manufacturer’s nail zone, usually below the sealant strip and above the visible portion of the shingle. If the nail lands too high, too low, or across a cutout, the roof may still look finished from the ground, but the fastening is already compromised.
- Keep every nail within the printed or indicated nail zone.
- Drive nails straight, not at an angle.
- Leave the head flush against the shingle, not buried and not proud.
- Keep nails away from cutouts, end joints, knot holes, and cracks in the deck.
- On many laminated shingles, the nail needs to catch the intended layers, not just the top skin.
- For very steep sections, including some mansard roofs, special fastening and hand-sealing may be required.
One detail that gets overlooked is nail offset from the ends. ARMA recommends keeping each nail at least 1 inch from either end of the shingle, and I follow that because it reduces tear-out and edge failure. That kind of detail sounds small until wind starts working on the roof.
From here, the nail itself matters just as much as the pattern, which is where many DIY jobs quietly go wrong.
The nail itself has to match the roof
I do not think of roofing nails as generic hardware. For asphalt shingles, the usual specification is a corrosion-resistant roofing nail with a minimum 12-gauge shank and a minimum 3/8-inch head. The nail also needs enough length to penetrate at least 3/4 inch into the deck, or through the sheathing by at least 1/8 inch if the deck is thinner. That is not an optional detail; it is what gives the fastener real holding power.In the field, I pay attention to three things:
- Corrosion resistance so the roof does not fail early in wet or coastal conditions.
- Length so the fastener reaches solid wood instead of barely grabbing the surface.
- Driving depth so the head bears tightly without cutting the shingle.
A pneumatic nailer can speed up work, but only if it is tuned correctly. Too much pressure overdrives the head into the mat. Too little leaves the nail proud and the shingle loose. In my experience, a fast nail gun is useful only when the operator is disciplined enough to check the result as often as the pace.
That connects directly to the mistakes that create callbacks, which are usually more expensive than the roof work itself.
The mistakes that cause leaks and blow-offs
The common failures are boring on paper and expensive in real life. They usually come from rushing, using the wrong nail, or assuming that close enough is good enough.
- Too few nails can let wind lift the shingle and start a blow-off.
- Overdriven nails cut into the shingle mat and reduce holding strength.
- Underdriven nails leave a raised head that can break the seal or create a leak path.
- Angled nails do not clamp the shingle cleanly and are more likely to loosen.
- Nails placed too high can miss the bonding area and weaken wind resistance.
- Nails placed too low can become visible or land where the shingle should flex and seal.
These problems matter because they do not always show up immediately. A roof can look finished and still be vulnerable the first time a strong front rolls through. That is why I am strict about both the count and the pattern, especially on roofs that face open wind.
If you want the fastening to hold, the last step is not hammering faster. It is checking the roof against the actual job conditions before the first course goes down.
The last check I make before I start nailing
Before I trust a shingle run, I check the roof as a system. That means the code, the product sheet, the slope, and the accessories all have to line up. If one part conflicts with the others, I follow the stricter instruction unless the local authority or product documentation says otherwise.
- Confirm whether the shingle line calls for four nails or six.
- Check the roof slope and any steep-slope exception.
- Verify the nail type, head size, and length before loading the gun.
- Make sure starter strips, field shingles, and ridge caps each follow their own instructions.
- Snap lines so the nailing zones stay consistent across the deck.
That is the practical answer I give on real jobs: four nails is normal, six nails is common in higher-risk conditions, and the manufacturer’s pattern always wins. When I treat fastening that way, the roof has a much better chance of staying tight, staying warrantied, and staying out of trouble when the weather turns.