The details that matter most before you start
- Asphalt shingles belong on roofs with a slope of at least 2:12; low-slope roofs need extra protection and may need a different assembly.
- Dry, sound decking and correct flashing matter more than brand name or color.
- Starter strip, drip edge, underlayment, and ventilation are part of the roof system, not optional accessories.
- Most leaks begin at valleys, walls, chimneys, vents, or gutters, not in the middle of the field.
- Plan on roughly 3 bundles per roofing square, but always check the wrapper because coverage varies by product.
What I check before the first shingle goes on
Before I think about shingle color or warranty tiers, I want to know whether the roof is actually a shingle roof in the first place. The first filter is slope: asphalt shingles are meant for roofs at 2:12 or steeper, and anything between 2:12 and 4:12 needs extra underlayment protection. Below that, I start looking at other roof systems instead of trying to force shingles into a job they were not designed to do.
| Check | What I want to see | Why it matters |
|---|---|---|
| Slope | 2:12 or steeper | Too little pitch slows drainage and raises leak risk. |
| Deck condition | Flat, dry, and firmly nailed | Shingles copy whatever is underneath them. |
| Weather window | No rain, dry decking, workable temperatures | Wet wood and sloppy sealing shorten roof life fast. |
| Ventilation | Balanced intake and exhaust | Heat and trapped moisture age the roof from below. |
| Code limits | Local rules for layers, ice barrier, and fasteners | What passes in one county may fail inspection in another. |
I also check for soft spots in the sheathing, rotten fascia, and sagging at the eaves. If the deck flexes underfoot, the roofing problem is already bigger than the shingles. Once those basics are clear, the next decision is whether I am starting from bare deck or building over an existing roof.
Tear-off or recover over the old roof
This choice changes both the cost and the quality of the finished roof. A tear-off costs more up front, but it lets me inspect the deck, replace damaged flashing, and flatten out the surface before the new system goes on. A recover can save time and disposal money, but only if the existing layer is sound, dry, and permitted by local code.
| Option | When it makes sense | Tradeoff |
|---|---|---|
| Tear-off | Leaks, soft decking, multiple old layers, major flashing changes | More labor and waste, but a cleaner and safer reset. |
| Recover | One sound existing layer, dry structure, code allows it | Cheaper and faster, but hidden problems stay hidden. |
My rule is simple: if I suspect trapped moisture, bad nailing, or aging flashing, I lean hard toward tear-off. A new shingle layer over a bad base is just a delayed repair bill. Once that decision is made, the roof system starts with the layers you never see from the street.
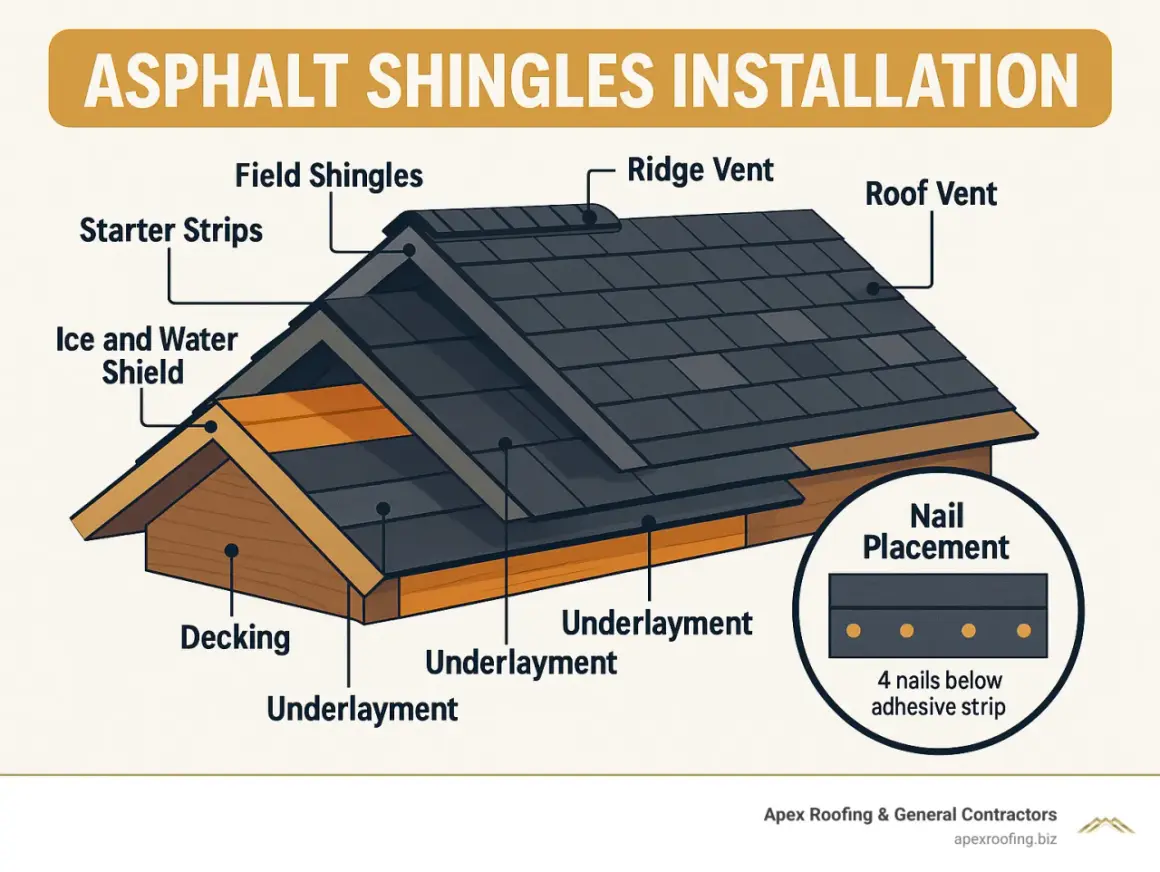
The materials and tools that keep the roof watertight
The shingles matter, but they are only one part of the assembly. I want the right underlayment, a proper starter strip, corrosion-resistant flashing, and fasteners that are sized for the deck thickness. A 100-square-foot roofing square usually takes about 3 bundles of shingles, but product coverage can vary, so I still read the wrapper before I order anything.
| Component | What I look for | Practical note |
|---|---|---|
| Underlayment | Synthetic or felt roofing underlayment | It is the secondary water-shedding layer, not decoration. |
| Ice barrier | Self-adhering membrane in cold or snowy regions | Many roofs need it from the eave up and around vulnerable areas. |
| Starter strip | Purpose-made starter at eaves and rakes | It seals the first course and helps resist wind lift. |
| Drip edge | Corrosion-resistant metal | It directs water into the gutter instead of behind the fascia. |
| Flashing | Step, valley, pipe, and chimney flashing | Most roof leaks start where planes or penetrations meet. |
| Fasteners | Roofing nails long enough to penetrate the deck properly | Underdriven and overdriven nails both create avoidable failures. |
If I am working in a colder climate, I pay extra attention to the ice barrier. On many roofs, that layer is not a nice-to-have; it is the backup that keeps meltwater and wind-driven rain from sneaking under the shingles when gutters ice over or snow loads build up. With the material list settled, the actual installation order becomes much easier to follow.

The installation sequence that actually works
Good shingle work is mostly about discipline. The steps are not complicated, but the order matters, and I do not like improvising once the roof is open.
- Prepare the deck. Remove old roofing if needed, pull nails, replace rotten sheathing, and make sure the surface is flat and dry.
- Install drip edge and ice barrier where required. At eaves and other vulnerable areas, this is the first real line of defense.
- Lay the underlayment. Keep laps consistent and follow the product’s printed overlap marks instead of guessing.
- Snap chalk lines. This is how I keep the courses straight on a roof that would otherwise drift as I work upward.
- Set the starter strip. The starter locks down the eaves and rakes so the first course has a clean edge and a good seal.
- Install the field shingles. Work across and up the roof with the correct exposure, stagger, and nail placement for the product.
- Finish hips, ridges, and ventilation. Ridge caps and vents need to be finished cleanly so the roof can shed water and breathe.
The part that gets rushed most often is the first few courses. If those are crooked, every line above them carries the mistake, and the roof can look “off” even when it is technically watertight. I also watch nail placement closely, because the best shingles in the world cannot compensate for bad fastening. Once the field is up, the roof survives or fails at the edges and penetrations.
Flashing, valleys, and gutter edges where roofs fail first
I tell homeowners the same thing again and again: the middle of the roof is rarely the problem. Water usually wins at a transition, which is why valleys, walls, chimneys, skylights, and pipe penetrations deserve more attention than the center field of shingles. Flashing is not something I treat as a decorative detail; it is the waterproof seam of the entire system.
- Valleys need a clear water path. Whether the roof uses an open or closed-cut method, I want the valley to stay smooth, with nails kept out of the most vulnerable drainage path.
- Step flashing should be installed course by course where shingles meet sidewalls or chimneys. Caulk can help, but it should never be the main defense.
- Pipe boots and vent flashings should be replaced if the rubber is brittle, cracked, or shrinking away from the pipe.
- Drip edge and gutters have to work together. I want runoff to land cleanly in the gutter, not track behind it or soak the fascia board.
Gutters are often treated as a separate trade, but on a roof job they are part of the drainage system. If the drip edge ends too high, or the gutter sits too far from the eave line, water can curl behind the metal and quietly rot the board underneath. I like to test that path with water before I call a job finished. When those details are ignored, the roof can look new and still leak from day one, which leads straight into the most common installation mistakes.
The mistakes that shorten shingle life
The failures I see most often are rarely dramatic. They are small installation errors repeated across a roof until they become expensive. A bad nail here, a missing starter strip there, and a roof that should have lasted for decades starts acting old within a few seasons.
- Wrong nail placement. Nails that miss the nailing zone weaken wind resistance and can void coverage on some products.
- Overdriven nails. If the nail cuts into the mat, the shingle is damaged before the roof even sees weather.
- Underdriven nails. Raised nail heads prevent shingles from laying flat and create leak points.
- No starter strip. The first course loses its seal and becomes more vulnerable at the eaves and rakes.
- Poor ventilation. Heat and moisture build up in the attic and slowly cook the roof from underneath.
- Too much roofing cement. More sealant is not better; excessive cement can blister shingles and look messy fast.
- Installing over a wet deck. Trapped moisture is one of the fastest ways to shorten roof life.
One thing I have learned the hard way is that a roof does not forgive sloppy sequencing. If you try to “fix it later” after the shingles are on, you usually end up cutting into fresh work and paying twice. That is why the budget question matters next, because the cheapest bid is not always the cheapest roof.
What the job usually costs and when DIY stops making sense
For a typical U.S. home, a full shingle replacement can range widely depending on roof shape, tear-off needs, ventilation work, and the quality of the shingles. Recent cost guides put a 2,000-square-foot asphalt shingle roof somewhere in the rough range of $6,885 to $23,993, and that spread makes sense once you factor in labor, flashing, disposal, and the number of roof details that have to be rebuilt correctly.| Project factor | What usually raises the price | Why it matters |
|---|---|---|
| Roof complexity | Valleys, dormers, skylights, chimneys | More transitions mean more labor and more flashing. |
| Tear-off | Multiple layers or hidden deck damage | More disposal and more time, but fewer surprises later. |
| Shingle grade | Architectural or impact-rated products | Better performance usually means a higher material bill. |
| Safety setup | Steep slopes, multiple stories, fall protection | Access and risk drive labor costs quickly. |
DIY makes sense only when the roof is small, low, simple, and fully within your skill set. Once you add steep pitches, second-story edges, valley work, or a deck that needs repair, the project stops being a weekend savings move and starts becoming a safety and liability problem. I am blunt about that because roof work is one of the few home projects where a mistake can cost far more than the labor you were trying to save. After the roof is on, I still want one last set of eyes on the finished work.
What I would inspect before signing off
When I inspect a finished roof, I do not start by admiring the color. I start with the system behavior. If the courses are straight, the flashings are tight, the edges are sealed, and the attic stays dry after the first hard rain, the roof is probably doing its job.
- Check for straight, even shingle exposure across the roof plane.
- Look at the valleys to make sure water has a clean path and no exposed fasteners sit in the wrong place.
- Confirm that starter strips, drip edge, and ridge caps were installed cleanly.
- Inspect gutters and downspouts to see whether water is entering the trough instead of running behind it.
- Step into the attic after the first storm and look for damp sheathing, staining, or blocked ventilation paths.
If I were evaluating a roof today, I would look first at the edges, then the valleys, then the attic. That sequence tells you more than the shingle color ever will, and it is the fastest way to separate a roof that merely looks new from one that will stay dry.