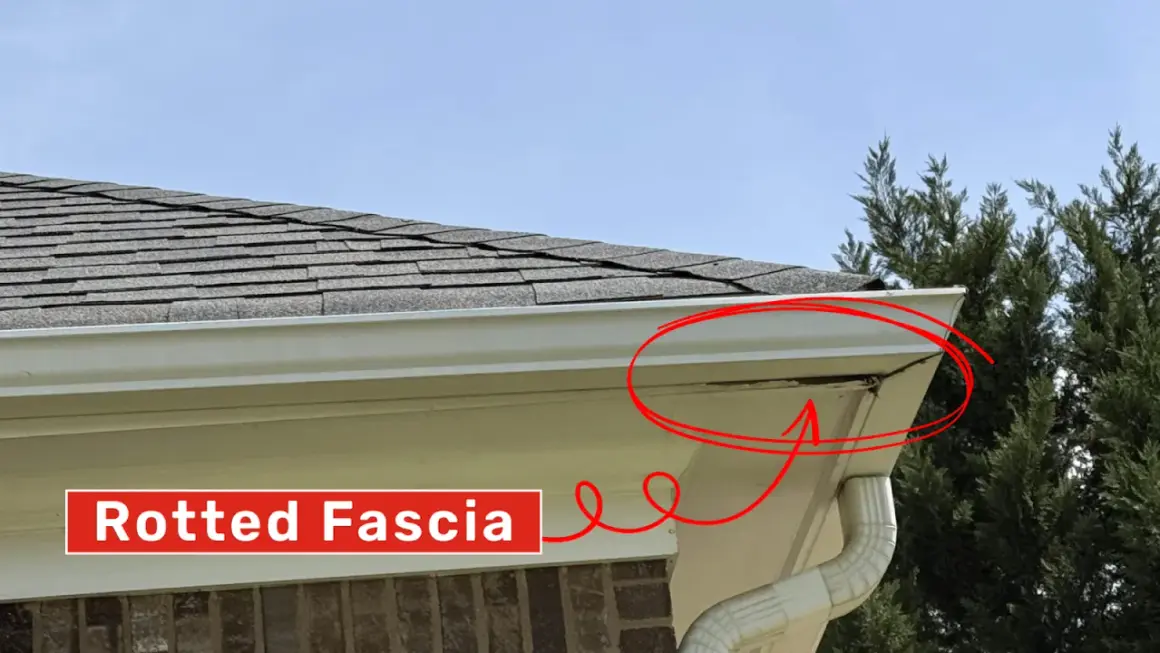
Water damage at the roof edge usually starts small and becomes expensive slowly. A fascia board replacement is often the point where a homeowner finally sees the problem, because the trim has gone soft, the gutter has started to pull away, or paint and caulk are no longer keeping moisture out. In this guide, I cover how to spot the damage early, what the job costs in the U.S., which materials make sense, and how the repair is actually done without creating a bigger leak.
These are the points that decide the repair
- Fascia is not just trim, it anchors the gutters and helps protect the roof edge from water intrusion.
- Soft wood, peeling paint, sagging gutters, and recurring overflow are the clearest warning signs.
- Costs in the U.S. usually depend more on access, hidden rot, and material choice than on the board itself.
- Most jobs require at least part of the gutter run to come off before the new board goes in.
- Wood is the most familiar choice, but PVC and composite boards can reduce future moisture problems.
- If the damage reaches rafter tails or roof sheathing, the repair is bigger than a simple trim swap.
What the fascia board actually does at the roof edge
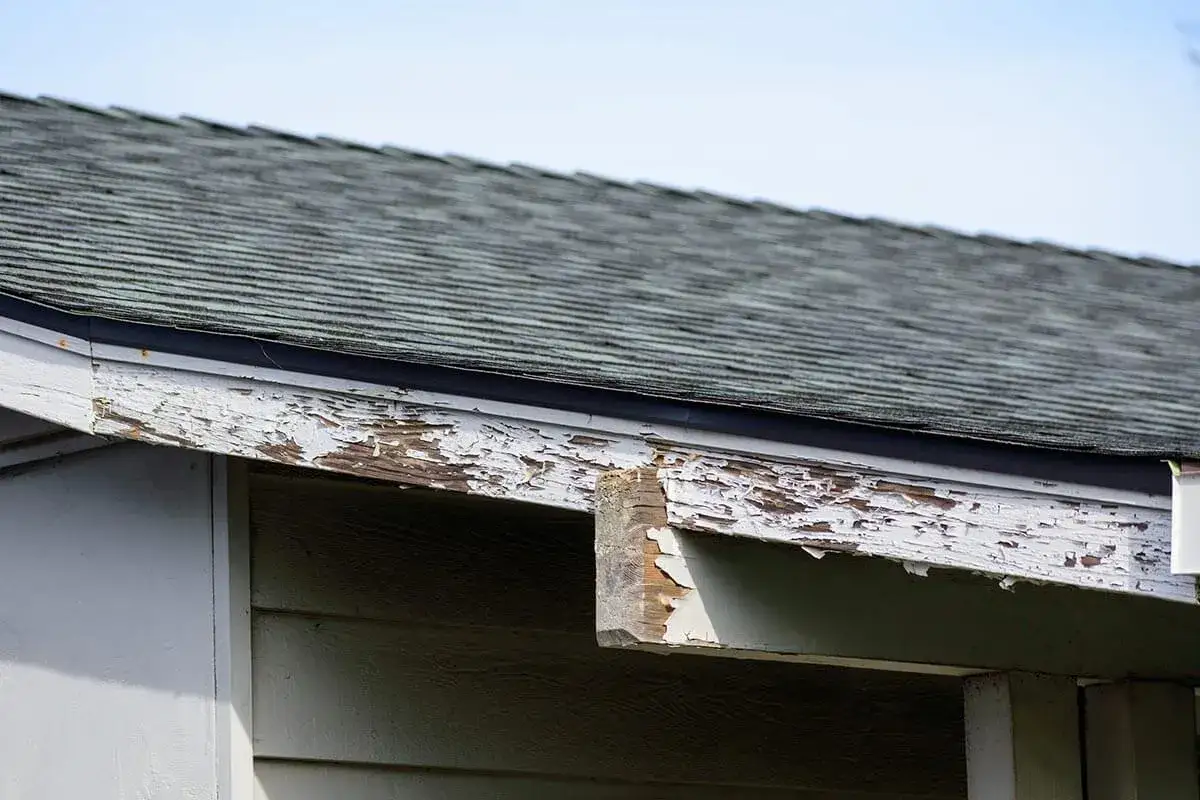
I treat the fascia as a small part with a big job. It gives gutter hangers something solid to bite into, covers the end grain of the rafters, and helps close off the eave so wind, insects, and rain do not have an easy path into the roof assembly. When it starts failing, the cause is usually not the board alone. More often, I find clogged gutters, missing or damaged drip edge, trapped moisture behind the paint, or a leak that has been quietly soaking the edge of the roof for a while.
The key point is simple: if the fascia is rotten, the problem is almost always about water management, not appearance. That is why I do not look at it as trim work first and roofing work second. I look at it as part of the system that keeps water moving away from the structure, and that framing matters when you decide whether to patch, replace, or open the area further. Once you understand that, the signs of failure become much easier to read.
How to tell repair from full replacement
Not every bad-looking board needs to come out. If the damage is mostly cosmetic, such as peeling paint, a shallow crack, or a loose fastener hole, I usually start by repairing the surface and repainting. Full replacement makes more sense when the wood feels soft, the gutter is pulling away in more than one place, or the rot comes back after the area dries out. If the board is holding a gutter run that has already shifted, I assume the fasteners are no longer doing their job.
| Condition | What I usually do | Why it matters |
|---|---|---|
| Peeling paint and shallow surface checking | Repair, prime, and repaint | The board is still structurally sound |
| One soft section around a fastener | Cut back to sound wood and replace the affected section | The damage is local, not widespread |
| Sagging gutter line or repeated leak marks | Replace the board and inspect the hangers | The fastening surface is no longer reliable |
| Rot that reaches the rafter tails or soffit | Open the area wider and repair framing as needed | The problem is bigger than the fascia alone |
That last row is where people often misjudge the job. A board swap is one thing; hidden structural damage is another. If I have any doubt about what is behind the trim, I want the area open enough to inspect it before new material goes up. That leads directly to cost, because once you open the roof edge, material choice and access start to matter a lot more.
Material choices and realistic U.S. costs
For U.S. homeowners, the price is shaped more by access and hidden rot than by the board itself. This Old House puts fascia replacement at about $7 to $40 per linear foot, while HomeGuide lists board-only work at $5 to $12 per linear foot and combined fascia-and-soffit projects at $9 to $34 per linear foot. On a typical 100 to 200 linear foot project, that puts many jobs somewhere around $900 to $6,800, with single-story repairs at the lower end and multi-story, hard-to-reach work at the higher end.
| Material | Best for | Tradeoffs |
|---|---|---|
| Primed wood | Matching existing trim and keeping the budget down | Needs sealing, painting, and periodic upkeep |
| PVC | Wet climates and lower-maintenance priorities | Must be fastened with expansion in mind and can feel less traditional |
| Composite or fiber-cement | Durability and dimensional stability | Heavier, slower to cut, and often more labor-intensive |
| Aluminum-clad wood | A painted look with better weather resistance | More specialized detailing and usually a higher material cost |
My rule of thumb is practical rather than sentimental. If the roof edge is dry and the goal is to match an existing profile, wood is still sensible. If water has been the recurring problem, I lean toward PVC or another moisture-tolerant option, especially where gutters are close to the board and runoff has been an issue. The right material can buy you time, but it will not fix bad drainage by itself, so the next step is to check what has to come apart before the new board goes in.
What I check before starting the job
Before I cut anything, I want a clear picture of the whole roof edge. The fascia rarely fails in isolation, so I look for the conditions that caused the damage and decide whether the repair will stay local or spread into adjacent components. A quick inspection saves a lot of rework later.
- The gutter condition, especially loose hangers, rusted screws, and sections that have already pulled away from the board.
- The drip edge, which is the metal flashing that helps direct water into the gutter instead of behind it.
- The soffit and the underside of the roof edge for swelling, staining, or insect activity.
- The rafter tails and any exposed sheathing for softness, discoloration, or dark streaks.
- The paint and caulk lines, because failed coatings often show where water has been working for years.
- The roof pitch and access, since steep or high work changes the safety plan immediately.
If the gutter system is still in decent shape, I may only remove the section directly over the damaged area. If the whole run is old, bent, or leaking at the seams, I would rather deal with that now than put a fresh board behind a failing gutter. With the area inspected, the actual replacement is straightforward, but only if each layer goes back in the right order.
How the replacement process works
The job is usually more orderly than most homeowners expect. I remove the pieces that depend on the old board, inspect the hidden structure, and then rebuild the edge so water can drain cleanly again. Cutting corners here is what turns a trim repair into repeated rot.
- Remove the gutter section and any downspout attachments that interfere with the repair area.
- Lift or remove the drip edge if it overlaps the damaged board, then keep track of how it was layered with the roof edge.
- Cut out the rotten fascia and expose the rafter tails so I can see whether the damage goes deeper.
- Repair any soft framing before installing the new board, because new trim over wet or rotten wood is a temporary fix at best.
- Measure, cut, prime, and fasten the replacement board so it sits straight and contacts solid backing.
- Reinstall the drip edge and gutter, then set the gutter slope so water moves toward the downspout instead of pooling.
- Seal joints, touch up paint, and test the run with water to confirm that the edge drains cleanly.
I am careful with the fasteners as well. Corrosion-resistant nails or screws matter near the roof edge, because moisture and gutter splash will punish cheap hardware. I also pay attention to end grain, which soaks up water faster than a face cut, and I do not leave that unsealed if I can avoid it. Once the board is back in place, the biggest threats are usually not dramatic failures, but small mistakes that let water back in.
Mistakes that make the repair fail early
Most fascia repairs fail for boring reasons, which is exactly why they are easy to prevent. I see the same errors over and over, and they all come down to ignoring water, movement, or hidden rot.
- Covering over soft framing instead of repairing it first.
- Reusing rusted or bent gutter hangers that no longer hold the run correctly.
- Skipping primer and paint on wood, especially at cut ends and joints.
- Forcing PVC tight against another board without allowing for expansion.
- Reinstalling the gutter with the wrong slope, so water sits against the edge.
- Ignoring missing or badly installed drip edge, which lets runoff work behind the board.
- Choosing a board thickness or profile that does not match the existing trim and leaves the gutter line uneven.
The hidden issue in almost all of these mistakes is the same: the board is treated as cosmetic when it is really part of the drainage system. If you avoid those shortcuts, the next question becomes less about failure and more about service life, which is where the small maintenance habits start to matter.
The details that help the new board last
Once the board is installed, I focus on keeping water from lingering at the roof edge. That is what protects the repair over the long run, and it is also what keeps you from repeating the same project too soon.
- Clean gutters regularly so overflow never backs up onto the fascia.
- Check the end joints and caulk lines after heavy storms or freeze-thaw weather.
- Make sure downspouts discharge away from the house so splashback does not soak the eaves.
- Repaint wood before the coating breaks down, not after the board has already started to weather.
- Watch for recurring stains under the gutter line, because they usually show where water is escaping.
That is the part I always come back to: the repair is only as good as the water management above it. If the roof edge stays dry, a well-done replacement can hold up for years; if the gutter system keeps dumping water onto the board, even the best material will eventually fail. I treat fascia as a drainage detail first and trim second, because that is the difference between a fix that lasts and one that just resets the clock.