Ice dam damage is rarely limited to one leak; it usually starts at the eaves and spreads into shingles, gutters, insulation, ceilings, and wall cavities. In this article I break down how ice dams form, what they do to a roof and building envelope, which warning signs matter most, and what actually prevents the problem from coming back.
The real issue is usually heat loss plus trapped meltwater
- Ice dams form when snow melts on a warm roof and refreezes at the colder eaves.
- The visible ice is only part of the problem; backed-up water is what gets under shingles.
- Common early signs include long icicles, water stains, peeling paint, and damp attic insulation.
- The best long-term fix is air sealing, insulation, and ventilation working together.
- Temporary tools like roof rakes help, but they do not solve the root cause.
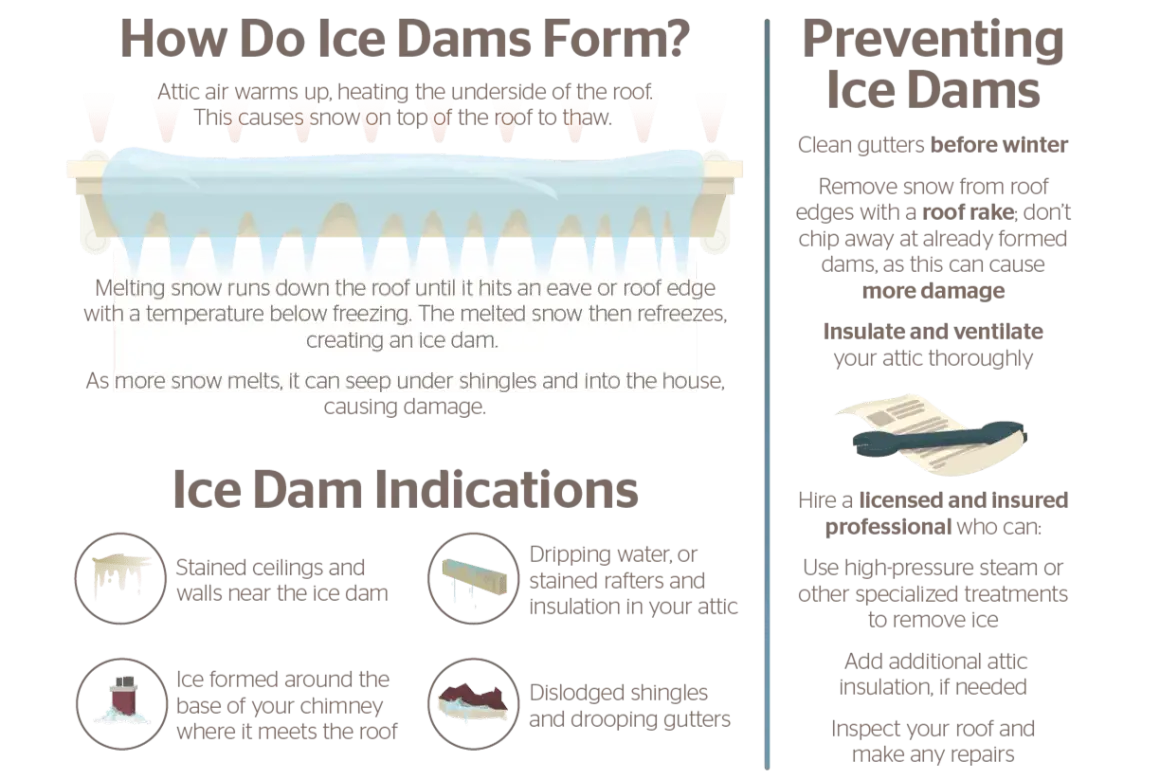
What an ice dam really is and why it forms
An ice dam is a ridge of ice that builds along the cold edge of a roof and blocks meltwater from draining normally. The pattern is simple: snow sits on the roof, heat escaping from the house warms the upper roof surface, the snow melts, and that water runs down to the colder eaves where it freezes again. Over time the dam gets taller, the meltwater backs up, and the roof starts acting like a shallow pond.
This is why I never treat it as a gutter problem alone. Clogged gutters can make the situation worse, but the real trigger is usually an attic or roof assembly that is too warm. Homes in the U.S. cold-weather states see the worst of it, especially where roofs have valleys, dormers, low slopes, or uneven insulation. A sunny afternoon followed by a hard freeze is enough to start the cycle.
The important detail is that the ice itself is not the only issue. The dam is just the blockage; the real trouble is the water it traps behind it. That sets up the next step, where the roof, gutters, and interior materials begin to fail in different ways.
How ice dams damage roofs, gutters, and interiors
When water cannot drain off the roof edge, it tries to move sideways and upward under shingles, flashing, and underlayment. Once it gets under the roofing, it can wet the roof deck, soften fasteners, stain sheathing, and eventually show up inside as a ceiling leak. I often see the interior symptoms first because water follows framing members and wiring paths before it becomes visible.
- Shingles and underlayment can loosen as repeated freeze-thaw cycles pry open small gaps.
- Roof decking can stay damp long enough to swell, stain, or deteriorate.
- Flashing around chimneys, skylights, and walls can be overwhelmed by backed-up water.
- Gutters may bend, detach, or fill with ice that adds extra weight to the fascia.
- Soffits and fascia can rot if meltwater repeatedly spills over the edge.
- Insulation loses effectiveness once it gets wet, which can make the roof warmer and repeat the cycle.
- Drywall and paint often show stains, bubbling, peeling, or sagging after a hidden leak.
- Mold risk increases when wet materials stay damp, especially in enclosed wall or attic spaces.
The roof edge is usually where the problem begins, but the repair bill often lands somewhere else entirely. A ceiling stain, warped trim, or a musty attic can be the clue that the water traveled far from the entry point. That is why the first visible sign is not always the best guide to the source.
Once you understand the damage path, the next question is what to look for before the leak reaches that stage.
The warning signs I would check first
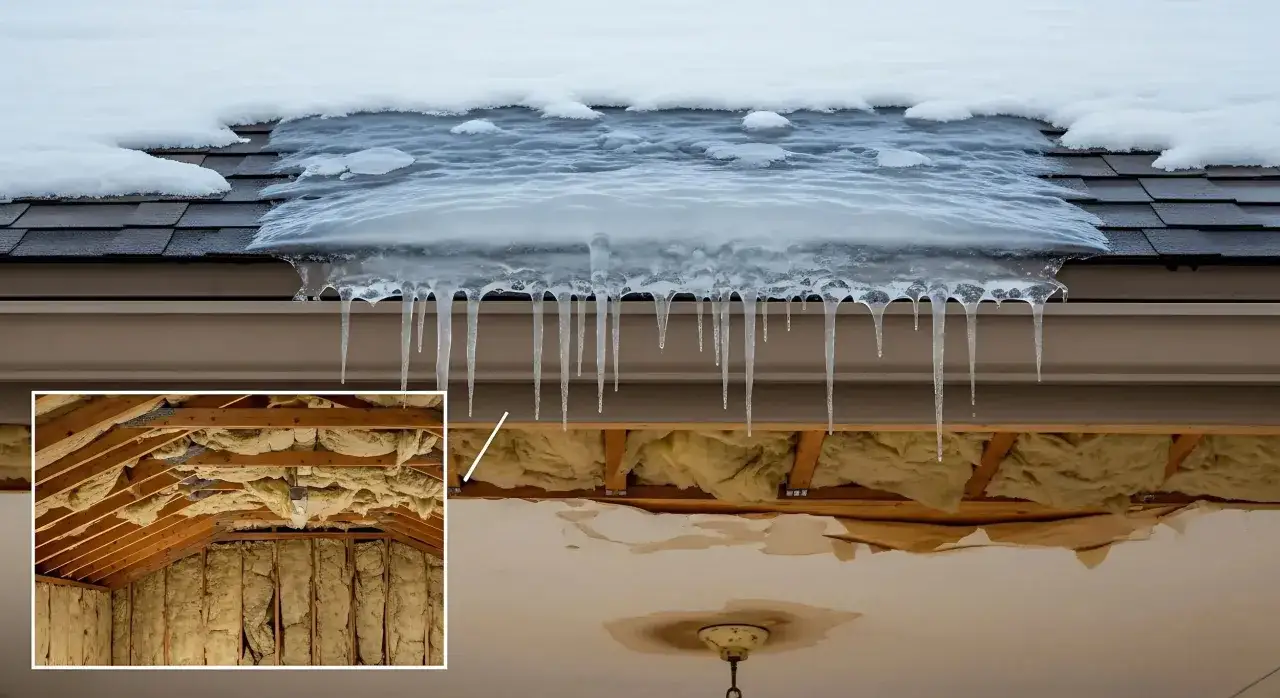
In practice, I look for a cluster of small clues rather than one dramatic failure. One icicle is not a crisis. A line of heavy icicles, melting patterns at the roof edge, and a damp attic together tell a much clearer story.
- Long icicles hanging from the eaves or gutters.
- A thick ridge of ice at the roof edge while the rest of the roof is snow-covered.
- Water stains on ceilings, especially near exterior walls.
- Peeling paint, bubbling drywall, or warped trim close to the roofline.
- Damp insulation, rusted nails, or frost in the attic.
- Sagging gutters or gutters pulling away from the fascia.
- Ice buildup around soffit vents or near roof-to-wall intersections.
One detail many homeowners miss is timing. If the stain appears during a thaw and disappears during a deep freeze, that does not mean the issue fixed itself. It usually means the water path is still there, just hidden by weather. I would inspect the attic, the roof edge, and the drainage path together before assuming the leak is minor.
Once the warning signs are obvious, speed matters more than perfection. The goal is to limit moisture exposure and avoid making the roof problem worse.
What to do when water is already coming in
If water is actively entering the house, I focus on containment first and roof work second. A bucket under a ceiling drip is not a solution, but it buys time while you stop the spread.
- Move furniture, rugs, and valuables away from the leak.
- Place buckets, towels, or plastic sheeting under active drips.
- Check the attic if it is safely accessible and look for wet insulation or frost melt.
- Do not climb onto the roof to chip or pry ice loose; that often causes more roof damage and is a serious fall risk.
- If the ceiling is bulging, shut off power to the affected area and call a water-damage or roofing professional.
- If conditions allow, clear snow from the roof edge using a roof rake from the ground, working gently and not scraping shingles.
I am cautious about any quick fix that involves force. Chipping ice with metal tools, pouring random chemicals, or stepping onto a slippery roof can turn a manageable leak into a larger repair. Emergency action should protect the interior, not trade one problem for another.
That leads to the part that matters most over the long run: preventing the roof from warming up in the first place.
The prevention work that actually holds up
If I had to rank prevention, I would put air sealing first, insulation second, ventilation third, and accessories after that. The reason is simple: ice dams are usually a building-envelope issue, not a single-product issue. The U.S. Department of Energy has long emphasized that reducing heat loss through the attic is central to preventing winter roof problems, and that matches what I see in the field.
| Prevention method | What it does | Main limitation | Best use |
|---|---|---|---|
| Air sealing | Blocks warm indoor air from escaping into the attic through gaps, chases, and penetrations. | Hidden leaks around fixtures, ducts, and attic hatches are easy to miss. | Best first step in most homes. |
| Insulation | Slows heat transfer from the living space to the roof deck. | Without air sealing, added insulation alone may not solve the problem. | Essential when attic coverage is thin or uneven. |
| Ventilation | Helps keep the roof deck colder and more evenly tempered. | Ventilation alone cannot fix major heat loss from below. | Useful when paired with good air sealing and insulation. |
| Roof raking | Removes snow before it can melt and refreeze at the eaves. | Temporary and weather-dependent. | Good during or right after heavy snowfall. |
| Heat cables | Create a melt path along vulnerable roof edges or gutters. | They are a supplement, not a cure for a warm attic. | Helpful for trouble spots and repeat problem areas. |
| Ice-and-water membrane | Adds backup protection under shingles at vulnerable edges and valleys. | Usually installed during reroofing, not as a quick patch. | Smart during roof replacement or major repair. |
One practical note: a roof rake can help, but it has to be used carefully. Push too hard or stand too close and you can scar shingles, bend gutters, or knock down the very edge you are trying to protect. I would treat it as a snow-management tool, not a winter cure-all.
Once those building-system basics are addressed, the remaining question is what the repair side typically costs when the damage is already there.
Repair priorities and rough cost ranges
For 2026 planning, I would budget in layers because the price depends on how far the water traveled. Angi’s 2026 cost guide puts professional ice dam removal at around $1,200, with snow removal commonly in the $200 to $700 range and roof or gutter repairs often starting around $120 to $900. If water gets into the interior, cleanup and restoration can climb quickly, and the bill is driven more by moisture damage than by the ice itself.
| Problem | Typical response | Rough U.S. cost range |
|---|---|---|
| Active ice dam | Professional removal and drainage relief | About $1,200, depending on access and severity |
| Heavy roof snow load | Roof snow removal from the ground or by a pro | $200-$700 |
| Minor gutter or fascia damage | Repair, rehang, or replace damaged sections | $120-$900 |
| Leak that reached the interior | Drying, patching, drywall repair, paint, and cleanup | $400 and up, often much more if framing or insulation is wet |
| Heat cable installation | Supplemental melt path at the eaves or gutters | $500-$4,600 |
| Snow guards | Helps control sliding snow on certain roofs | $500-$10,000 |
The price swings because roof pitch, number of stories, access, and hidden moisture matter more than the ice ridge you can see from the driveway. In my view, it is usually cheaper to spend on attic air sealing and insulation than to keep paying for repeated winter cleanup, paint repair, and small roof patches.
That is why I prefer a simple winter checklist before the next storm hits.
The prevention checklist I would use before the next freeze
If I were preparing a house for winter, I would start with the attic and work outward. That order catches the cause, not just the symptom.
- Seal attic bypasses around lights, chases, plumbing, bath fans, and the attic hatch.
- Check insulation depth and make sure coverage is even at the eaves and in corners.
- Confirm that soffit and ridge vents are clear and not blocked by insulation or debris.
- Clean gutters and downspouts before the first long freeze.
- Trim overhanging branches that dump extra snow onto the roof.
- Keep a roof rake accessible for heavy snowfall, but use it from the ground.
- Watch for repeat stains or icicles in the same spots, because repeat locations usually point to a structural weak point.
The pattern is consistent: stop warm air from reaching the roof deck, keep snow from piling too deep at the edge, and give meltwater a clear path off the roof. When those pieces work together, ice dams become a manageable winter nuisance instead of a recurring repair cycle.