Moisture control in an attic comes down to more than cutting a few holes in the roof. Proper attic ventilation depends on a clear air path, enough intake at the eaves, enough exhaust near the ridge, and a ceiling plane that is sealed well enough to keep indoor air where it belongs. In this article I cover the airflow pattern that actually works, the vent combinations I trust, how I size openings, and the mistakes that lead to heat buildup, mold, ice dams, and damaged shingles.
The core decisions that keep the roof dry
- The safest setup is usually low intake through soffits and high exhaust near the ridge.
- Net free area matters more than the vent’s shape or marketing label.
- Baffles keep insulation from choking the eaves and preserve the air channel.
- Blocked soffits, mixed vent styles, and attic fans without enough intake are the most common failures.
- In some homes, a sealed roof assembly is a better long-term fix than trying to force more outside air through the attic.
Why the air path matters more than the vent label
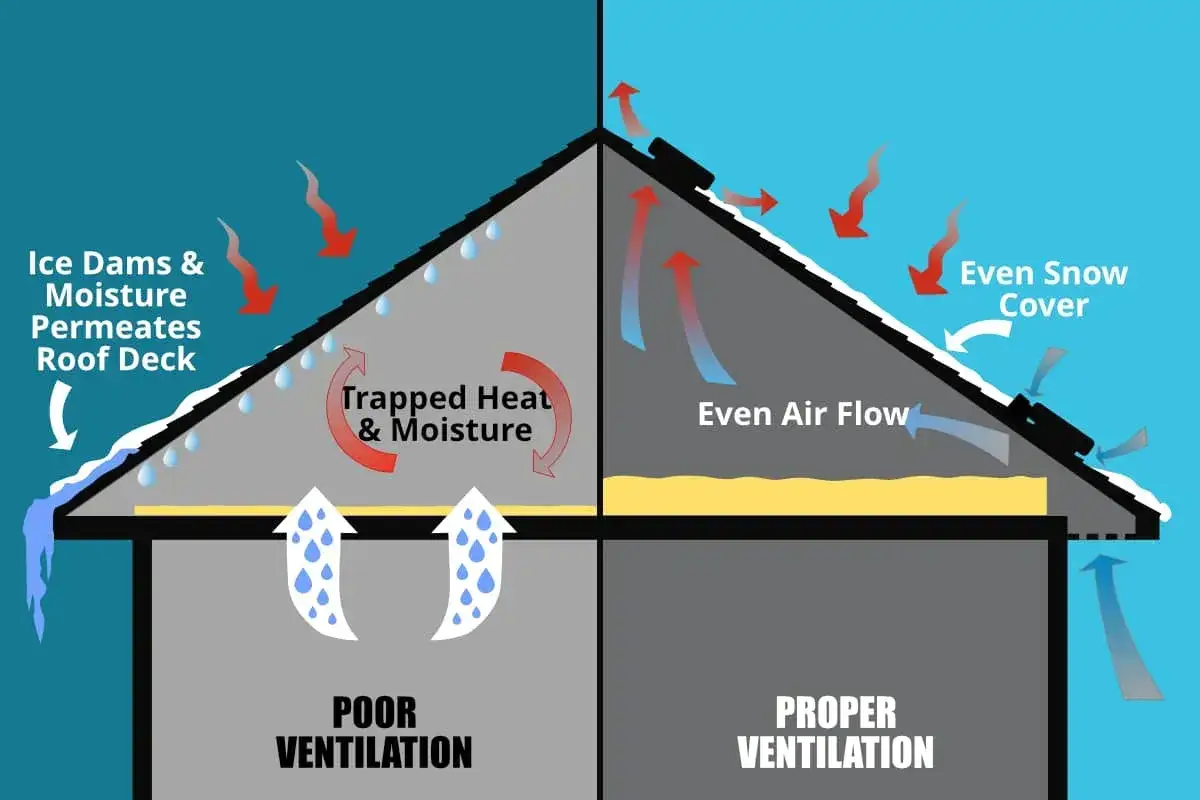
I rarely start by talking about the product name on a vent. I start by asking whether air can actually move the way the roof needs it to move. Warm, moist air from the house rises, and if that air leaks into the attic it can condense on cold roof sheathing in winter or sit against a hot deck in summer and drive up temperatures. Either way, the roof assembly pays for it.
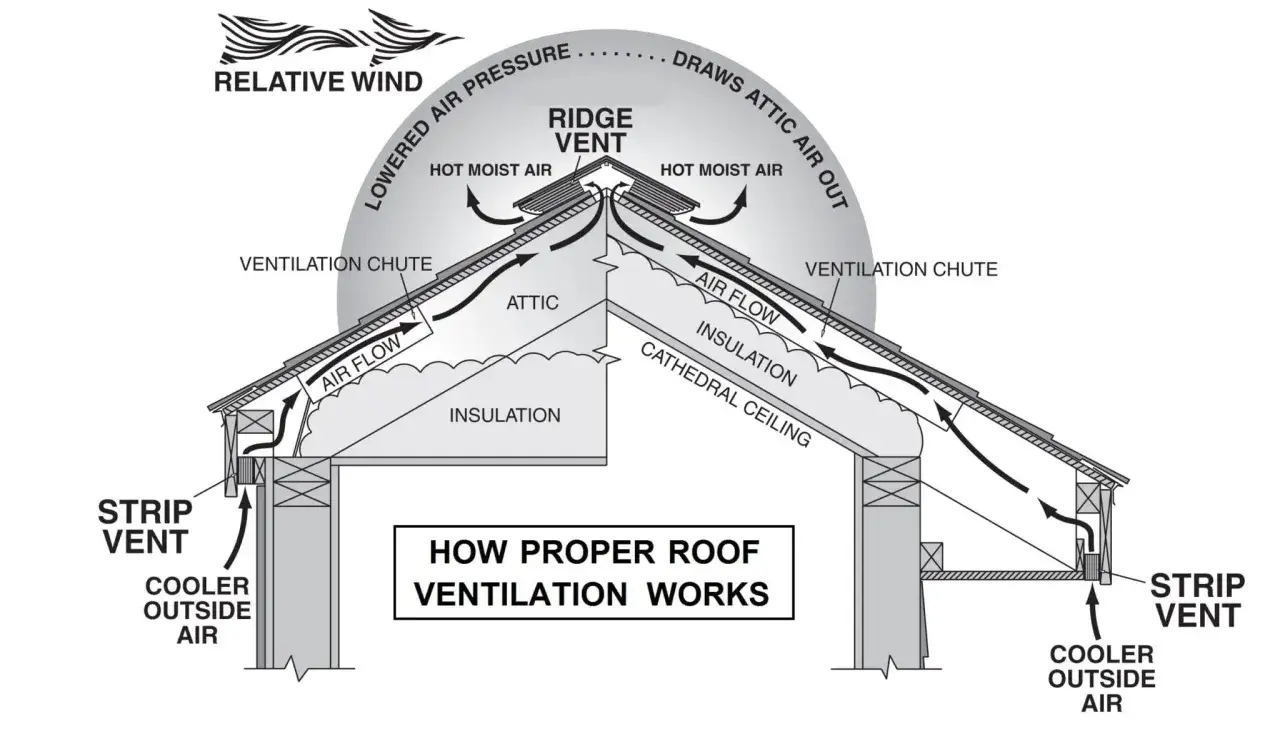
The practical goal is simple: create a path where outside air enters low at the eaves and exits high near the ridge. That keeps the attic closer to outdoor conditions, which helps reduce moisture buildup, protects insulation, and limits the kind of heat that can shorten shingle life. It also matters for gutters, because roof heat loss in winter can melt snow, refreeze at the edge, and turn into ice dams that overload gutters and fascia.
I also watch the ceiling plane. If the attic floor leaks around can lights, plumbing stacks, attic hatches, and bath fan housings, the vent openings are doing too much work. I would rather see a tighter ceiling plane with a clean vent path than a huge number of vents fighting indoor air leaks. Once that basic airflow picture is clear, the next step is choosing the right hardware instead of just adding more holes.
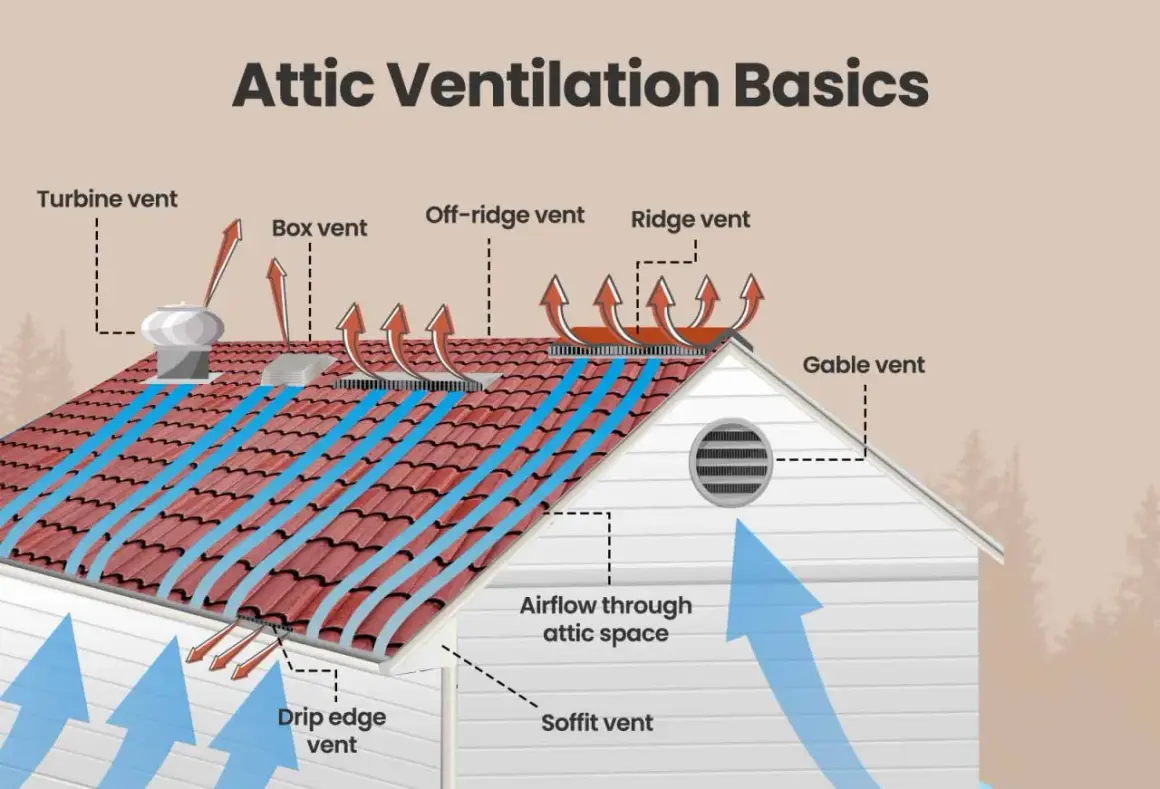
The vent setups I trust most
On a simple gable or hip roof, I usually prefer a passive system built around continuous soffit intake and a ridge exhaust. It is the most even setup I know because it uses the whole roof length instead of relying on a few isolated openings. The Department of Energy has consistently pointed homeowners toward that same basic pattern: intake low, exhaust high, with baffles preserving the air gap at the eaves.
| Setup | Best use | Strengths | Limits |
|---|---|---|---|
| Continuous soffit plus ridge vent | Most straightforward roof shapes | Balanced airflow, low profile, passive, low maintenance | Needs clear soffits and proper baffles |
| Soffit vents plus static roof vents | Roofs that cannot take a full ridge vent | Simple and familiar to many roofers | Can be less even than a ridge system |
| Gable vents | Older roofs or odd layouts | Useful as a supplement when the roof shape is awkward | Can short-circuit airflow if paired poorly with other exhausts |
| Powered attic fan | Narrow situations with strong intake and good air sealing | Moves a lot of air when the setup is right | Can pull conditioned air from the house if the ceiling leaks or soffits are blocked |
| Unvented conditioned roof assembly | Complex roofs or attics with ducts and mechanicals | Keeps equipment inside the thermal envelope | More expensive and must be detailed carefully |
I am cautious about mixing vent styles without a clear reason. A ridge vent and gable vents can fight each other, and a powered fan can create problems if the intake path is weak. In practice, the best system is the one that matches the roof geometry and keeps airflow predictable. After that, the real question becomes sizing, because the right product still fails if the open area is too small.
How I size the vent openings without guessing
In many U.S. jurisdictions, the baseline code logic comes from the IRC: the vent area is commonly set at 1/150 of the vented space, with an exception that can reduce the requirement to 1/300 when the assembly meets the code conditions. Local amendments can change the details, so I always treat the code as a floor, not a design goal.
The number that matters is net free area, which is the actual open space after screens, louvers, and internal obstructions are accounted for. A vent box may look generous from the outside and still deliver less open area than you expect. That is why I size by the rating, not by the face of the product.
Here is the simple calculation I use:
- A 1,200-square-foot attic at 1/300 needs 4 square feet of total net free area.
- Split evenly, that is about 2 square feet of intake and 2 square feet of exhaust.
- If the roof cannot balance perfectly, I prefer to protect the intake side first.
Baffles matter in this section because they keep insulation out of the air channel. I want a clear air space at the eaves, and I want it to stay clear even after the insulation settles. If the soffit path is blocked, the numbers on paper stop meaning much in the real attic. Once you know the sizing is right, the next thing to look for is the handful of mistakes that break the whole system.
The mistakes that trap heat and moisture
Most attic problems I see are not caused by one dramatic failure. They come from a series of small details that add up. The most common ones are easy to spot if you know where to look.
- Insulation packed into the eaves and blocking soffit intake.
- Too much exhaust and not enough intake, which makes the airflow weak or erratic.
- Mixed vent strategies that short-circuit the flow path instead of improving it.
- Bath fans, kitchen hoods, or dryers terminating in the attic instead of outdoors.
- Air leaks from the ceiling plane that keep feeding warm indoor air into the attic.
The symptoms are usually just as readable: frost on nail tips, dark or damp roof sheathing, musty odors, mold on wood surfaces, curling shingles, and in colder climates, ice dams that can force water back under the roof edge. When that happens, gutters are often part of the damage trail, not the root cause. Cleaning gutters helps, but it does not fix a roof that is heating itself from below.
I also think homeowners sometimes overrate powered fans as a cure-all. If the intake path is poor, a fan can simply pull air from the house instead of from the outside. That makes the attic feel more active while making the home less efficient. At that point I stop treating the problem as a simple vent issue and start asking whether the attic should be vented at all.
When a sealed roof assembly is the better answer
There are roofs where forcing outside air through the attic is not the cleanest solution. If the attic contains HVAC ducts, air handlers, or a maze of penetrations, I often look at an unvented conditioned attic instead. That approach moves the thermal boundary to the roof deck, which can keep the mechanicals inside conditioned space and reduce the penalty of duct losses.
That tradeoff is not theoretical. The Department of Energy notes that ducts in unconditioned vented attics can raise heating and cooling energy use by around 10%. In the right home, especially one with complex framing or lots of roof penetrations, sealing and insulating at the roof line can outperform trying to force perfect airflow through a difficult attic.
But I would not treat that as a casual upgrade. A sealed roof assembly has to be designed for the climate, detailed for moisture control, and installed carefully. It usually costs more up front, and it is not the right answer for every house. When the roof is simple, the attic is accessible, and the soffit-to-ridge path can be built correctly, a vented attic is still the easier and cheaper system to maintain. Before you redesign the whole roof, I would always check the simple fixes first.
The first fixes I would make on a real house
If I were standing in a real attic today, this is the order I would work in.
- Seal the obvious ceiling leaks around recessed lights, plumbing penetrations, attic hatches, and fan housings.
- Clear the soffits and install or repair baffles in every affected rafter bay.
- Verify that the exhaust openings match the roof shape and are not fighting one another.
- Confirm that every bath, kitchen, and dryer exhaust duct leaves the house outdoors.
- Check for winter signs such as ice dams, frost, gutter overload, and stained sheathing.
- Only after those steps, consider adding more vent area or redesigning the roof assembly.
That sequence matters because it solves the common failures first and keeps you from paying for hardware that cannot overcome a leaky ceiling or a blocked intake path. If the attic still runs hot or damp after those fixes, the roof likely needs a more structural answer than another vent. That is the point where I would bring in a roofer or building-science-minded contractor and treat the attic as a system, not as a place to add one more opening.