
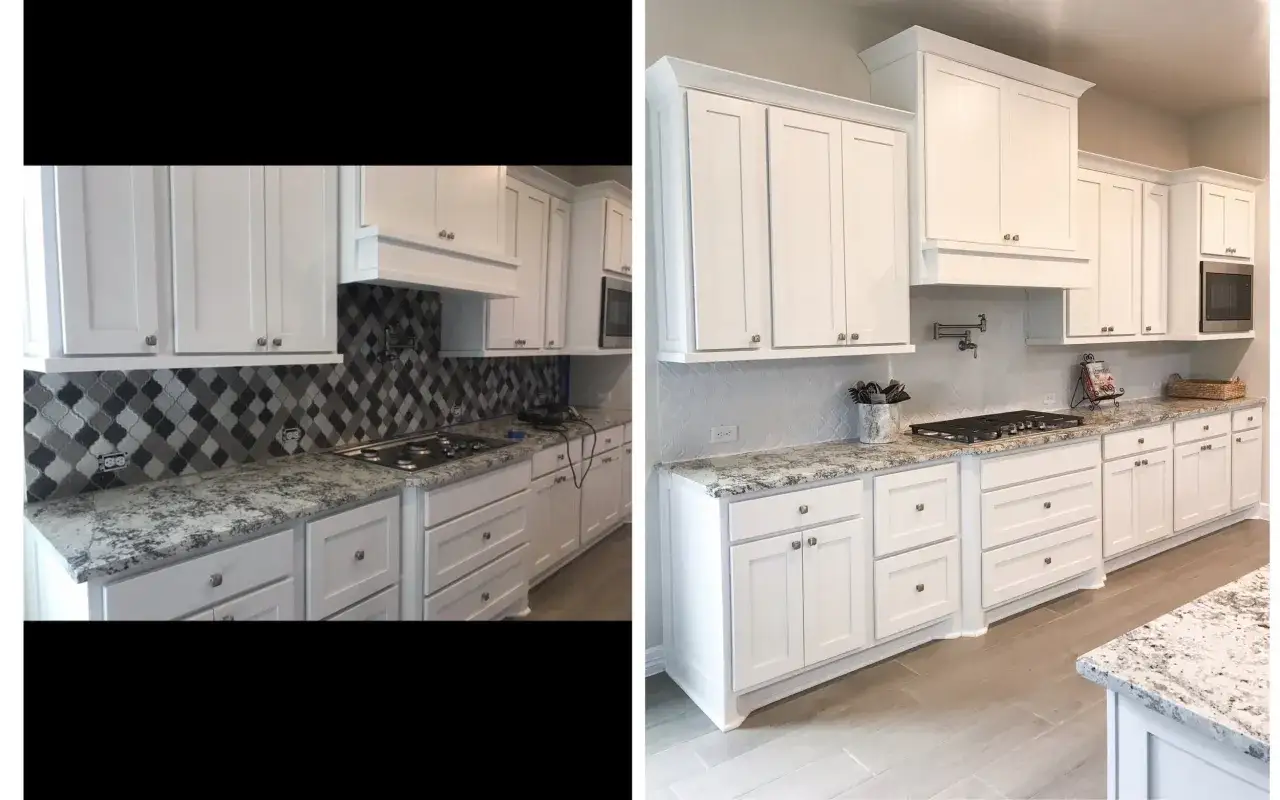
Painting a tile backsplash can be one of the fastest ways to make a kitchen feel cleaner without tearing out perfectly serviceable tile. I treat it as a surface-renewal job, not a quick color change: the finish only holds when the tile is sound, fully degreased, properly scuffed, primed, and given enough cure time. In this guide I cover when the project makes sense, how I prep the surface, which coating systems are worth using, what it costs, and the mistakes that usually cause peeling.
The right prep and the right primer matter more than the color
- Best suited to tile that is structurally sound but visually dated.
- Grease removal, sanding, and bonding primer are what separate a refresh from a failure.
- Most DIY jobs take about 1 to 2 days, plus several days of curing before hard use.
- A painted backsplash is usually a mid-term solution, not a forever finish.
- For a small project, materials can land around $50 to $125, far below replacement.
When painting a tile backsplash makes sense
Paint is best when the tile is sound and the problem is cosmetic. That is the rule I keep coming back to. If the backsplash behind your counter or sink is intact, the grout is mostly stable, and you are mainly tired of the color or shine, a painted finish can buy you time and save a lot of money.
It is a poor choice when tile is loose, cracked, hollow-sounding, or stained through from behind. I would also be cautious around a cooktop, where heat and grease are harder on any coating than a simple sink wall. Paint can improve the look, but it does not repair the substrate underneath, and that distinction matters more than the color you choose.
I also think about material before I commit. Ceramic and porcelain are the most predictable candidates, while very glossy glass or slick specialty tile need more careful testing and a stronger primer. Once you know the backsplash is worth keeping, the next question is how to give paint something it can actually grip.
The prep work that decides whether it lasts
This Old House notes that the project usually takes a day or two, including drying time, and that matches what I see in practice. The visible work goes quickly; the waiting does not. The difference between a durable finish and a flaky one is usually hidden in the prep, not the topcoat.
| Prep step | Why it matters | Common mistake |
|---|---|---|
| Turn off power and remove outlet covers | Makes the work safer and gives you clean edges around electrical boxes | Painting around plates and cleaning up later |
| Degrease the tile and grout | Paint cannot bond to cooking residue, soap film, or finger oils | Using only a quick soap-and-water wipe |
| Repair chips, cracks, and loose grout | Defects usually show through the finish and can keep spreading | Hiding damage under primer and hoping it disappears |
| Scuff the glaze with fine sandpaper | Gives the primer a surface it can bite into | Skipping sanding because the tile already looks dull |
| Vacuum, wipe, and dry fully | Dust and moisture both weaken adhesion | Priming while the surface still feels damp |
| Mask counters, cabinets, and sink edges | Helps the finish look deliberate instead of messy | Freehanding every edge near sealant and trim |
| Test a hidden tile | Confirms the coating will actually bond before you commit | Assuming every section of tile behaves the same |
That kind of prep sets up the primer decision, which is where durability really starts.
Choosing the right primer and paint system
Benjamin Moore's tile-prep sequence is the one I keep returning to: repair the surface, remove old sealant, clean away grease, dull the glaze with sandpaper, prime, and then apply two top coats after the primer has fully dried. That is more work than a quick color wash, but it is also the reason some painted backsplashes hold up while others start flaking around the grout.
| System | Best for | Strengths | Limits |
|---|---|---|---|
| Bonding primer plus acrylic or urethane finish | Most kitchen backsplashes | Good adhesion, broad color choice, easier cleanup | Depends heavily on prep and still needs full curing |
| Epoxy-based system | Higher-abuse areas | Harder film and strong moisture resistance | More finicky to apply and usually less forgiving |
| Specialty tile refinishing kit | One-box DIY convenience | Simpler instructions and consistent product pairing | Heat and humidity limits can be strict |
| Standard wall paint | Nowhere on slick tile | Cheap and familiar | Poor adhesion and short life |
For a kitchen, I usually favor a washable satin or semi-gloss because grease wipes off more easily. Matte can look softer, but it also shows cooking residue faster, so I only reach for it when the room is lightly used or the product is specifically made for humid spaces.
Once the coating system is settled, the application steps become much simpler.
How I would apply it step by step
- Turn off the breaker, remove switch and outlet covers, and protect the counter, sink, and nearby appliances.
- Clean the tile and grout with a grease-cutting cleaner, then rinse and dry completely.
- Scrape away loose caulk and fill cracks or chips so defects do not show through the paint.
- Scuff the tile with fine sandpaper, then remove every trace of dust.
- Apply bonding primer in a thin, even coat with a brush around grout lines and a small roller on the tile faces.
- Let the primer dry for the full label time. Some waterborne bonding primers recoat in 3 to 4 hours and fully cure in 3 to 4 days, so I plan around the label rather than the clock on the wall.
- Apply two thin top coats instead of one heavy coat. Thick coats leave roller texture and can puddle in grout.
- Leave the backsplash alone until it has cured. If the product calls for a longer wait before scrubbing or reinstalling caulk, I follow that, even if the surface feels dry sooner.
I usually cut in with a brush first and then roll the wider areas so the finish stays even. That is slower than flooding the surface with paint, but it is the difference between a backsplash that looks repainted and one that looks intentionally updated.
What it costs and how it compares with replacement
For a small DIY job, materials often land around $50 to $125 for roughly 25 square feet. Full replacement is a different budget entirely: a standard backsplash project commonly runs about $480 to $1,500 for around 35 square feet, and premium materials can push that much higher. Paint is cheap because you are buying time and appearance, not a new surface.
| Option | Typical spend | Best when | Trade-off |
|---|---|---|---|
| Painted refresh | $50 to $125 for about 25 square feet | The tile is sound and you want a cosmetic update | Less durable than new tile |
| Full replacement | About $480 to $1,500 for a standard backsplash | The tile is damaged or you want a new layout | More mess, labor, and cost |
| Peel-and-stick overlay | Starts around $4 per square foot | You need a temporary or renter-friendly change | It covers the old tile rather than fixing it |
Paint buys time, replacement buys permanence. That gap explains why painted tile stays popular: it is not the longest-lasting answer, but it can be the smartest one when the backsplash is structurally fine and you want a fast visual reset.
The mistakes that shorten lifespan
The biggest failures are usually boring and preventable. The finish does not usually peel because the color was wrong; it peels because the surface was dirty, the primer was skipped, or the cure time was cut short.
- Painting over grease, silicone residue, or soap film.
- Skipping sanding because the tile already looks dull.
- Using ordinary wall paint on slick tile.
- Applying one thick coat instead of several thin ones.
- Ignoring chips, loose grout, or failing caulk seams.
- Scrubbing the surface too early or with abrasive cleaners.
- Not testing a hidden tile first, especially on glossy or glass surfaces.
In real-world use, a painted tile backsplash often lasts somewhere between 6 months and 2 years, and the spread mostly comes down to prep, moisture, and cleaning habits. If you avoid those shortcuts, the finish has a fair chance of holding up in daily kitchen use.
The checks that make this feel finished, not just painted
Before I call the project done, I check three things: the surface is fully cured, the grout lines are even, and the backsplash still looks good under the room's real lighting, not just fresh off the roller. If any tile is still loose, if the finish feels soft, or if the area sits directly in a harsh heat zone, I stop and rethink the approach rather than pretending paint solved everything. For a sound backsplash behind a counter or sink, though, a careful paint job can buy a clean, updated look with very little demolition.