Pool filter maintenance is one of those jobs that looks simple until the water turns cloudy and the pressure gauge starts telling a different story. The real question is not just how to clean a pool filter, but how to clean the right type the right way. I’m going to walk through the signs that the filter needs attention, the safest cleaning methods for cartridge, sand, and D.E. systems, and the mistakes that usually cause bigger problems than the dirt itself.
The safest approach is to match the cleaning method to the filter type
- Cartridge filters are usually cleaned by hosing the pleats and, only when needed, soaking away mineral scale.
- Sand filters are cleaned by backwashing, then rinsing; they do not need a full teardown for routine maintenance.
- D.E. filters need pressure relief, grid cleaning, and a fresh D.E. recharge after reassembly.
- As a rule of thumb, cartridge cleaning is due around 10 psi above clean pressure, sand at about 10 psi above baseline or a 30% flow drop, and D.E. at roughly 4 to 5 psi above normal start pressure.
- Never open the tank until the pump is off and the gauge reads zero.
- If pressure keeps climbing after cleaning, or the tank, clamp, or O-rings are damaged, the filter needs inspection, not more force.
What kind of pool filter you have changes the job
I start here because the wrong cleaning method wastes time and can damage the equipment. A cartridge filter traps dirt in pleated fabric, a sand filter traps it in the sand bed, and a D.E. filter captures very fine particles on coated grids or elements. Each one works well, but each one fails differently when it is dirty.
| Filter type | Routine cleaning | When I act | What I avoid |
|---|---|---|---|
| Cartridge | Rinse pleats with a hose, then deep-clean if scale or oils remain. | Pressure is about 10 psi over clean baseline, or flow drops noticeably. | High-pressure washing that tears pleats or bends the core. |
| Sand | Backwash, rinse, and occasionally chemically clean the sand bed. | Pressure is about 10 psi over baseline or flow drops about 30%. | Backwashing on a fixed schedule when the filter is still clean. |
| D.E. | Open the tank safely, hose the grids, then recharge with D.E. | Pressure is about 4 to 5 psi over the normal start pressure. | Opening the tank before pressure is fully relieved. |
Once you know the filter type, the rest of the job gets a lot easier. From there, the real issue is deciding when the filter actually needs cleaning instead of guessing.
When a filter actually needs cleaning
I use the pressure gauge first and the water condition second. If the gauge is higher than the clean starting pressure, the filter is doing more work than it should; if the return jets are weak, the water turns hazy, or the pressure jump feels abnormal, I check the baskets and pump before blaming the filter. That order matters, because a clogged skimmer basket can look like a dirty filter from the deck.
- After heavy use, storms, or a week of pollen, cottonwood, leaf litter, or fresh landscaping dust.
- After a new pool startup, when construction dust and plaster residue can load the filter fast.
- When pressure climbs 10 psi above a clean cartridge baseline.
- When sand flow drops about 30% from its clean reading, or the gauge rises 10 psi above clean pressure.
- When a D.E. system rises about 4 to 5 psi above its normal start pressure.
I also pay attention to the opposite symptom: if pressure falls instead of rising, the filter may not be dirty at all. Air leaks, a clogged pump basket, a skimmer problem, or a pump issue can look like filtration trouble, so I clear the easy parts before I dismantle anything. On variable-speed pumps, I record the clean pressure at the RPM I actually use, because that number changes with speed.
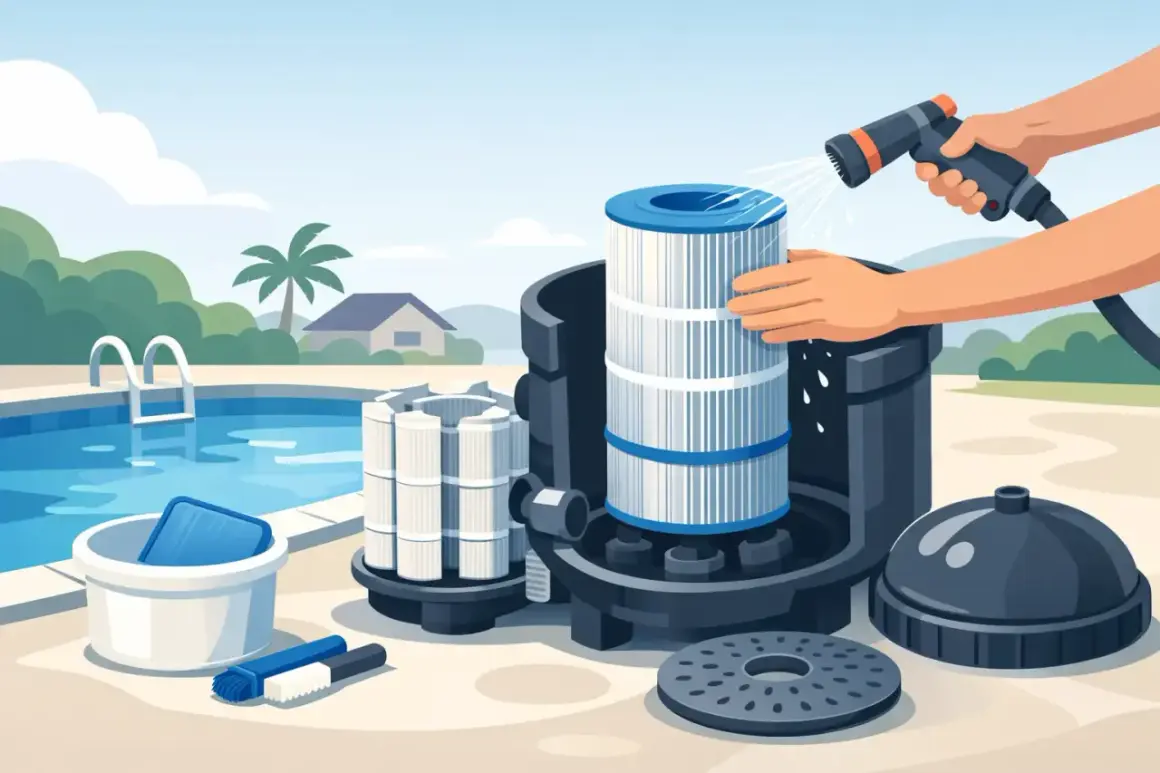
How I clean a cartridge filter safely
For most residential pools, this is the most common cleaning job. I shut the pump off, cut power if the equipment is hardwired, open the air relief, and wait until the gauge reads zero before I touch the clamp or lid. That step is not optional; it is the difference between routine maintenance and a dangerous lid release.
- Shut off the pump and any automation that could restart it.
- Open the air relief valve and confirm the pressure gauge has dropped to zero.
- Remove the drain plug or clamp only after the system is fully depressurized.
- Lift out the cartridges and rinse each one with a straight-stream garden hose held at about a 45-degree angle.
- Work from top to bottom and pay attention to the pleat valleys, where debris hides.
- Skip the pressure washer. A garden hose is usually enough, and excessive force damages the fabric.
- Let the cartridges dry, then inspect for frayed fabric, flattened pleats, cracked end caps, or mineral crust.
- If oily film or scale remains, use a cartridge cleaner or follow the manufacturer’s acid-soak instructions exactly before reinstalling.
I do not treat cartridge cleaning as a force problem. If a hose rinse leaves the element gray and stiff, more pressure is not the answer; chemistry or replacement is. When the cartridges go back in, I make sure the O-ring is seated correctly and I record the new clean pressure so the next service call is based on a real baseline.
For mineral buildup that will not wash out, I only use an acid soak when the manual explicitly calls for it and I have the safety gear out. That is a last-resort step, not part of every routine cleaning, and it is exactly why cartridge maintenance is easier than it looks when you stop at the rinse stage. If the numbers keep climbing after a proper rinse, the next stop is usually the sand bed or the D.E. system, because those filters fail in different ways.
How I backwash and clean a sand filter
A sand filter is different because the media stays in the tank. Routine cleaning means reversing the water flow so trapped debris is flushed out to waste, not trying to scrub the sand itself. That makes sand filters simple to live with, but only if I let the gauge and flow tell me when they need attention.
- Stop the pump before changing any valve position.
- Set the multiport valve to backwash and confirm the waste line is open.
- Restart the pump and backwash for about 3 to 5 minutes, or until the waste water runs clear.
- Shut the pump off, move the valve to rinse, and run it for about 30 seconds.
- Return the valve to filter, open the return line, and restart the pump.
- Check the pressure gauge and note the new clean reading.
I do not backwash sand on a fixed calendar if the pool is barely used. Dusty wind, big swim weekends, and a fresh startup matter more than the date on the wall. On a new pool, many manuals call for a backwash after the first 48 hours of operation because construction dust and plaster residue clog the bed quickly.
When the pressure stays 4 to 6 psi above the normal start pressure after a backwash, I consider a chemical sand-bed cleaning. That step is for oils, scale, and rust that the reverse flow did not remove, and it usually requires an overnight soak before another backwash cycle. This is the point where a dirty bed starts behaving more like a compacted bed, so the cure is deeper cleaning rather than more frequent backwashing.
That same pressure logic becomes even more important on D.E. systems, where the grid surfaces do the actual filtering.
How I clean a D.E. filter without damaging the grids
D.E. systems catch very fine debris, which is why they make water look exceptionally clear when they are working well. They also demand the most respect during service, because the tank has to be fully depressurized before the clamp or lid comes off. I never rush this part, because trapped pressure is the part that hurts people.
- Shut the pump off, disable automation, and open the manual air relief valve.
- Wait until the gauge falls to zero and there is no trapped pressure left in the tank.
- Open the filter carefully, remove the element assembly, and keep track of every seal and spacer.
- Hose the grids or elements thoroughly with a garden hose to remove spent D.E. and debris.
- Inspect for tears, warped frames, and broken ribs, because damaged grids will not hold a proper coat of D.E.
- If mineral scale is still clinging to the elements, use an approved acid-cleaning procedure only when the unit needs it and only with full protective gear.
- Reassemble the filter, then add the correct D.E. slurry through the skimmer or feeder as directed by the system manual.
The part I pay the most attention to is the pressure baseline after startup. If the clean starting pressure for the D.E. system climbs by roughly 4 to 5 psi, the elements are telling me they need service, not just another dose of powder. If the grids keep plugging that quickly, the issue is usually deeper than normal dirt load, and I start looking for scale, oils, or a damaged element assembly. Once that is done, the focus shifts to avoiding restart mistakes, because most damage happens after the cleaning, not during it.
The small mistakes that cause the biggest problems
Most bad filter repairs come from impatience, not bad hardware. I see the same mistakes again and again, and they are easy to avoid once you know what they are.
- Opening a tank before the pressure is fully relieved.
- Using a pressure washer on cartridge pleats and shredding the fabric.
- Backwashing sand too often, which can reduce performance instead of improving it.
- Skipping the rinse cycle after backwashing, which sends cloudy water back to the pool.
- Forgetting to recharge a D.E. filter after cleaning.
- Reusing cracked O-rings, weakened clamps, or damaged lids.
- Ignoring a pressure gauge that no longer returns to zero.
I also treat strong chlorine smell, cloudy returns, and air bubbles as clues, not conclusions. Sometimes the filter is the problem, but just as often the pump basket, skimmer basket, or a tiny suction-side air leak is the real cause. Cleaning the wrong component makes the whole system look worse, not better.
What I record after cleaning so the next service is easier
Once the filter is back together, I watch it for a full start-up cycle and write down the new clean pressure. That number becomes the reference point for the next service, which is the easiest way to avoid both overcleaning and neglect. I also note what I actually did, because memory gets fuzzy once a pool season gets busy.
- The date and the reason I cleaned it, such as pollen, storms, heavy use, or startup debris.
- The clean pressure or flow reading after the service.
- Whether I rinsed, backwashed, or used a deeper chemical cleaning step.
- Any leaks, air bubbles, odd noises, or damaged seals I noticed.
- Whether the cartridge pleats, sand bed, or D.E. grids looked worn enough to track for replacement.
A simple log turns pool filter care from guesswork into a repeatable routine, and that is what keeps outdoor water clear through pollen, parties, and the dusty stretch of late summer.