Key points to plan before you cut any lumber
- Start with the rise, because the height difference determines the full ramp length.
- Use a maximum 1:12 running slope, 36 inches of clear width, and 60-inch landings as the baseline.
- For permanent outdoor ramps, drainage and frost-aware footings matter as much as the frame itself.
- Wood is the easiest to customize, aluminum modular systems are the fastest to install, and concrete is the most permanent.
- Handrails, edge protection, and non-slip surfaces are not extras; they are what make the ramp truly usable.
Start with the slope and access rules
I always begin with the height difference from finished threshold to finished grade, because that number controls everything else. The Access Board’s ADA guidance uses 1:12 as the maximum running slope, which means every 1 inch of rise needs 12 inches of ramp run. A 24-inch rise, for example, needs at least 24 feet of ramp length before you even count the landings.
| Rise | Minimum run at 1:12 | What it means in practice |
|---|---|---|
| 6 inches | 6 feet | Short enough for many entries, but handrails are usually needed above this point. |
| 12 inches | 12 feet | Still manageable in many yards, but the landing space must be planned early. |
| 18 inches | 18 feet | Often the point where a straight run starts to feel long in a small front yard. |
| 24 inches | 24 feet | Usually requires a serious layout decision, especially if the entry is near a walkway or planting bed. |
| 30 inches | 30 feet | The maximum rise for a single run, so taller entries need multiple runs with landings. |
The other baseline numbers matter just as much: 36 inches of clear width, 60 inches of landing length at the top and bottom, and a landing slope no steeper than 1:48 so water can drain without creating a slippery surface. I also treat 30 inches of rise per run as a hard planning limit, because once you exceed it, you need another run and another landing.
That is why I never start by buying lumber. I start by turning the rise into a footprint, because once the geometry is fixed, the rest of the project becomes much easier to plan.
Measure the site and decide where the ramp will land
The yard controls the layout as much as the doorway does. I measure the threshold at several points, because porches, slab edges, and grade transitions are rarely perfectly level. Then I check three things at once: where the ramp can start, where it can end, and whether the route leaves enough room to open the door, turn, and pause safely on the landing.
- Measure finished threshold height, not raw framing.
- Check door swing so the landing stays usable when the door is open.
- Look for drainage patterns, because a ramp that sits in runoff will age badly.
- Mark nearby walkways, shrubs, planters, and steps that could narrow the path.
- Call the local building department before digging footings or attaching anything to the house.
When a straight run does not fit, I would rather use a switchback than force a ramp into a too-steep shortcut. Curves can look elegant in a landscape plan, but they often create awkward cross slopes and compound grades that feel wrong under a wheelchair. A simple L-shaped or switchback layout is usually easier to build, easier to inspect, and easier to live with.
For a small rise, a threshold ramp or short transition may be enough. For anything higher, the site layout has to be treated like a path design problem, not just a carpentry job.
Choose a material that fits weather and maintenance
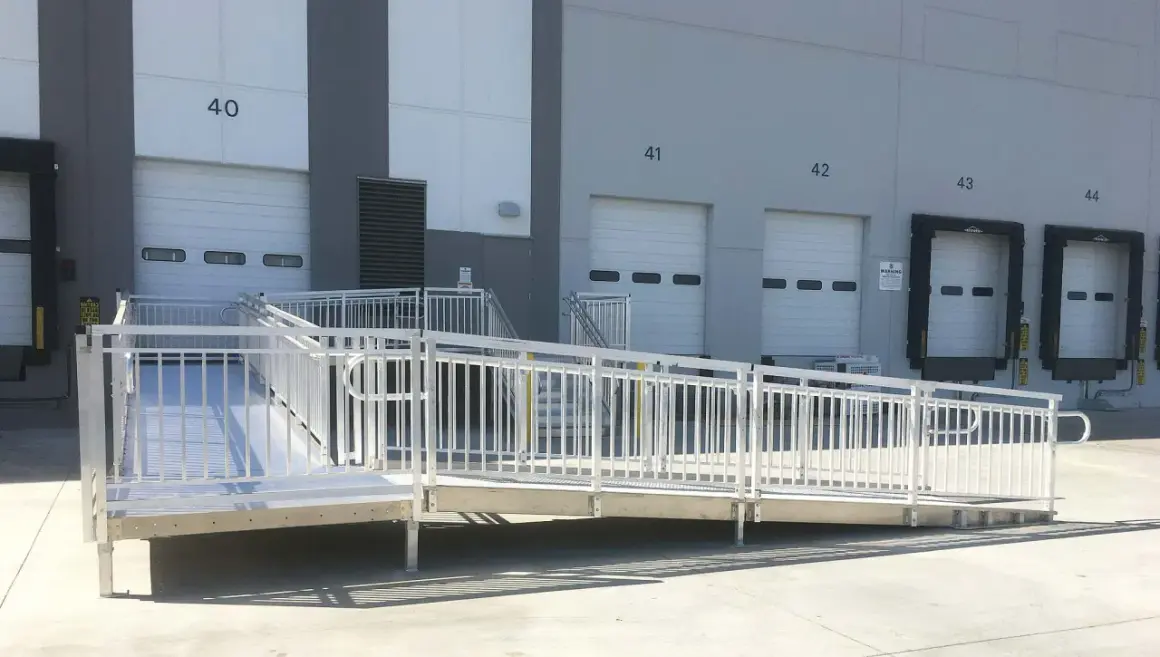
Outdoor ramps live or die by material choice. In the US, I usually narrow the decision to wood, aluminum modular systems, or concrete. Each can work well, but they solve different problems. Wood is flexible and budget-friendly, aluminum is fast and low-maintenance, and concrete is the most permanent when the layout is simple.
| Material | Best for | Strengths | Tradeoffs |
|---|---|---|---|
| Pressure-treated wood | Custom layouts and DIY builds | Easy to cut, adjust, and integrate with decks or porches; usually the most approachable for a homeowner. | Needs periodic sealing, careful fastener selection, and regular inspection for movement, rot, or warped boards. |
| Aluminum modular | Fast installs and changing needs | Low maintenance, good drainage, clean lines, and easier replacement of sections if the route changes later. | Higher upfront cost and a more industrial look, though that is often a fair trade for reliability. |
| Concrete | Permanent entries with simple geometry | Very durable, stable under wheels, and good for a long-term hardscape that blends into the landscape. | Hard to alter once poured, more expensive, and unforgiving if the site slope or drainage is wrong. |
For budget planning, a professional install often lands around $100 to $250 per linear foot, and switchbacks, landings, rails, and site work can push that higher quickly. If the ramp sits in a wet, snowy, or heavily shaded area, I would pay extra attention to traction and drainage before I pay for decorative finishes. A ramp that looks good but turns slick in the first storm is the wrong place to save money.
Once the material is chosen, the build order becomes much clearer, because the frame, footings, and finished surface all have different jobs.
Build the structure in the right order
The safest builds are the boring ones: the frame is square, the slope is checked twice, and the supports are placed where the ramp actually needs them. I start by laying out the centerline and landing footprints with stakes and string, then I set the support points or footings. For permanent exterior ramps, footings should be below the local frost line, and posts should not rely on loose soil or stacked pavers for stability.
- Lay out the full route on the ground and confirm the footprint fits the yard.
- Build the top and bottom landings first, because they control door access and turning space.
- Frame the runs to match the target slope, using a long level or laser level as you go.
- Check the cross slope so the surface drains without pulling a wheelchair sideways.
- Install the decking or surface material with traction in mind, not just appearance.
- Anchor the system according to the ramp design and local code, then flash any house connection so water cannot get behind it.
- Test for bounce, wobble, and flex before the finish work goes on.
If I am working with a modular aluminum system, I follow the manufacturer’s spans and connection points instead of inventing my own. If the project is large, elevated, or tied into a porch, I would seriously consider a contractor or engineer, because lateral stability and load handling start to matter a lot more than they do on a short threshold ramp.
That structural order matters because every safety detail added later depends on a frame that already sits correctly in the yard.
Add the safety details that make the ramp usable
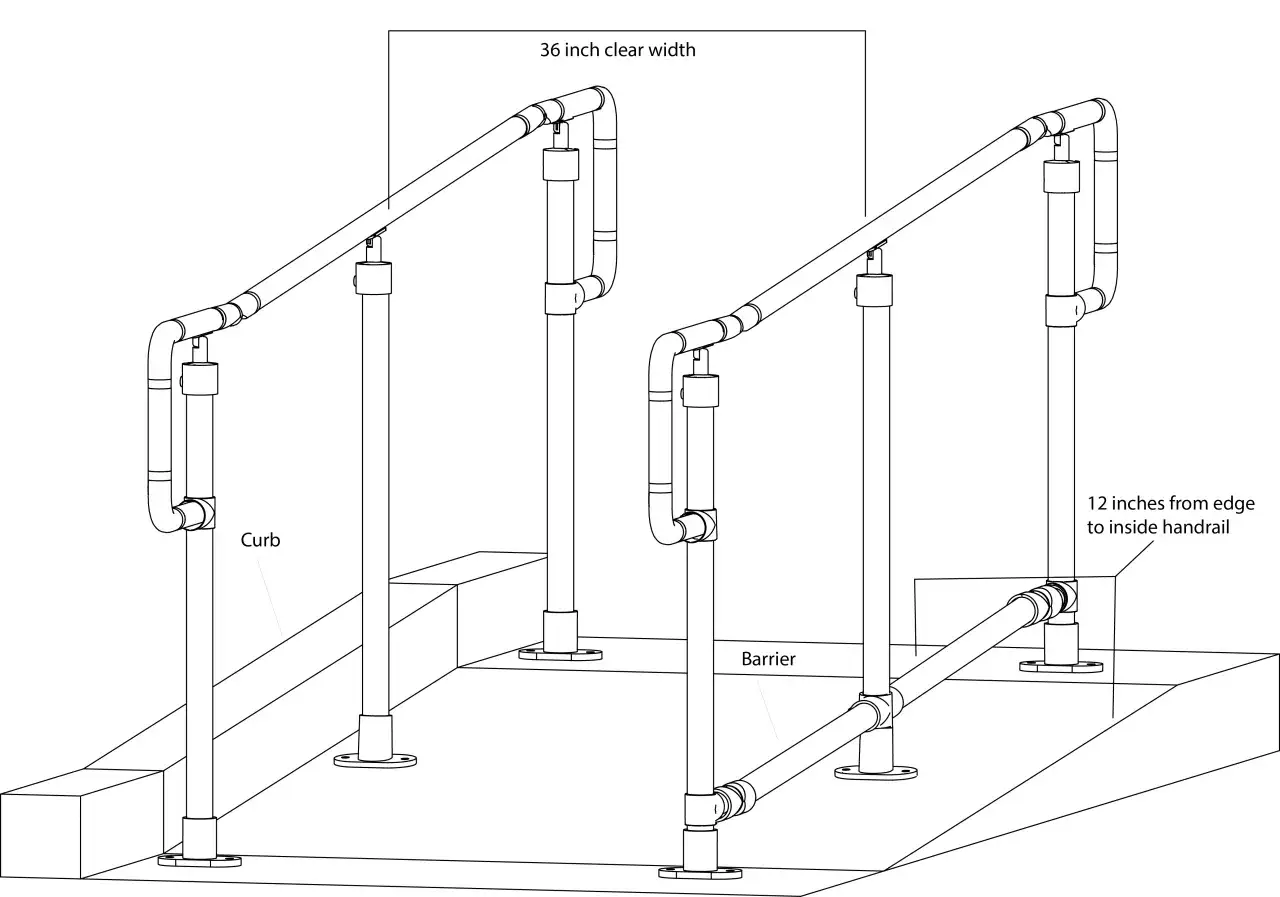
This is the point where a ramp stops being a platform and starts being a true access route. I treat the safety details as part of the structure, not as afterthoughts. The Access Board’s ADA guidance requires handrails on both sides for ramp runs with a rise greater than 6 inches, and the common residential standard is a 34 to 38 inch handrail height with a continuous grip surface and 12-inch extensions at the top and bottom.
- Use handrails on both sides when the rise is greater than 6 inches.
- Keep the clear ramp width at 36 inches minimum after the rails are installed.
- Add edge protection so a wheel or cane tip cannot slip off the side.
- Use a non-slip surface, especially on wood decking and shaded entries.
- Make the landing at the door large enough for turning and door operation.
- Install lighting if the ramp will be used after dark or in winter mornings.
The same guidance allows landings to slope no steeper than 1:48 for drainage, and that matters more than most people expect. Water should leave the surface without pooling, but the slope should stay subtle enough that it does not feel pitched under a wheelchair. I also keep mulch, edging, and planting beds away from the path so landscaping never steals clearance from the ramp itself.
If the entry turns, a 60-inch by 60-inch clear landing is the difference between a usable route and a frustrating one.
Avoid the mistakes that make a ramp feel unsafe
Most bad ramps are not disasters; they are just full of small errors that add up. The steepness is almost right, the landing is a little short, the finish looks fine until it gets wet, and the door barely opens on the platform. Those are the mistakes I watch for first, because they are the ones users notice every day.
| Mistake | Why it matters | Better approach |
|---|---|---|
| Trying to shorten the ramp by steepening it | It becomes tiring, unstable, and often noncompliant. | Use the full run length or switch to a switchback layout. |
| Skipping proper landings | There is nowhere to turn, rest, or open the door safely. | Keep the top and bottom landings generous and level. |
| Ignoring drainage | Water creates algae, rot, and slippery surfaces. | Grade the site away from the ramp and keep landing slopes gentle. |
| Using a slick finish | Paint and coatings can look clean and still fail in wet weather. | Choose traction-rated decking, texture, or anti-slip treatment. |
| Building a curved route without checking the geometry | Curves often create compound slopes that are awkward for wheelchairs. | Use straight runs, L-shapes, or switchbacks with clear landings. |
I also check maintenance risk before I call a project finished. Loose fasteners, exposed screw heads, snow buildup, and seasonal wood movement can all change how the ramp feels after a few months. A ramp should not need constant attention to remain safe.
That is why the final inspection matters just as much as the framing stage.
The checks I would never skip before the first use
Before anyone depends on the ramp, I do one slow walk-through from the yard to the door and then back again. I want the route to feel obvious, stable, and predictable. If anything feels vague or awkward during that first pass, it will feel worse after a month of weather and regular use.
- Measure the clear width again after the rails are installed.
- Open the door fully and confirm the landing still works.
- Test the surface with a wheelchair, walker, stroller, or loaded cart.
- Hose the ramp down and watch where water collects.
- Check fasteners, rail connections, and transition points for movement.
- Inspect again after the first heavy rain and after the first freeze-thaw cycle.
If the rise is large, the yard is tight, or the entry needs a complex turn, I would rather choose a modular system or a contractor-built switchback than force a homemade shortcut. The best ramp disappears into the routine of the house: it works every time, it handles weather without drama, and it lets the landscape support the entry instead of fighting it.