
Installing a toilet seat is one of those small bathroom jobs that looks simple until the hinge shifts, the bowl rocks, or the porcelain gets stressed by a bolt that was tightened too hard. The practical answer to how to install toilet seat hardware starts with fit, not force: choose the right seat, align it correctly, and tighten it just enough that it stays put.
What matters most before you tighten the bolts
- Match the bowl shape first. In the U.S., that usually means round or elongated.
- Measure from the mounting holes to the front edge before buying a replacement seat.
- Clean the rim and hinge area before you install anything.
- Tighten evenly and stop when the seat is stable. Overtightening can crack porcelain.
- Use the hardware that comes with the seat, especially for quick-attach or bidet models.
Start with the right seat and hardware
I never start by tightening anything. I start by identifying the seat style and the way the hinges are meant to anchor to the bowl. That matters because a standard bolt-on seat, a quick-attach model, and a bidet seat may all look similar from above, but they do not install the same way.
| Hardware type | Best for | What I look for | Main tradeoff |
|---|---|---|---|
| Standard bolt-on | Most open-backed bowls with easy underside access | Two bolts, nuts, and washers that pass through the hinge and bowl holes | Simple, but loose hardware can wobble if it is not centered |
| Quick-attach | Fast replacement and easier cleanup | Top-side tightening or wing-nut style hardware | Cleaner install, but the parts have to match the seat design exactly |
| Top-fix or concealed | Skirted bowls or situations with limited access underneath | Hardware that locks from the top instead of relying on easy underside access | Neater look, but the setup is less forgiving if you mix parts |
For a standard replacement, I usually expect the work to take about 10 to 15 minutes once the old hardware comes off cleanly. If the bolts are corroded or the seat is a powered model, the job stops being a simple swap and becomes a different kind of install. Once you know what hardware you have, the next step is getting the fit right.
Measure the bowl before you touch the bolts
In the United States, the two common shapes are round and elongated. Round seats are typically about 16 to 17 inches from the back of the seat area to the front, while elongated seats are usually around 18 to 19 inches. I still measure, because manufacturers vary and an old seat is not always a reliable template.
- Measure from the center of the mounting holes to the front rim of the bowl.
- Measure the widest point of the bowl if the shape is not obvious.
- Check whether the new seat uses standard bolts, quick-attach hardware, or top-fix hardware.
- If the bowl has a skirted shape or limited underside access, confirm compatibility before you buy.
The point is not perfection down to the millimeter. The point is to avoid forcing a seat that was never meant for that bowl. Once the fit is confirmed, the actual installation is straightforward.
Install the seat step by step
This is the part most people think about first, but I treat it as the middle of the job. The seat installs cleanly only after the bowl is measured and the hardware is sorted out. I also like to clean the rim before I start, because old residue under the hinges can make a new seat sit crooked.
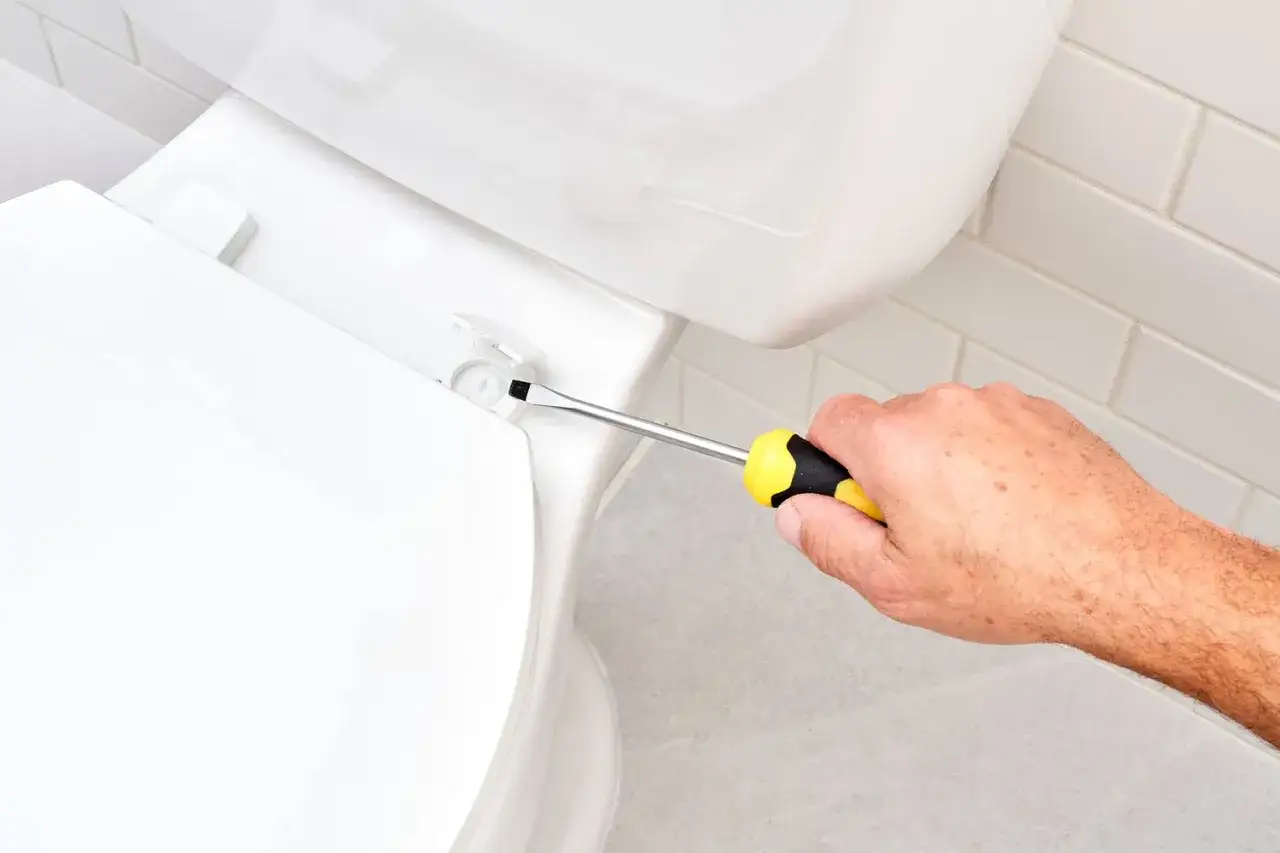
- Lift the hinge covers, if the seat has them, and expose the bolts.
- Loosen the nuts from underneath the bowl. If a nut spins, hold the bolt or screw from above while you turn the nut below.
- Remove the old seat and clean the mounting area and bowl rim with a mild bathroom cleaner.
- Set the new seat on the bowl and align the hinge holes with the mounting holes.
- Insert the bolts through the hinges and bowl. If the kit includes a rubber washer, place it between the hinge and the china as directed by the manufacturer.
- Thread the nuts on underneath and tighten them just enough to hold the seat in place.
If your seat uses quick-attach hardware, the top side may do most of the tightening, and the wing nut may be designed to catch the bolt threads without being held from below. I follow the hardware that came in the box instead of improvising, because this is one of those jobs where the original design usually works better than a clever workaround.
Center, tighten, and test the fit
Once the seat is mounted, alignment becomes the real test. I want the seat centered left to right, positioned evenly front to back, and able to open without hitting the tank. If the lid or seat sits too close to the tank, the hardware may be installed correctly but the seat shape is wrong for that bowl.
- Press gently on both sides of the seat to check for wobble.
- Look at the gap around the rim and make sure it is even.
- Open and close the lid to confirm it moves freely.
- Recheck the underside nuts after the first round of tightening.
I tighten in small steps, alternating from side to side, because that keeps the seat centered. A quarter turn at a time is usually enough. The goal is a seat that feels solid, not hardware that is squeezed hard against the bowl. If you are installing a powered bidet seat, this is also the point where the plumbing and electrical instructions matter: shut off the water supply, follow the manual, and use a GFCI outlet when the product requires one.
Avoid the mistakes that crack the bowl or leave the seat loose
The same errors cause most loose seats. The first is overtightening. Porcelain is strong, but it is not forgiving when someone keeps turning the wrench after the seat is already secure. The second is mixing up the washers. If the rubber washer is supposed to sit between the hinge and the china, placing it in the wrong spot can make the seat slip later. The third is using the wrong shape and hoping the hardware will compensate.
- Do not overtighten. If the seat is stable, stop there.
- Do not skip the rubber washer if the manufacturer includes one.
- Do not assume a previous seat proves the bowl shape is correct for the new one.
- Do not leave dirt, old adhesive, or mineral buildup under the hinges.
- Do not force stripped or rusty hardware if the nut no longer bites cleanly.
I also see people ignore how the seat settles during the first few uses. A seat that seems fine while you are standing over it can shift once pressure is applied. That is why I treat the first day of use as part of the install, not something separate. When the hardware itself is worn out, the fix is not more force, which leads to the next question: when should the parts be replaced instead of tightened again?
When the hardware is the real problem
Sometimes the seat is not the problem at all. Rusted bolts, cracked hinge caps, stripped plastic nuts, and bent mounting posts can all make a new seat feel unstable even when the installer does everything right. At that point, replacing the hardware is faster and safer than trying to rescue tired parts.
- Replace bolts and nuts if they are corroded or no longer hold tension.
- Replace cracked hinge covers if they prevent the seat from sitting flat.
- Use the brand’s replacement kit if the original hardware is proprietary.
- Choose quick-release hardware if you want easier cleaning and removal later.
If the toilet bowl itself is chipped around the mounting holes, I stop and inspect carefully before tightening anything further. That kind of damage changes the risk profile, because a small chip can spread if the hardware is forced. Once the right parts are in place, the last job is simply keeping everything stable over time.
The checks I would do after the first day
After the seat has been used a few times, I like to recheck the nuts by hand and give them a very small additional turn only if needed. Plastic washers can settle, and a seat that felt tight on the workbench may loosen slightly after real use. I also wipe the hinge area dry after cleaning, because trapped moisture shortens the life of cheap hardware.
If the seat still shifts after a careful reinstall, I usually suspect one of three things: the seat shape is wrong for the bowl, the hardware is worn, or the porcelain is not giving the bolts a clean, level seat. In other words, the fix is usually diagnosis, not brute strength. When the fit is right and the fasteners are healthy, a toilet seat should stay centered, close smoothly, and feel boringly solid every time you sit down.