One square foot is the kind of measurement that sounds simple until you have to buy tile, estimate flooring, or compare room sizes. The short answer is that it is a 12-inch by 12-inch area, but the practical answer is more useful: it helps you calculate coverage, waste, and cost without guessing. I like to think of it as the basic building block behind every flooring estimate.
The key numbers to keep in mind
- One square foot is a 12 in by 12 in area, or 144 square inches.
- A 12 x 12 tile covers 1 square foot, while a 12 x 24 tile covers 2 square feet.
- For flooring, square footage comes from length x width, not from counting pieces.
- Plan extra material for cuts, pattern matching, and breakage, especially on diagonal or herringbone layouts.
- Box coverage matters more than tile count when you place an order.
What one square foot actually measures
A square foot is a unit of area, not length. That means it describes how much surface a material covers, not how long something is. If you draw a square that is 1 foot long on each side, the area inside that square is 1 square foot.
In smaller terms, that same space equals 144 square inches. That is where the math becomes useful for flooring: if you know a room’s area in square feet, you know how much tile or flooring you need to cover it. If you know the area in square inches, you can still work it out by dividing by 144.
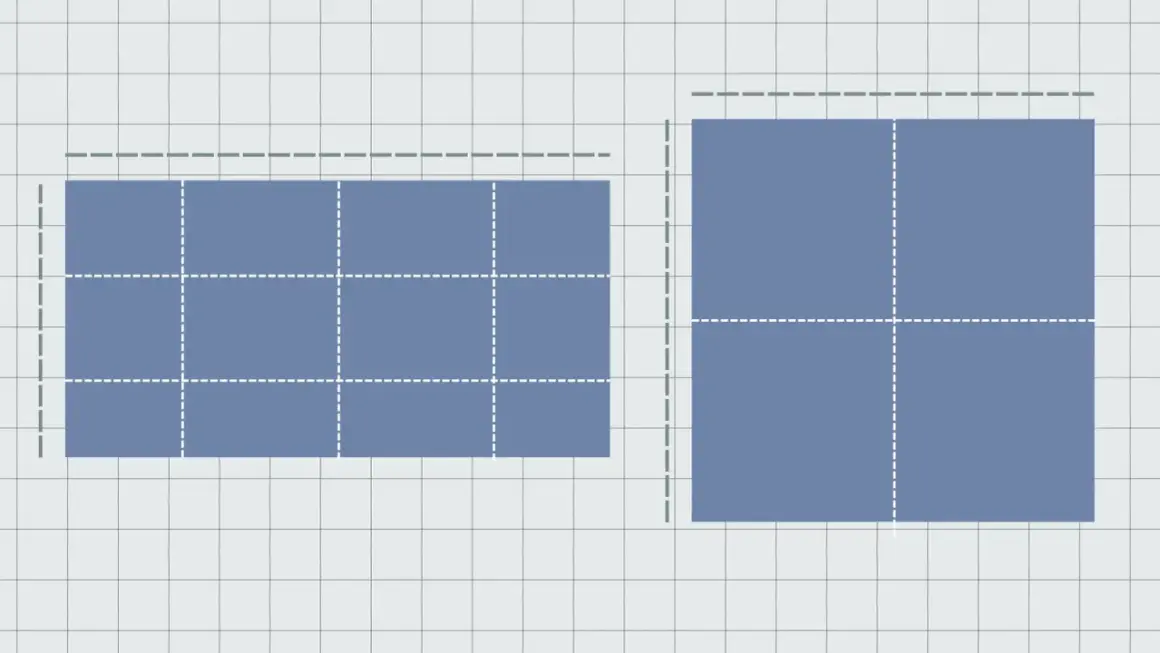
I usually explain it this way: the shape can change, but the coverage does not. A long, narrow strip and a perfect square can both measure the same if their total area matches, which is why the next step is learning how that area looks in real tile layouts.
How that size looks on tile and flooring
For flooring, the easiest way to picture a square foot is to think of a 12 x 12 tile. That piece covers exactly 1 square foot before grout joints and layout adjustments. Once tile gets larger or smaller, the piece count changes, but the total coverage still follows the same area math.
| Tile size | Area per piece | Why it matters |
|---|---|---|
| 12 x 12 in | 1 sq ft | The cleanest reference point for estimating coverage |
| 6 x 24 in | 1 sq ft | Common plank format that still covers one square foot per piece |
| 12 x 24 in | 2 sq ft | Fewer pieces to install, same room coverage |
| 18 x 18 in | 2.25 sq ft | Large-format tile reduces piece count, but cuts can waste more material |
| 8 x 8 in | About 0.44 sq ft | Small tile increases the number of pieces and grout lines |
That difference becomes even more important once you start calculating a room, because the room rarely comes in a perfect, waste-free rectangle.
How I calculate flooring square footage
The basic method is straightforward: multiply length by width. For a room that is 10 feet by 12 feet, the area is 120 square feet. That is the starting point for tile, carpet, vinyl, engineered wood, and most other flooring materials.
- Measure the longest length and the widest width of the space.
- Multiply those numbers in feet to get square footage.
- If your measurements are in inches, divide the total square inches by 144.
- For L-shaped or irregular rooms, break the space into rectangles, calculate each part, and add them together.
- Add a waste allowance before you order, especially if the layout includes cuts or patterns.
For a simple straight lay, I usually start with about 10% extra material. That is not a rigid rule, but it is a practical buffer for cut edges, breakage, and small errors in measurement. If the layout is diagonal, herringbone, or full of angles, I would plan for more.
For example, a 10 x 12 room is 120 square feet. Add 10% waste and the order target becomes 132 square feet. That is the number I would use when checking how many boxes to buy or comparing products by coverage.
Once the math is in place, the next question is usually not how to measure, but how to buy without ending up short.
Why box coverage matters more than tile count
Tile packaging can be misleading if you only look at the number of pieces. Two boxes can contain very different counts and still cover the same area because the pieces are different sizes. That is why I always check the square footage listed on the box first.
A box that covers 11.5 square feet and a box that covers 12 square feet may look nearly identical in the warehouse, but they change your order calculation. If your project needs 132 square feet, you need to divide by the coverage per box and round up to the next full box. You cannot buy 0.4 of a box, and you should not cut the order so close that a few broken pieces put the job on hold.
| What to check | Why it matters |
|---|---|
| Square feet per box | This tells you how much floor the box actually covers |
| Nominal tile size | The listed size may be rounded, so the actual piece can differ slightly |
| Pattern direction | Diagonal and herringbone layouts create more cuts and more waste |
| Shade or dye lot | You want all boxes to match closely, especially in open spaces |
| Replacement stock | Keeping extra material helps if a tile cracks later |
In real projects, the product label is just as important as the room measurement. That leads directly to the mistakes I see most often, because they usually happen before anyone opens a single box.
Mistakes that make estimates go sideways
The biggest flooring errors are rarely dramatic. They are usually small measurement mistakes that compound into the wrong order size.
- Measuring only the main rectangle. Closets, alcoves, and bump-outs still need coverage.
- Mixing up linear feet and square feet. A border measurement is not the same thing as surface area.
- Forgetting waste. Every cut that is not reusable increases the amount you need to buy.
- Ignoring the layout. Straight runs are easier than diagonal or patterned installs.
- Ordering by piece count. Coverage per box is the number that protects your budget and your timeline.
- Skipping the sketch. A simple room drawing catches angles and transitions that are easy to miss in your head.
I have found that the least expensive mistake is usually a few minutes spent remeasuring. The most expensive mistake is stopping a job because the order came up short, especially when the exact tile is out of stock or comes from a new dye lot. That is why the final check before ordering matters so much.
What I check before ordering tile
Before I place an order, I run through a short checklist. It keeps the math honest and makes the project easier to finish cleanly.
- Confirm the room dimensions on a sketch, not just in memory.
- Verify the square footage of the space and add a waste buffer.
- Check the coverage per box, not just the tile dimensions.
- Make sure the tile size is consistent with the layout you want.
- Keep extra material for future repairs if the product may be discontinued.
- Separate trim, transitions, and grout from the tile count so the order is complete.
If you can picture 144 square inches, you can estimate most flooring jobs with confidence. That is the real value of understanding the measurement: it turns a vague room estimate into a clear buying decision, and that usually saves both time and money on install day.