When a roof starts leaking after a storm, speed matters, but so does restraint. Knowing how to tarp a roof can prevent water from soaking insulation, drywall, and framing while you arrange permanent repairs, yet the job only works if the tarp is sized, anchored, and placed to shed water correctly. I treat it as damage control, not a substitute for roof repair, and that distinction matters more than most homeowners realize.
The safest way to stop roof leaks is a temporary cover that sheds water and stays out of the wind
- A roof tarp is a short-term water barrier, not a permanent fix.
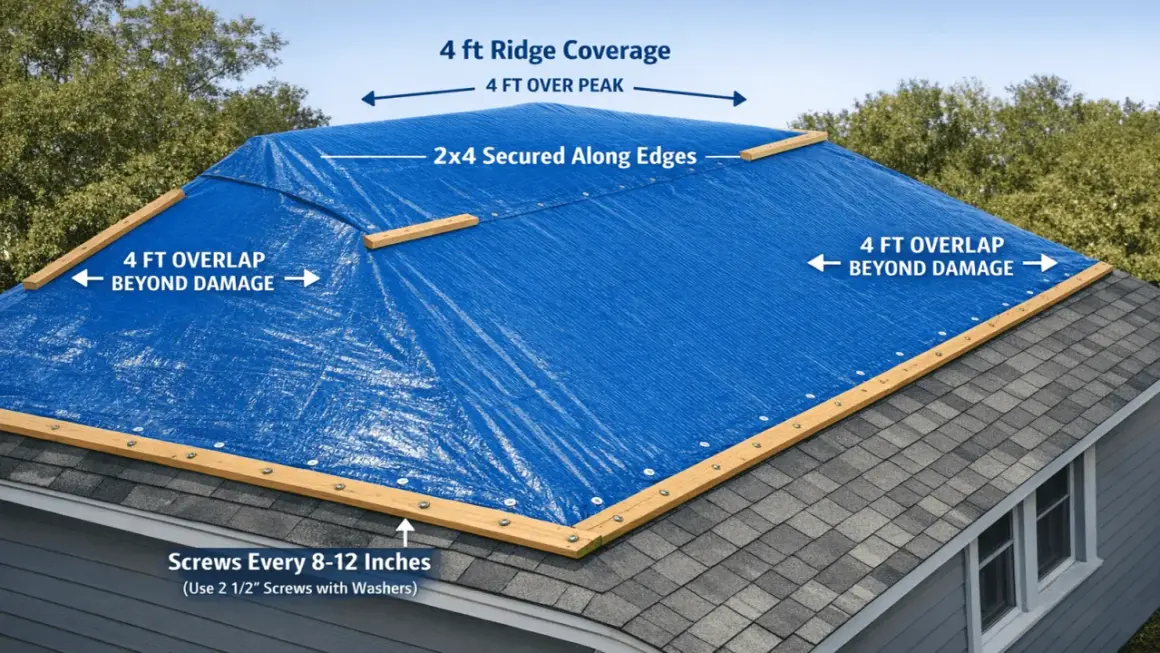
- The cover should extend well beyond the damaged area and over the ridge when possible.
- Bad weather, a steep roof, or any sign of structural damage is a reason to stop and call a pro.
- Fastening with battens and solid anchors is far more reliable than weighing down loose corners.
- After installation, check the tarp after wind and rain and move quickly toward permanent repair.
What a roof tarp can and cannot do
A well-installed tarp buys time. It can keep rain out of an open roof deck, missing shingles, torn underlayment, or a puncture caused by falling debris, and that usually means the difference between a manageable repair and a much larger water claim. In disaster work, people sometimes call this a blue roof, but I think of it as a temporary shell that protects the structure until the real fix is scheduled.
What it cannot do is repair rot, dry wet insulation, replace flashing, or make a compromised roof safe to walk on. If water has already reached the attic, ceiling, or wall cavity, the tarp only stops more moisture from getting in. It does not solve the hidden damage underneath.
- Good for missing shingles, localized storm damage, exposed decking, and short-term leak control.
- Not good for ongoing structural movement, sagging roof framing, or a roof that is already unsafe to access.
- Not a substitute for permanent shingles, underlayment, flashing, or repair to the roof deck.
Once that limit is clear, the next question is whether the roof is safe enough to touch at all.
When I would do it myself and when I would call a roofer
My cutoff is simple: if I cannot work from a stable ladder, the roof is steep, the weather is turning, or the damage looks larger than a small patch, I move away from DIY and toward professional help. I also stop immediately if I see sagging decking, downed electrical lines, broken glass, or damage around chimneys, skylights, solar hardware, or vent stacks. As a practical line, anything steeper than a 4:12 roof starts to feel like pro territory unless the setup is unusually safe.
| Situation | What I would do | Why |
|---|---|---|
| Single-story, low-slope roof, calm weather, small damaged area | DIY tarp may be reasonable | Access is simpler and the fall risk is lower. |
| Steep roof, two-story access, wet surface, or soft decking | Call a roofer or emergency service | The chance of a fall or structural failure is too high. |
| Any damage near power lines or electrical equipment | Stay off the roof | Electrical hazards change the job completely. |
| Damage around a chimney, skylight, valley, or vent stack | Use a pro if possible | Those details need more than a flat cover to stay watertight. |
Recent U.S. consumer cost guides commonly place standard professional tarping around $175 to $700, with emergency after-hours work often running about $1.00 to $2.80 per square foot. I bring that up because the price gap often looks smaller than the risk gap once a roof is steep, wet, or unstable. If the roof is accessible and the weather is calm, DIY can save money; if it is not, the savings disappear fast. With that decision made, the next step is gathering the right materials before you climb.
What to gather before you start
I keep the kit simple and purposeful. A heavy-duty waterproof tarp is the core piece, but it works only when the rest of the setup helps the tarp shed water and stay tight. For a large hole, I want 1/2-inch plywood ready as well, because an open gap can hold water and defeat the whole job.
- A heavy-duty waterproof tarp large enough to extend at least 3 feet beyond the damaged area on all sides.
- Extra length to run over the ridge or peak if the tarp can reach it safely.
- 2x4 battens or similar boards to anchor the edges.
- Corrosion-resistant screws or nails long enough to pass through the board and into solid roof decking.
- A sturdy ladder, preferably with a stabilizer, plus a helper on the ground.
- Gloves, eye protection, and footwear with real grip.
- A measuring tape, utility knife, broom, roof rake, and a phone camera for photos.
- 1/2-inch plywood for any opening large enough to sag or collect water.
For roof edges near gutters, I also want enough coverage that runoff clears the eave cleanly instead of getting trapped behind the fascia or dumped into a clogged gutter edge. Once the kit is ready, the actual installation is mostly about water flow and safe positioning.
How to install the tarp without making the leak worse
- Inspect from the ground first. I look for missing shingles, punctures, lifted flashing, sagging areas, and anything that suggests the structure is unstable. If the roof looks compromised, I stop there.
- Check the attic and photograph the damage. Interior stains, damp insulation, and visible daylight through the deck help confirm where water is getting in. I take photos before I cover anything because documentation is easier now than after the tarp is on.
- Clear loose debris. Branches, leaves, and broken material create lumps under the tarp and can leave channels for water. If a hole is large, I place 1/2-inch plywood over it first so the tarp does not sag into the opening.
- Set the ladder safely. I use a 4:1 ladder angle, make sure it extends about 3 feet above the roof edge, and keep a helper at the base. I do not climb in wind or rain, and I avoid metal ladders if there is any electrical hazard nearby.
- Lay the tarp from the highest point downward. I want the top edge to start near the ridge or overlap it by about 4 feet when possible. That way, water moves over the tarp instead of underneath it.
- Fasten the tarp with battens. I roll the edge around a 2x4, then secure the board into solid decking. After that, I repeat the process along the lower edge and sides so the tarp stays taut without relying on a few corners. I do not step on the tarp once it is in place because wet plastic is slippery.
- Check the runoff path. The lower edge should let water flow past the damaged area and off the roof cleanly. If the tarp is bunching at the eaves or forcing water behind the gutter line, I adjust it before I leave.
That sequence sounds simple, but the order matters. If the tarp is too small or the top edge is wrong, the whole thing can channel water back into the house instead of away from it. The next section is where most of those failures happen.
The mistakes that cause most tarp failures
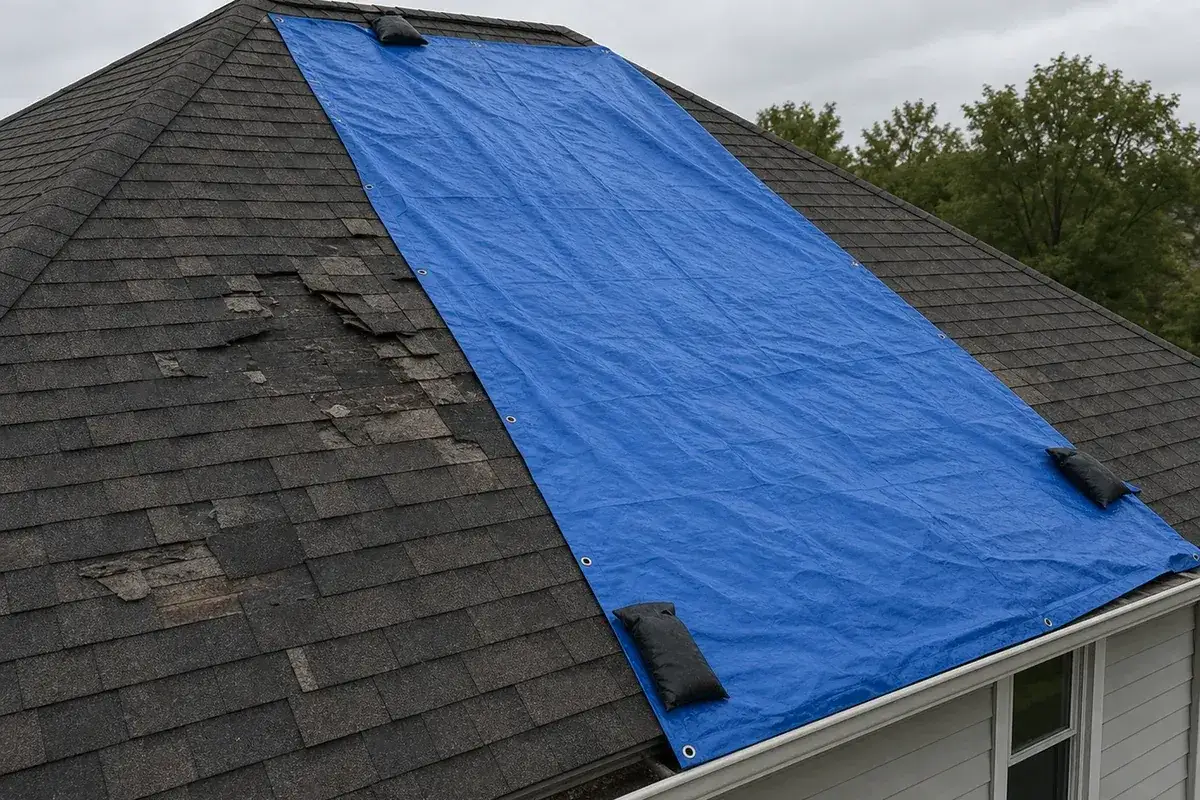
Most bad tarp jobs fail for the same few reasons. The tarp is too small, the edges are loose, or the installer tries to outsmart gravity and wind instead of working with them. I see the same pattern after storms: a homeowner has the right idea, but the tarp is secured like a picnic cover instead of a temporary roof.
- Using a tarp that barely covers the damage.
- Securing only the corners and leaving the middle exposed to wind uplift.
- Fastening into loose shingles instead of using battens and solid decking.
- Leaving folds or low spots where water can pool.
- Walking on the tarp after it is installed.
- Working during active rain or gusty wind.
- Ignoring skylights, vents, chimney details, and other roof penetrations.
- Letting the lower edge trap water at the eaves or against the gutter line.
The pattern is simple: if the tarp cannot shed water cleanly or resist wind, it becomes a problem of its own. Once it is holding, the job still is not finished, because a tarp is only a bridge to the real repair.
How long it should stay up and what to do after the first storm
I never think of a tarp as long-term roofing. It is a short bridge between the damage and the permanent fix, and I want it checked after the first hard rain and again after any meaningful wind event. If it starts to flap, sag, or collect water, I treat that as a warning sign rather than something to ignore.
| Action | When I do it | Why it matters |
|---|---|---|
| Inspect the tarp after installation | Same day | Catch loose fasteners, wrinkles, or pooling early. |
| Recheck after rain or wind | Within 24 hours | Weather is what usually exposes a weak setup. |
| Schedule permanent repair | As soon as practical | Sun, wind, and debris break down temporary covers over time. |
| Save receipts and photos | Immediately | Useful for contractor records and insurance documentation. |
For budgeting, I think of tarp work in three buckets: a small DIY supply run that can stay in the low hundreds, a standard pro tarp that often lands around $175 to $700, and emergency after-hours service that is commonly priced around $1.00 to $2.80 per square foot. The exact number depends on roof size, access, pitch, and how quickly someone has to respond, but the structure of the pricing is predictable: safety and speed cost money. After the tarp is on, I still look inside the house, because the roof is only half the story.
What I check inside the house before I call it finished
Once the roof is covered, I go inside and check the attic, ceiling corners, insulation, and any light fixtures below the leak path. Fresh stains, damp drywall, or a musty smell tell me the job is not truly finished; the structure may still need drying or repair even if the tarp is holding. If water reached wiring, a breaker panel, or ceiling fixtures, I stop treating it as a roofing-only issue and bring in the right help.
The best tarp job is the one that buys you time without creating a new hazard. Keep the cover large enough, fasten it to solid wood, stay off the roof in bad weather, and give the house a clean path to a permanent repair instead of a second round of water damage.