Taking a television off a wall mount should feel controlled, not risky. Once you know where the hooks, latches, and safety screws are, the job is mostly about disconnecting the cables, supporting the screen, and lifting it in the direction the mount was built to release. I’ll walk through the mount types you are likely to see, the safest removal sequence, and the small storage and wall-repair details that make the next step easier.
What matters most before you unhook the television
- Identify the mount style first, because the release motion changes from one bracket to another.
- Unplug power and signal cables before you touch the screen, and clear a padded landing area.
- Use a second person for larger panels or any TV mounted high on the wall.
- Look for locking screws, pull cords, or safety tabs under the bottom rail.
- After removal, label the hardware and store the bracket, spacers, and screws together.
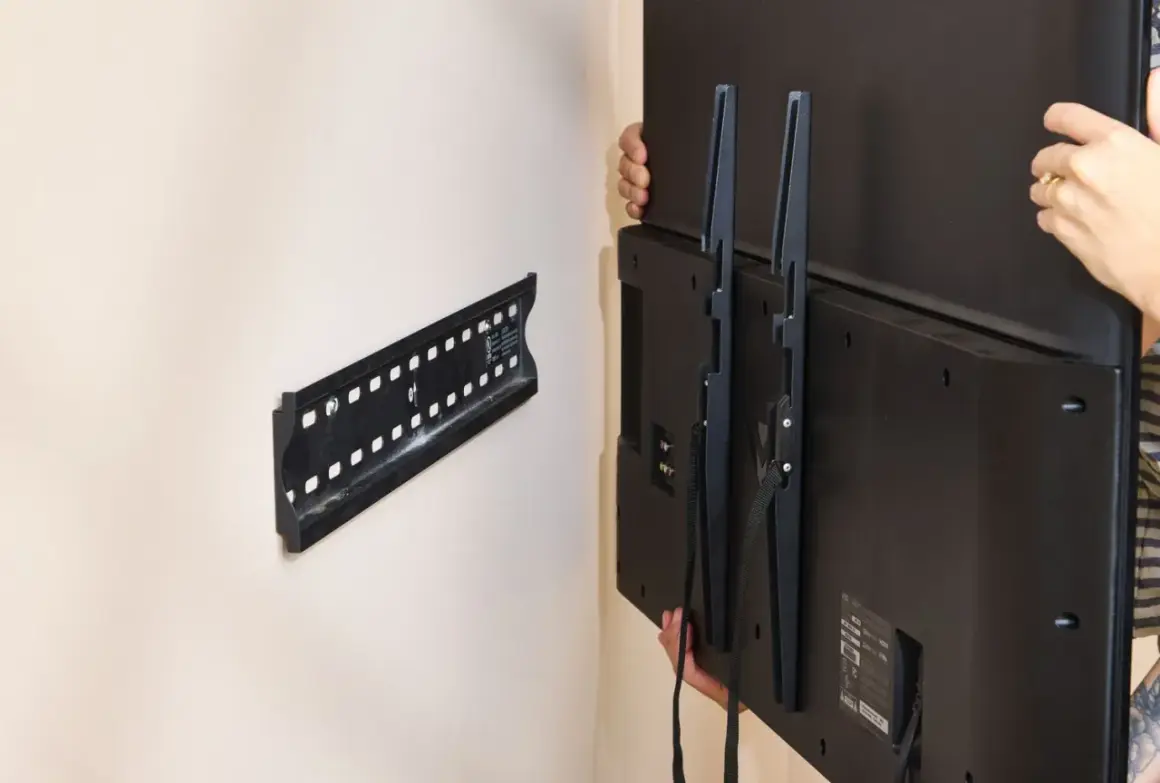
Identify the mount style before you lift anything
Most U.S. home installations use a wall plate on the wall and brackets on the back of the TV. The exact release method depends on whether the mount is fixed, tilting, or full-motion, and that difference matters more than people expect. VESA, the standard spacing pattern for the mounting holes on the back of most TVs, tells you how the bracket attaches, but the mount style tells you how it comes off.
| Mount style | How it usually releases | What I watch for |
|---|---|---|
| Fixed mount | Lift the TV slightly to clear the top hooks, then pull it away from the wall | Bottom safety screws or locking tabs are easy to miss |
| Tilt mount | Tip the bottom out a little, then lift to unhook | Extra tilt can help, but the TV still usually lifts up first |
| Full-motion mount | Retract the arms, release the lock, then lift or slide the TV off the arm assembly | Locking screws, release cords, and arm tension points |
Once I know the mount style, I can predict whether the TV will lift straight up, tilt forward first, or need the arm collapsed before release. That saves time and prevents the most common mistake: pulling outward before the hooks or locks are free. With that sorted, the prep work becomes much easier.
Prepare the room, tools, and a helper
I always start by making the area boring and open. That means clearing furniture, moving decor out of the way, and laying down a blanket, moving pad, or thick towel where the TV can rest safely after it comes off the wall. If the set is large, awkward, or mounted above shoulder height, I want another person there before I touch a fastener.
For the tools, I keep the list simple:
- Phillips screwdriver
- Hex key or Allen wrench set
- Flashlight or headlamp
- Painter’s tape and labels
- Small zip bags for screws, washers, and spacers
- Microfiber cloth for the screen and hardware
Power comes off first. I unplug the TV from the outlet, disconnect HDMI, coax, Ethernet, soundbar leads, and any hidden cable-management clips, then I let the cords hang free. I also take a quick photo of the back of the TV before touching anything else, because that picture is often the fastest way to rebuild the setup later. With the area clear, the actual removal is much less stressful.

Remove the TV without stressing the panel
This is the part where slow hands matter more than strength. I usually stand with one person on each side of the TV, hands under the lower edge, while I look underneath for the locking points that keep the screen attached to the wall plate. If the mount has decorative covers, I remove those first so I can see the real hardware.
- Power down the TV and unplug all cables.
- Clear the floor and place a padded landing surface nearby.
- Remove any cable clips, covers, or small plastic caps hiding fasteners.
- Find the locking screws, latch tabs, or release cords on the bracket.
- Support the TV evenly with both hands or with a helper on the opposite side.
- Release the lock, then lift, slide, or pull the TV in the direction the mount allows.
On a simple fixed mount, the motion is usually up, then out. On a tilt mount, the bottom may need to come forward first so the top hooks can clear the wall plate. On a full-motion arm, I retract the arm as far as it will go before I release the lock, because that reduces leverage and makes the panel easier to control. I never force the TV straight out if it still feels pinned at the top or bottom; that is how brackets bend and screens get cracked.
Once the display is free, I set it upright on a soft, stable surface and keep my hands on it until I know it is secure. If the set is large enough to feel awkward, I do not try to “catch” it one-handed. I reset, get a better grip, and move it cleanly instead. After that, the next question is what the release mechanism actually did and whether the mount needs a different approach.
Understand the release mechanism before you force it
Different mounts fail for different reasons, and the wrong assumption is what causes most problems. If the TV does not move when you expect it to, I stop and identify the exact lock instead of pushing harder. A hidden screw, a safety latch, or a tension point can hold the screen in place even when the obvious fasteners are already loose.
Fixed and tilt mounts
These are usually the easiest to remove, but they can still surprise you. The TV often hangs from top hooks, so the bottom must be pulled away only after those hooks are free. If the bottom edge feels stuck, I look for small screws or tabs near the lower rail before trying again.
Full-motion arms
Full-motion mounts are the ones most likely to feel “stuck” when they are actually just locked. I retract the arms fully, locate the lock or release screw, and keep the TV supported while I disengage it. On some designs, the set lifts up and off the arm assembly; on others, it slides off after the release point is cleared. The manual matters here more than guesswork.
Pull cords and safety latches
Some brackets use a pull cord or a small latch underneath the TV. That cord usually releases the bottom of the bracket, but the TV still needs to be lifted in a very specific direction. If a latch clicks back into place while I am working, I stop immediately and reset the mechanism instead of pulling through it.
When the release point is clear, the TV usually comes free quickly. After that, the job shifts from removal to cleanup, and that is where storage and wall care start paying off.
Handle the cables, bracket, and wall like a storage project
I treat the hardware like a small storage system, not loose junk. Every screw, washer, spacer, and adapter goes into a labeled bag, and I mark the bag with the TV model, the room, and the mount model if I can find it. That matters because the back of the TV and the bracket often use specific screw lengths, and guessing later is a waste of time.
For the wall itself, I decide early whether the bracket is staying up. If the mount is going back on the same wall, I leave the wall plate in place and only patch what I need to patch around it. If the mount is coming off completely, I remove the lag bolts or mounting screws, then fill the holes with the right repair material for the surface:
- Lightweight spackle for small drywall holes
- Patching compound for larger wall-plate scars
- Wood filler if the bracket was anchored into wood trim or cabinetry
- Appropriate masonry patch material for concrete or brick
I also keep the cable run organized while everything is open. Coiling HDMI, power, and audio cables separately makes the next install cleaner, and it prevents the common “which cable was that?” problem later. If the TV will live in storage for a while, I keep the remote, mounting hardware, and original spacers together so nothing gets separated in the move. Once the cleanup is under control, it becomes easier to judge whether the rest of the job is still DIY-friendly.
Know when to stop and call a pro
There are a few situations where I would rather pause than push ahead. If the TV is mounted above a fireplace, on masonry, inside custom cabinetry, or on an arm that feels damaged, the removal is no longer a simple household task. The same is true if I cannot find the release point, if the locking hardware is stripped, or if the set is so large that I cannot support it confidently with a helper.
I also stop if the wall itself is questionable. Crumbling drywall, loose studs, visible cracking around the mounting area, or signs that the bracket was installed into an unsafe surface are reasons to slow down and reassess. It is much cheaper to call for help than to repair a cracked panel, a torn-out bracket, or a damaged wall.
If any part of the setup feels borderline, I take that as useful information rather than a challenge. A mount should release cleanly, and if it does not, there is usually a reason buried in the hardware or the installation.
Make the next reinstall easier than the removal
The best time to prepare for the next setup is right after the TV comes down. I take one photo of the back of the set, one of the wall plate, and one of the cable routing before I pack anything away. Then I write the TV size, model number, and screw bag contents on masking tape and stick it to the hardware bag.
If the TV is going into storage, I keep it upright when possible and away from pressure points that could stress the panel. I also store the mount flat, not half-random in a closet, because bent brackets and missing spacers are what turn a quick reinstall into a frustrating search. The same rule applies to the screws: if the original hardware came with the mount or the TV, it belongs back in the same labeled bag.
For most homes, removing a wall-mounted TV is less about strength and more about sequence: power down, expose the lock, support the screen, release the bracket, and store everything in an organized way. If you keep those steps tidy, the wall is easier to patch, the hardware is easier to reuse, and the next installation starts on solid ground.